Posted on Leave a comment

Fridge Repair Guide: Basic Diagnosis and Repair Cost

Fridge repair can seem intimidating, but with a little knowledge, many common issues can be diagnosed or even fixed by beginners. Tasks like clearing a blocked drain or replacing door seals are often within the reach of a homeowner, but more complex problems, such as compressor or refrigerant issues, usually require a licensed technician. In Australia, expect to pay around $150 – $200 AUD for a call out, with additional costs for parts and labour.

This guide is designed to help you assess common fridge repair issues. While it offers basic solutions, it’s important to know your limits and recognise when to call in a professional, fridges are more complex than they may seem. Fridge repair is nuanced, and this guide won’t cover every possible problem or model. It’s a starting point – a practical resource to help you diagnose and understand potential issues. Treat it as a guide, to help triage the situation and make informed decisions about whether it is even worth having the fridge repaired, and to get an idea of what it might cost depending on the symptoms.

Table of Contents

Are Parts Even Available?

Before committing to a service call one of the first things you should do is identify the potential issue using this guide, and then check whether parts are available for your fridge model. If your fridge is older or from a budget brand, finding replacement parts may be difficult, and you don’t want to waste $150 AUD or more on a service call if parts can’t be sourced. To find your fridge’s model number, check the following common locations:

  • Inside the fridge: Look for a sticker on the side walls, the door jamb or near the door seal.
  • Back of the fridge: Some models have the information plate on the exterior, typically near the top back.
  • User manual: The model number is usually listed in the fridge’s user manual.

Once you have the model number, search online or contact a parts supplier to see if parts are still available. This simple step can save you from investing time and money into a fridge you cannot get parts for.

Fridge Not Cooling Properly but Freezer is OK

One of the most common fridge repair issues is when your fridge is too warm, but your freezer is working fine. Every rookie out there diagnoses this incorrectly as the fridge needing regassing, which is completely incorrect. This typically points to an airflow issue between the freezer and fridge compartments. Most fridges rely on a fan to circulate cold air from the freezer to the fridge. If this fan is faulty or the ducts from the freezer to the fridge are blocked by ice due to a defrost fault, the fridge won’t cool properly.

Check that the Door Hasn’t Been Left Open in the Past few Weeks

If the door has been open for an extended period (say 30 minutes or more continuously), the cooling system may have overworked, leading to ice buildup. Often this is caused by the fridge or freezer being overloaded and the door can’t close properly. It looks shut – but its actually ajar by just the tiniest bit. The ice buildup this causes can block airflow, causing the fridge section to stop cooling effectively. Additionally, a fridge that has been running for a few years without a manual defrost may also have some ice buildup in the ducts in positions where it cannot be melted away through the defrost cycle.

Check the Door Seals

Bad seals on either the fridge or freezer door have the same effect as leaving the doors open. Really you’re just checking that there are no huge gaps in the seal. If the seals looks alright they probably are. On most modern models bad seals are just push fit and easily replaced by the DIYer. Peel the old ones off, and push the new ones on.

Manually Defrost the Fridge

If you suspect an ice buildup, unplug the fridge with doors open for 24 hours to let the ice melt out. Place a towel on the floor in front of the fridge and expect it to leak water. Manually defrosting the fridge will rule out airflow blockages caused by ice. If manually defrosting your fridge solves your issue, monitor the situation over the next month or so. If the fridge starts to become too warm again, but the freezer is ok, its likely that there is an issue with your defrost system, most likely the defrost heater.

Check if the Fan is Running

I’m going to give you some unhelpful advice here, and for that I’m sorry. Determining whether a fan is faulty is more complicated than you think. Listening alone isn’t a reliable way to check if the fan is working. Try pressing the door’s light switch (if it has one) to simulate the door closing. If you still can’t hear the fan, it may need replacement. However, be wary that fridges often have more than one fan, and even if you can hear a fan, it doesn’t mean you don’t have a bad fan. Also remember that the fan doesn’t run constantly, so check in at a few different times of the day. Having completed these steps will not really help you one way or the other. If you’ve tried the other steps and suspect the fan isn’t working its best to contact a professional at this point.

Faulty Thermostat, Control Board, or Thermistor (Temperature Sensor)

While rare, sometimes the systems that measure the temperature of the fridge can go out of range. Typically though, when these systems fail they tend to fail completely. Determining whether a fridge has an out of range temperature measurement system requires a professional diagnosis.

Estimated Fridge Repair Cost

  • Manual defrost: No cost, just time!
  • Fan replacement: $250–$350
  • Defrost system repair: $250-$350
  • Repair out of range temperature measurement system: $300 – $400

Fridge and Freezer Both Not Cooling Properly

If neither your fridge nor your freezer is cooling in any significant way, it is usually a more serious issue that could involve several systems, and is usually repairable but more likely to require a professional diagnosis. Lets go through the potential faults from most to least fixable.

Thermostat or Controller and Thermistors

Any fridge or freezer, particularly cheaper or older models, will be controlled by a thermostat. The thermostat controls the compressor, turning it on and off to maintain the right temperature. Most standalone fridges, bar fridges, and chest freezers are also typically controlled by a thermostat, but this isn’t always the case.

Most modern fridge freezer models use a controller (PCB or main board) along with several thermistors (temperature sensors) to manage their cooling system. If these components fail, the compressor won’t receive the correct signals to run, causing the fridge to stop cooling.
A fridge will either have a thermostat or a controller (including thermistors) never both. Determining whether your fridge has a thermostat or a controller can be tricky for a novice, and even then, diagnosis can be dangerous to the uninitiated as you have to work with wiring. Better to have a pro make a diagnosis.

Compressor Switches (Overload Relay and Starter Relay)

The overload relay and starter relay, typically located on the left side of the compressor beneath a protective cover, are essential for starting and running the compressor. If these switches fail, the compressor won’t start, and the fridge won’t cool. This problem is often misdiagnosed as requiring a fridge regas or being a failed compressor, but it’s usually a simple electrical issue with the compressor switches. Misdiagnosing it can lead to unnecessary costs for fridge regassing, which won’t fix the underlying problem.

For beginners, replacing these switches is a relatively straightforward task, though there is some electrical risk involved, as you’ll be handling exposed wires. If you’re comfortable with technical tasks, you might give it a try, making sure the fridge is unplugged. Removing the protective cover can be tricky, often requiring the removal of a clip or carefully flicking it off with a flathead screwdriver. Once the cover is off, you can access the switches.

The rectangular one is typically the compressor start switch, which should measure less than 1,000 ohms of resistance with a multimeter. There’s bad advice circulating that suggests you can shake these switches and, if they rattle, they’re faulty. That’s not true—some switches just rattle by design. The only reliable way to test is with a multimeter. The overload switch, usually cylindrical or triangular, should measure less than 10 ohms at room temperature.

For novices, replacing these switches might be the only repair they feel comfortable attempting, and even then, only if they are confident in their technical skills.

Compressor Issues

The compressor is the heart of your fridge, and what makes the cold. It can usually be found at the rear of the fridge at the bottom in the middle. Fridge compressors are very reliable and it is unlikely that the compressor is faulty unless the fridge is very old and other causes have been ruled out. There are no tests a novice can perform to determine if the compressor is faulty. It’s possible to check if the compressor is electrically good with a multimeter and limited technical experience, but compressors tend to fail mechanically. If you are sure that the compressor switches are good, and you can hear an audible click about 5-20 seconds after you turn the fridge on at the wall after having left it off for 30 minutes, then the compressor is likely faulty. There’s a million ways you can screw that test up without experience so take the test results with a grain of salt.

Refrigerant Loss

If your fridge has a refrigerant (gas) leak, it won’t be able to cool properly. A common misconception is that fridges “use up” their gas over time—this isn’t true. A fridge only loses gas if there’s a leak in the system. Novices and even professionals alike often jump to the conclusion that the fridge needs regassing before considering more likely causes. Refrigerant leaks often occur due to rough handling during a move, though they can also happen from corrosion over time.

To determine if your fridge has a refrigerant leak, here’s a simple test: Turn the fridge off at the wall for an hour, then turn it back on and locate the compressor at the bottom middle back. You may have to remove a cover. Be careful as there is a risk of electrical shock in this area and when touching the compressor. Place the back of your hand against the compressor—you should feel some vibration. If there’s no vibration, the issue likely isn’t related to refrigerant loss. However, if you feel vibration but the fridge isn’t cooling, or barely cooling it’s possible you need a fridge regas or there’s a blockage in the system. Either way, these issues usually aren’t worth repairing.

While some believe that fridge regassing is as simple as adding more refrigerant, it won’t solve the issue unless the leak is fixed first. Regassing a fridge is costly, but finding and repairing the leak is even more expensive. Even after the leak is repaired and the fridge is regassed, the compressor has often been damaged in subtle difficult to detect ways, from running without enough refrigerant. This can cause it to run less efficiently, or noisier, than it did before, and often ends in a significantly shorter compressor lifespan.

What’s more, the reduced efficiency of the compressor results in the system needing a different refrigerant charge to what is labelled on the appliance. This often leads to overcharging. Overcharging causes icing on the evaporator line near the compressor, which often results in water leaking onto the floor as the compressor cycles on and off. Worse, icing can allow liquid refrigerant to enter the compressor, often causing its failure. The only way to really work this out is with several visits from a technician, each time removing a small amount of refrigerant. In the real world though its not addressed, most of the time it won’t even be noticed until the compressor packs up or you notice your nice timber floor has been ruined by the water.

If your fridge needs regassing, carefully consider whether it’s worth repairing, as it will never be as reliable as it once was. Diagnosing and repairing refrigerant issues requires professional help and specialist tools – often beyond that of an appliance repairer, you need an appliance repairer with a refrigerant handling license, and that’s gonna cost you extra. The first guy the repair shop sends is unlikely to have this qualification, so it’s usually a two trip job as well.

Blockage in the Refrigeration System

Blockages can develop in a fridge’s refrigeration system, particularly if it’s turned on too quickly after being moved, especially if it has been laid down. The compressor contains oil, some of which circulates through the refrigeration system. Over time, corrosion can cause tiny bits of rust and debris to mix with the oil, which typically settles in the compressor’s sump. However, if a rust particle finds its way into a critical part of the system – such as the capillary tube – it can block the refrigerant flow, preventing the fridge from cooling.

Remember to always wait at least 24 hours before plugging a fridge back in after moving it, regardless of how you moved it. This allows the refrigerant to settle and gives any water that spilt onto electrical components like the main controller, time to evaporate also reducing the risk of short circuiting important components.

Estimated Fridge Repair Cost

  • Repair Faulty Thermostat, Controller or Thermistors: $200 – $500
  • Compressor replacement: $700–$1,000
  • Fridge regassing cost no leak repair: $200–$300
  • Fridge regassing cost with leak repair: $400–$700
  • Repair blocked system: $400–$700

Noisy Fridge: What Could Be Causing It?

If your fridge is making unusual noises like rattling, buzzing, or vibrating, it could be due to several factors, including fan issues, compressor problems, or even external causes. A noisy fridge can be concerning, but it’s not always a sign of serious trouble.

Vibrating Shelves

If the shelves inside your fridge are rattling, it’s often because they have no weight on them. Try putting something on all the shelves if there are empty shelves, and see if the problem persists.

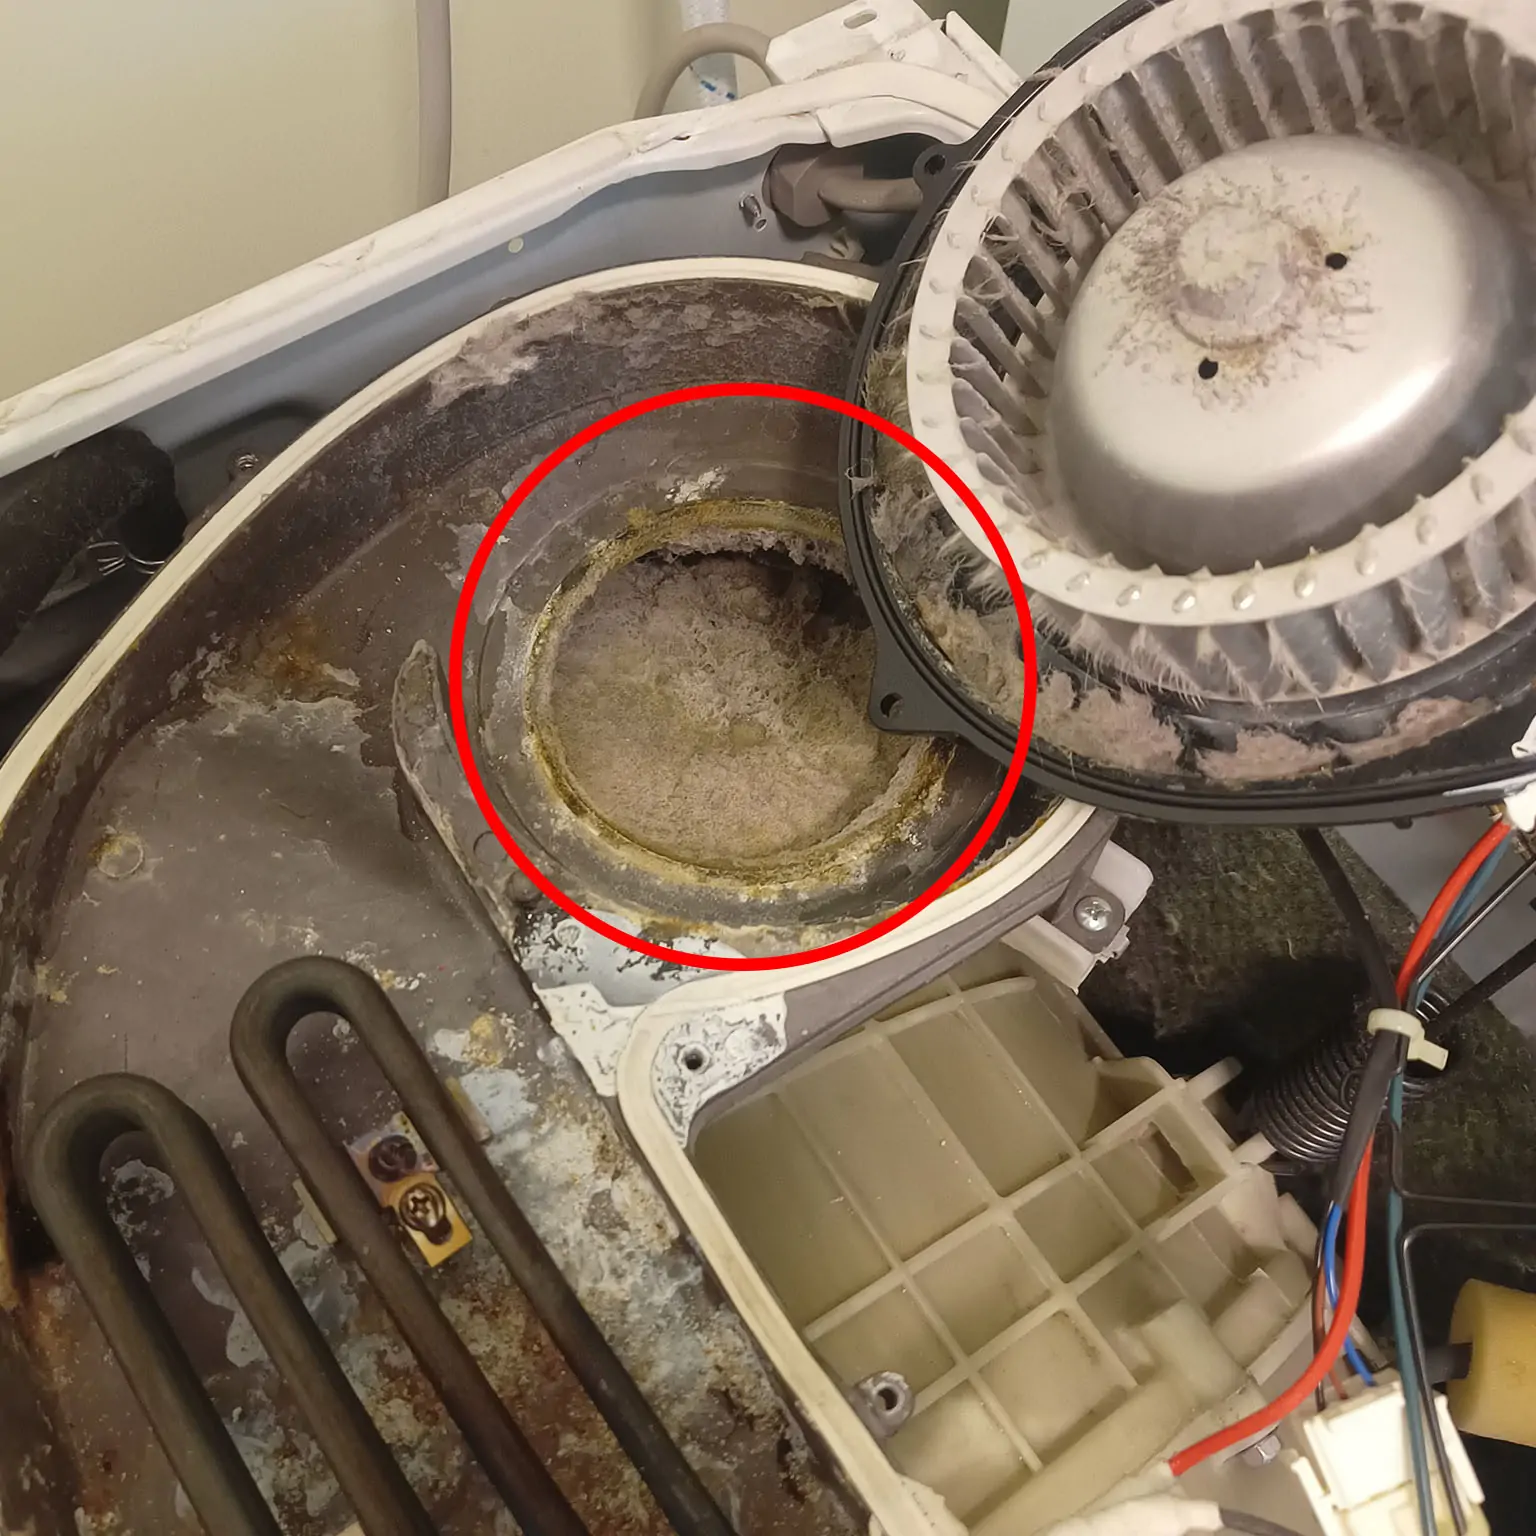
Ice buildup in the Freezer:

If the fan blades are hitting an ice buildup in the freezer, it can create noise. Typically this points to a problem with the defrost system as discussed above. A manual defrost will help clear the ice and stop the noise, but if the symptoms return you likely have a faulty defrost system. Sometimes the fan blades hitting the ice can cause them to snap or break the fan mounting points too, which can cause the noise to remain or even worsen after a manual defrost is performed.

Compressor noise

If the noise is coming from the bottom of the fridge, it might be the compressor or the condenser fan (if there is one which there usually isn’t). A noisy fridge compressor often continues working for many years without causing immediate issues. Sometimes, a noisy fridge compressor is caused by something touching the compressor, like a misplaced pencil or pen that has fallen behind the fridge and got jammed between the compressor and the bottom of the fridge.

Is a Noisy Fridge Dangerous?

In most cases, a noisy fridge isn’t dangerous, but if you rely on that fridge to keep things cold its worth knowing why its noisy and if it’s at risk of failing. A noisy fridge compressor can often run for years without causing problems. However, if the noise bothers you, it might be time to either sell the fridge (while being honest about the noise) or relegate it to the garage as a drinks fridge

Estimated Cost of Fridge Repair

  • Repair faulty defrost system $250 – $350
  • Fan replacement: $250 – $350
  • Compressor replacement: $700 – $1,000

Fridge Leaking Water

If you have a fridge dripping water we’ve written a comprehensive guide here on how to deal with it. If you have a fridge dripping water you should definetly check out the full guide but we’ve added some basic instructions below as well. Most of the time the issue is caused by an improperly levelled fridge or a blocked drain. It can usually be repaired DIY, but often requires that you defrost the fridge for 24 hours with the doors open to clear all ice blockages.

Improperly Levelled Fridge

The fridge should have a tiny bit of a lean back on it. Most fridges have two adjustable legs at the front to make this happen. If the fridge leans forwards even slightly or is dead level, water generated during the defrost process can come forward and leak from the front door. This is more likely to be an issue on models with an overhead freezer as opposed to upside down models.

A Blocked Drain

For overhead freezer models check in the bottom back of the freezer, behind the back panel if you can, if there is an ice build up in there blocking the drain.

A Leaking Water Connection

If you have an ice or water dispenser in your fridge you should also thoroughly check the water lines for any drips.

A Cracked Evaporator Pan

Check that the evaporation pan on the back isn’t cracked. Usually needs a reason to crack, and often gets damaged during home removals.

Estimated Cost of Fridge Repair

  • Drain cleaning: $150 – $250
  • Water line replacement: $150 – $250
  • Evaporator pan replacement: $150 – $200
Posted on Leave a comment

Microwave Interfering with Wifi? Here’s How to Fix It

Does your wifi slow down or disconnect every time you use the microwave? It’s not uncommon, and it has to do with the frequency overlap between your microwave and wifi signals.

Why Does a Microwave Affect Wifi?

While microwaves are generally well-shielded to contain the microwave radiation generated when running, there may be some minor leakage even in a brand new machine. Microwave ovens generate electromagnetic radiation at 2.45 GHz to heat food, which is very close to the 2.4 GHz microwave frequency used by Wifi. This proximity in frequency means that even a small amount of radiation leakage or electromagnetic interference (EMI) from the microwave can disrupt your Wifi signal.

Sidebar: Why Does Wifi Operate on a Frequency So Close to Microwaves?

Microwave ovens were developed in the 1940s, and engineers found that 2.45 GHz was ideal for heating food because water molecules absorb energy efficiently at that frequency, generating heat. Given the existing use of 2.45 GHz by microwave ovens, regulators recognised that it wouldn’t be practical for other critical or highly regulated applications. Because microwave ovens were already emitting in this range, allowing unlicensed devices like wifi to share the spectrum made sense, despite the potential for interference. As a result, the entire 2.4 GHz ISM band (from 2.4 to 2.4835 GHz) was made available for unlicensed, low power devices like wifi, bluetooth, and cordless phones in 1947.

The Impact of Microwave Leakage on Wifi Performance

Microwave ovens are of course designed to prevent microwaves from escaping, but small amounts of microwaves can still leak, especially around the edges of the door. Even brand new microwaves will have some leakage, because safety standards permit a small amount, and preventing all leakage in every case, would make a manufacturers product uncompetitive in the market. Especially in today’s market where microwaves are built to a price and available for less than $50, it’s hard to imagine that reducing leakage beyond legislated levels is a high priority.

International standards allow microwave ovens to emit up to 5mW/cm² when measured from 5cm away. This limit is safe for human exposure, but it’s a much higher power level than the typical emissions from a wifi router. In most countries, wifi routers are limited by law to emitting 100mW on the 2.4GHz band, which translates to a power density of around 0.36mW/cm² when measured at 5cm from the router, and around .1-1mW/ cm² when 1-2 metres away.

Even if a brand new microwave is leaking at only 10% of the allowed emission limit—around 1 mW/cm²—this interference signal is  on par with the output of a wifi router. If the leakage is any higher, its easy to see how the leakage or electromagnetic interference (EMI) could easily affect the wifi signal or at the very least make it more difficult – and slower – for the receiving device to decode. In some ways its a miracle that every microwave does not cause significant wifi interference given the different incentives.

Sidebar: Why Routers can Coexist With Each Other

If a microwave emitting roughly the same amount of power as a router, in EMI, is enough to disrupt my wifi network, why don’t all the overlapping networks of my neighbourhood cause problems?

When you place two routers next to each other, or within range of each other, they can coexist without major issues because wifi routers are designed to avoid conflicts by using coordinated protocols. Technologies like channel allocation and CSMA/CA (Carrier Sense Multiple Access with Collision Avoidance) allow routers to operate on different channels or time their transmissions to minimise interference. This allows multiple networks to function smoothly even when they are physically close.

Microwaves, on the other hand, emit uncontrolled, broad-spectrum electromagnetic noise at 2.45 GHz, close to the 2.4 GHz wifi band. Unlike routers, which coordinate their signals, microwaves don’t follow any protocols, flooding the frequency range with noise that disrupts wifi signals. This uncontrolled emission is what causes problems, making microwaves different from two routers that can efficiently share the same space.

Guide to Fix Microwave Wifi Interference

If your microwave is interfering with your wifi, here’s the steps to take to resolve the issue.

1. Move Your Router Away from the Microwave

Increase the distance between your wifi router and the microwave. The farther the router is from the microwave, the less likely it is to experience interference. If possible, the router and microwave should be in different rooms.

2. Switch to 5GHz Wifi

If your router supports dual-band wifi, consider switching to the 5GHz band, which does not overlap with microwave frequencies. The 5GHz band is unaffected by microwaves and can significantly reduce interference. Many modern devices support 5GHz, so connect them to this band for a faster and more stable connection, but be aware that the 5GHz signal is less able to penetrate walls and obstacles and is only faster when closer to the router. As you move further away 2.4GHz is the better band for reliable connection.

3. Replace Your Microwave

If none of these solutions work and you’re still experiencing wifi interference, it might be time to replace your microwave. Although your microwave is designed to block most electromagnetic radiation, wear and tear over time – especially aging door hinges – can increase leakage. The slightest door misalignment, imperceptible to the human eye can be the cause of significant leakage and EMI. The older your microwave, and the rougher you have treated it, the more likely it is to be leaking a higher level of EMI.

Do Microwaves Disrupt Bluetooth? Yes, and Here's How to Fix It

Microwaves can also interfere with Bluetooth because Bluetooth operates on the same 2.4 GHz frequency band as Wifi. The magnetron’s emissions and any electromagnetic leakage from the microwave can affect both Wifi and Bluetooth, especially if your Bluetooth devices are close to the microwave.

1. Move Your Bluetooth Device Away from the Microwave

The simplest fix is to move your Bluetooth device farther away from the microwave. The farther your device is from the source of interference, the more stable the connection will be.

2. Keep a Clear Line of Sight

If possible, ensure there is a clear line of sight between your Bluetooth device and its connected source (like a phone or computer). Avoid positioning your devices near large metal objects or between the microwave and the Bluetooth source, as this can exacerbate interference.

3. Switch to 5GHz Wifi

If your Bluetooth device uses Wifi for streaming like smart speakers for example, switch your router to the 5GHz band to reduce congestion in the 2.4GHz spectrum. This will help prevent both Wifi and Bluetooth interference, but as discussed above, 5GHz

4. Upgrade to Newer Bluetooth Devices or Replace Your Microwave

If you continue to experience problems, consider upgrading to newer Bluetooth devices. Newer versions of Bluetooth have better interference management, which can reduce the likelihood of disruption.

Posted on

Where Do Lost Socks Really Go? The Truth Why Socks Disappear

We’ve all been there. You do a load of laundry, only to find that somehow, mysteriously, one sock is missing. Is it hiding under the bed? Did it get sucked into a black hole? Or maybe, just maybe, it was whisked away to a magical land by the sock fairy? As amusing as these theories are, the truth behind disappearing socks is a bit more grounded—though no less fascinating. Some have suggested that socks are lost in the home when being carried to the laundry, or getting caught inside other items of clothing during washing or drying. I know when I dry my bedding in the clothes dryer, I’m frequently losing the pillow cases within the doona cover and having to fish them out, so it’s not a stretch for me to imagine a sock being caught in a pant leg or within a t-shirt. You might wear the clothing later, and the sock may fall out unnoticed – far from home – and the prospect of ever being found. As an appliance repair specialist, I can’t speak to every theory on vanishing socks, but I can tell you what my experience has taught me about how socks go missing.

How Socks Disappear in Washing Machines

In many cases, missing socks are the victim of your washing machine. Often lost socks end up in places you’d never think to look, other times they have disappeared never to be seen again. In front-loading washing machines, socks (and sometimes but less commonly other small items like hankies or underwear) can slip through the gap between the door boot and the drum, getting lodged between the drum and the outer tub. In top-loading machines, socks can slip between the drum and collar, especially during spin cycles or when the machine is overloaded. Once they make their way into this space, they generally get jammed between the drum and the outer tub. As the drum rotates, the sharp edges on the backside of the many holes in the drum begin to shred the sock. Over about 10 cycles, the sock is torn into tiny pieces that eventually wash down the drain – disappearing for good. This process generally goes unnoticed but can present as excess lint on clothes, and in some cases, cause spin cycle errors. To speed up disintegration, running a long hot wash with a litre of cheap bleach can help soften and dissolve the sock. It’s important to use cheap bleach without detergent to prevent oversudsing, which can lead to overflowing, bearing damage, and flooding.

Toploader Specific Lost Socks

In top-loading machines, especially when overloaded, socks can also sneak over the top of the basket and drum, usually during the spin cycle. From there, they end up between the drum and the machine’s outer casing. You might find them later at the bottom of the machine or even on the floor if your washer doesn’t have a bottom panel.

How Socks Disappear in Dryers

Dryers are another common culprit in the mystery of missing socks. In all models the front of the drum isn’t completely closed; instead, it rotates against a flexible foam seal. The back of the drum might not be sealed either depending on the model. With bad luck – and especially if the seal is worn – socks can slip through these gaps and get stuck inside the dryer.

This is more than just an annoyance; it can become a safety risk. In some cases, all the lost socks within your dryer might be piling up around sensitive electrical components, insulating them and leading to overheating. Socks can also cause mechanical faults if they find themselves wrapped up in belts, pulleys or motors.

Why Only Socks?

Socks tend to disappear more frequently than other items simply because they are small enough to slip through the narrow gaps. However, hankies, small underwear, and even baby clothes can sometimes meet the same fate. I suspect though there is something about the shape of a sock that makes it more susceptible than other small items to disappearing.

Preventing Sock Loss

The good news? There are ways to prevent this from happening! Use mesh laundry bags for socks in both the washing machine and dryer. They prevent socks from slipping into gaps and keeps them together. However, it’s important to acknowledge the limitations of this strategy, particularly in the dryer. The mesh bag restricts airflow, potentially resulting in longer drying times and uneven drying, as the socks inside may not receive sufficient heat and tumbling. This reduced efficiency can lead to damp socks even after a full cycle. To ensure proper drying while minimising sock loss, keep the mesh bag only partially filled, allowing enough room for air to circulate effectively. It may take a bit of trial and error, but the payoff of no more lost socks might be worth it for you!

Posted on Leave a comment

Reviewing the Fisher & Paykel Washer Dryer Combo (WD8560F1)

I went into this review full of bias and expecting to hate the Fisher & Paykel WD8560F1 Washer Dryer Combo. As appliance technicians we’re taught to regard washer dryer combos as problematic, prone to frequent maintenance issues, and often disappointing in their drying performance.

I wanted to put this to the test and see for myself, because the concept of a washer dryer in one is a great idea. So, I used the Fisher & Paykel WD8560F1 washer dryer combo as my own personal machine for about six months. What developed was a love hate relationship with what turned out to be the best and worst washer and dryer I’ve ever had.

A Washer Dryer in One - Love at First Wash

I was surprised by how much I loved certain aspects of the washer dryer in one experience. The machine washed clothes well and efficiently with plenty of different options, but what higher end machine doesn’t these days? Here’s what stood out.

Whisper-Quiet Operation

The WD8560F1 is impressively quiet. Unlike typical dryers that rely on drum rollers, sleeve bearings, and belts, this machine utilises proper washing machine roller bearings and a direct drive system. This makes sense since it is a washing machine with a drying function added to it, not the other way around. As a result, it can spin at 1400 RPM relatively quietly. During the drying cycle, which operates at around 50 RPM, all you can hear is the noise the clothes make tumbling around as well as some very muted fan noise. Without a doubt the quietest dryer I have ever had.

Lint Free Laundry

My biggest pet peeves with dryers is lint dust. Even the most expensive machines leave a fine layer of lint all over the laundry room. The WD8560F1 washer dryer in one uses a bit of water to flush lint out of the machine and down the drain, eliminating this issue entirely. Plus, there’s no lint filter to clean, even better. A bit of a waste of water sure, but with all the talk of microplastics and their risk, I’d rather not have microplastic laden lint spread as a fine dust throughout my laundry room. Flushing the lint out with water offers a safer way to catch it with an aftermarket filter and dispose of it more sustainably if you don’t want to flush it down the drain to let the treatment plant deal with it.

Convenient for Small Loads

For small loads, the set-and-forget wash-dry cycle is fantastic. No need to wait around to move the washing into the dryer, you can go out and come back  later to clean, dry clothes, making it ideal for one or two people or as a backup dryer for a family.

Space-Saving Design

The compact footprint is another major plus. Instead of needing to stack a separate dryer, you get valuable space back, which is great for small apartments with limited room.

Dryer Energy Efficiency

Surprisingly, for a dryer that uses a heating element instead of heat pump technology, the energy rating is pretty high – at least according to the sticker. My experience below however really makes me question how that efficiency really measures up in the real world.

The Hate Begins

Despite the positives, my experience wasn’t all rosy. There are significant drawbacks to the WD8560F1 dryer washing machine combo.

Painfully Slow Drying Times

A close up photograph of a FIsher and Paykel WD8560F1 washer dryer combo showing the max level for dry sticker

The drying capacity is limited, and it makes sense. The machine has a washing machine drum, as it is a washing machine with a dryer added on. It’s not a dryer washing machine combo, but a washer dryer machine combo – It’s a washer before its a dryer. Dryer’s usually have much larger diameter drums to facilitate good airflow through the clothes. The machine comes with a fill line sticker by the door to show the max level of clothing for effective drying, but the machine struggles to dry clothes when filled to this line. At best, it can handle about 3 kg of dry-weight clothing. For me, exceeding this amount resulted in damp clothes at the end of the cycle, requiring an additional hour or more to finish drying. It would be nice if all manufacturers could be more honest about the limitations of trying to tumble dry clothes in a washing machine drum, and stop trying to oversell the drying capacity of these machines, I think the labelled capacity of 5kg is pretty ambitious. I’d consider a washer dryer combo for small loads or as a washer with a built-in emergency backup dryer. Forget about drying queen size bed sheets or more than a couple of bath towels at a time.

Undisclosed Maintenance Requirements

Over time, lint buildup inside the machine can significantly impede the already underwhelming drying performance. As a technician, I knew this was a common issue to all washer dryer combos. Whenever a washer dryer combo of any brand comes in for repair, the first step is to clear the accumulated lint, which realistically requires a professional service call every few years. This is something manufacturers should make buyers aware of upfront. I don’t think it’s the end of the world, but manufacturers could make it simpler to undertake this maintenance and let their customers know it needs doing, even offering a fixed price service for it. On the Fisher Paykels there are a lot of needless screws and bits that need to come off before you can remove the 5 or so screws holding the fan in. If you have a washer dryer combo and it is drying much slower than it used to, this is almost always the issue. When I first got the WD8560F1 in used condition for this test, it took 7 hours to complete a wash dry cycle when loaded with 1 pair of heavy cotton work shorts, 5 light t shirts and 2 pairs of jocks.  The machine was all gobbed up with lint.  After cleaning it all out, this time came down to 4 hours for the same load.

Slow Throughput

When compared to having separate machines, the WD8560F1 falls short, as would any washer dryer combo. For instance, a 7.5kg Fisher & Paykel front loader paired with a 7kg Electrolux condenser dryer can handle significantly larger loads in a fraction of the time. In 7 hours, you can wash and dry 22.5 kg of clothes with these separate machines, while the washer dryer combo could only manage around 8kg in a 6 hour period provided its not all gobbed up with lint.

Locked Door During Drying

A final, and somewhat minor gripe, is the locked door during the drying cycle. If you need to open the door mid-cycle, you must wait 15 minutes for the machine to complete cool-down mode—a frustrating delay. Even when the cycle ends you are locked out for a while so the machine can cool down. So if you’re running late for work and throw something in to dry as much as possible before you have to leave – well guess again, the WD8560F1 has other ideas.

Would I Recommend the Fisher & Paykel WD8560F1 Washer Dryer Combo?

Yes and no – it depends on the circumstances.  For smaller households and where space is at a premium the Fisher & Paykel WD8560F1 washer dryer combo makes good sense. It excels in quiet operation, lint management, and space-saving design. However, the painfully slow drying times, limited capacity, and uncommunicated maintenance requirements are significant drawbacks, which mean I wouldn’t recommend it for bigger households. If you’re considering this machine, or any washer dryer combo, weigh the pros and cons carefully to determine if it’s the right fit for your needs.

Posted on

How is TV Size Measured?

When shopping for a TV, one of the most important aspects (pun intended) to consider is its size. Understanding the actual dimensions of a TV can help you make an informed decision. In this article, we’ll cover various TV sizes, dispel common myths, and provide dimensions in both inches and centimeters.

Table of Contents

Understanding TV Measurements

How TVs are Measured

TV size is measured diagonally from one corner of the screen to the opposite corner. This measurement does not include the bezels or frame of the TV, only the screen itself. This diagonal measurement is a standard across the industry, which helps consumers compare sizes more easily.

Myth: TV Size is the Measurement of the Box it Comes In

One common misconception is that the size of the TV refers to the size of the box it comes in. This is not true. The size of a TV is measured diagonally from one corner of the screen to the opposite corner, not including the bezels or the frame of the TV. The box size is typically larger due to packaging and protective materials.

Myth: Larger TVs Always Provide a Better Viewing Experience

While larger TVs can enhance the viewing experience, it’s important to consider the size of your room and the distance from which you’ll be watching. A TV that is too large for your space can be overwhelming and may not provide the best picture quality from a closer distance.

TV Screen Measurement Table

TV SizeWidth (inches)Height (inches)Diagonal (inches)Width (cm)Height (cm)Diagonal (cm)
24"20.911.72453.129.661
32"27.915.73270.939.981.2
40"34.919.64088.649.8101.6
42"36.620.6429352.3106.7
43"37.521.14395.353.6109.2
50"43.624.550110.762.2127
55"47.92755121.768.6139.7
65"56.731.96514481165.1
75"65.436.875166.193.6190.5

How Big is a 24 Inch TV?

A 24 inch TV showing measurements in cm and inches

How Big is a 24 Inch TV in Inches?

A 24 inch TV, measured diagonally, typically has a screen width of about 20.9 inches and a height of about 11.7 inches. The diagonal measurement is, of course, 24 inches.

How Big is a 24 Inch TV in cm?

A 24 inch TV screen is approximately 53.1 cm wide and 29.6 cm tall, with a diagonal measurement of approximately 61 cm.

How Big is a 32 Inch TV?

A 32 inch TV showing measurements in cm and inches

How Big is a 32 Inch TV in Inches?

A 32 inch TV usually has a screen width of about 27.9 inches and a height of about 15.7 inches. The diagonal measurement is 32 inches.

How Big is a 32 Inch TV in cm?

A 32 inch TV screen is approximately 70.9 cm wide and 39.9 cm tall, with a diagonal measurement of approximately 81.3 cm.

How Big is a 40 Inch TV?

A 40 inch TV showing measurements in cm and inches

How Big is a 40 Inch TV in Inches?

A 40 inch TV typically has a screen width of about 34.9 inches and a height of about 19.6 inches. The diagonal measurement is 40 inches.

How Big is a 40 Inch TV in cm?

A 40 inch TV screen is approximately 88.6 cm wide and 49.8 cm tall, with a diagonal measurement of approximately 101.6 cm.

How Big is a 42 Inch TV?

A 42 inch TV showing measurements in cm and inches

How Big is a 42 Inch TV in Inches?

A 42 inch TV usually has a screen width of about 36.6 inches and a height of about 20.6 inches. The diagonal measurement is 42 inches.

How Big is a 42 Inch TV in cm?

A 42 inch TV screen is approximately 93 cm wide and 52.3 cm tall, with a diagonal measurement of approximately 106.7 cm.

How Big is a 43 Inch TV?

A 43 inch TV showing measurements in cm and inches

How Big is a 43 Inch TV in Inches?

A 43 inch TV typically has a screen width of about 37.5 inches and a height of about 21.1 inches. The diagonal measurement is 43 inches.

How Big is a 43 Inch TV in cm?

A 43 inch TV screen is approximately 95.3 cm wide and 53.6 cm tall, with a diagonal measurement of approximately 109.2 cm.

How Big is a 50 Inch TV?

A 50 inch TV showing measurements in cm and inches

How Big is a 50 Inch TV in Inches?

A 50 inch TV usually has a screen width of about 43.6 inches and a height of about 24.5 inches. The diagonal measurement is 50 inches.

How Big is a 50 Inch TV in cm?

A 50 inch TV screen is approximately 110.7 cm wide and 62.2 cm tall, with a diagonal measurement of approximately 127 cm.

How Big is a 55 Inch TV?

A 55 inch TV showing measurements in cm and inches

How Big is a 55 Inch TV in Inches?

A 55 inch TV typically has a screen width of about 47.9 inches and a height of about 27 inches. The diagonal measurement is 55 inches.

How Big is a 55 Inch TV in cm?

A 55 inch TV screen is approximately 121.7 cm wide and 68.6 cm tall, with a diagonal measurement of approximately 139.7 cm.

How Big is a 65 Inch TV?

A 65 inch TV showing measurements in cm and inches

How Big is a 65 Inch TV in Inches?

A 65 inch TV usually has a screen width of about 56.7 inches and a height of about 31.9 inches. The diagonal measurement is 65 inches.

How Big is a 65 Inch TV in cm?

A 65 inch TV screen is approximately 144 cm wide and 81 cm tall, with a diagonal measurement of approximately 165.1 cm.

How Big is a 75 Inch TV?

A 75 inch TV showing measurements in cm and inches

How Big is a 75 Inch TV in Inches?

A 75 inch TV typically has a screen width of about 65.4 inches and a height of about 36.8 inches. The diagonal measurement is 75 inches.

How Big is a 75 Inch TV in cm?

A 75 inch TV screen is approximately 166.1 cm wide and 93.6 cm tall, with a diagonal measurement of approximately 190.5 cm.


Posted on Leave a comment

Safely Using Power Boards, Extension Cords, and Double Adaptors

As an experienced appliance repair specialist and installer, I’m often asked about the safety and practicality of using extension leads, double adaptors, or power boards with high demand appliances like washing machines, clothes dryers, and fridges. Most advice on the topic tends to be overly cautious, often recommending against these practices outright. It’s understandable why, the stakes are high, and if used incorreectly and carelessly improper use of these products can easily burn your house down or cause an electrical hazard. However, understanding the specifics can help you make informed and safe decisions for your home.

The Common Problem

Especially in older homes, a common problem is the lack of sufficient powerpoints in laundries and bathrooms. Often, you’ll find a single outlet with one plug for both your washer and dryer, or a single outlet in the kitchen. So, what should you do? First, let’s cover some basics, and then we will come back to this problem.

A thermal image showing a coiled extension lead that is overheating
Always unravel an extension lead fully to prevent overheating, which is more likely with high-power appliances. This thermal image shows how coiled leads can pose a fire risk with this one at 54 degrees celcius. Use a cord of the right length to stay safe.

Understanding the Load Limit of Power Outlets in Australia

In Australia (this advice is Australia specific, it may burn your house down in other countries), the standard power outlet is rated at 10 amps, which translates to a maximum power draw of 2,400 watts (240V x 10A). This is the key to understanding how to use power boards, double adaptors, and extension leads safely.

  • Can you plug a double adaptor into a power board? Yes
  • Can you plug a power board into a double adaptor? Yes
  • Can you plug a power board into an extension cord? Yes
  • Can you plug a double adaptor into an extension cord? Yes
  • Can you burn your house down if you do it wrong? Yes

The key is to ensure that you never go over 10A of power draw. Overloading an outlet, power board, double adaptor, or extension cord can easily lead to overheating and potentially cause a fire. They are dangerous if used improperly. Power boards usually have an overload switch that triggers if the power draw is too high, but not so for the outlet, a double adaptor, or an extension lead. 

For example, a typical washing machine or dryer both draw close to the full 10A limit of a single outlet. If you plugged an extension lead into the outlet and then connected both appliances with a double adaptor, you’re using double the power that the outlet, the double adaptor, and the extension lead can safely carry. There is a real risk that one of them will overheat and melt, leading to a fire or an electrical hazard. High-power appliances should always have their own dedicated outlet to avoid overloading. Where you can create a dangerous situation is when you ask a high-draw appliance to share an outlet by means of a double adaptor which has no inbuilt overload protection, and it’s all made a lot worse if an extension lead is involved. Power boards usually have an overload fuse built in and will cut the power if the draw is too high, making them somewhat safer than double adaptors, but you shouldn’t rely on the overload fuse in a $3 power board to guard against the prospect of your house burning down either.

High Power Draw Appliances

These appliances should have their own dedicated outlet:

  • Clothes Dryers (Electric): Generally draw 2,000 watts continuously.
  • Frontloader Washing Machines: Typically draw 500W with frequent peaks up to 2,000 watts when the water heater activates.
  • Dishwashers: Typically draw 500W with frequent peaks up to 2,000 watts when the water heater activates.
  • Electric Room Heaters: Generally draw 2,400 watts continuously.
  • Kettles: Typically draw 2,000 watts continuously.
  • Toasters: Typically draw 1,500 watts continuously.
  • Electric Hotplates: Typically draw between 1,200-2,000 watts continuously.

You can use an extension cord with these appliances, the important thing is they do not share an outlet.

Medium Draw Appliances

These appliances can share an outlet but only with other thoughtfully selected medium draw appliances or lower power draw appliances:

  • Refrigerators: Typically draw between 100-500 watts (with peaks up to 2,400 watts when the compressor starts).
  • Microwaves: Typically draw between 600-1,200 watts continuously.
  • Heat Pump Dryers: Typically draw between 500-1,000 watts.
  • Top Loader Washers (without heating elements): Typically draw between 500-1,000 watts.

Low Power Draw Appliances

These appliances draw minimal power and are unlikely to overload power boards extension leads or double adaptors when used together:

  • LED Lightbulbs: Typically draw between 5-20 watts.
  • Fairy/Christmas lights: Typically draw less than 100 watts for LEDs but can be significantly higher if incandscent, which you’re unlikely to come across these days.  When in doubt check the box, it can vary significantly depending on string length.
  • Chargers: Typically draw between 5-100 watts.
  • Laptops: Typically draw between 50-100 watts.
  • Televisions (LED/LCD): Typically draw between 50-200 watts.
  • Desktop Computers: Typically draw between 100-300 watts.
  • Printers: Typically draw between 30-50 watts (when printing, higher during startup).
  • Gaming Consoles: Typically draw between 100-250 watts.

Can you use an Extension Cord, Power board, or Double Adaptor with a Fridge?

Using an extension cord or a double adaptor with a fridge is generally fine. A fridge typically draws only a quarter to a third of the rated power of a socket, though it can peak up to 2400W for a few seconds when the compressor powers on. If the compressor or its switch fails, the draw can reach 10A for several seconds every few minutes, which could potentially cause an issue if there’s another high or medium draw appliance running from a double adaptor or trigger the overload switch on a power board.

Can you use an Extension Cord, Power board, or Double Adaptor with a Washing Machine and Dryer?

As mentioned earlier, a washer and dryer should never share an outlet as they are both high-power appliances. So, what should you do if you only have a single outlet? First and foremost, never use a double adaptor. Both appliances draw close to the rated power of the outlet (10A), so plugging them both into a double adaptor will overload both the outlet and the adaptor. Especially avoid using a double adaptor plugged into a single extension lead for a washer and dryer—this is a recipe for disaster and a great way to melt an extension lead and cause an electrical hazard or fire. 

The correct way to remedy this situation is to have a licensed electrician replace the single outlet with a two-plug outlet. This upgrade is generally straightforward and is particularly recommended for power-intensive appliances like washers and dryers. Upgrading ensures that each appliance can operate independently without overloading the system.

2 powerpoints in a Laundry in a shared laundry in a St Kilda flat, with only one outlet per powerpoint. One of the outelets has a double adpator plugged in, trhe other outlet only one single appliance.
These outlets in a communal laundry in Elwood, Melbourne should be replaced with double outlets, or as a stopgap solution, a powerboard with overload switch. The connection of a washer and dryer on outlet 6 with a double adaptor is a fire waiting to happen. The presence of safety tags on each appliance is almost an exercise in malicious compliance and epitomises the philosophy of "not my job, not my problem" by the test and tag inspector.

The Exception to the Rule: Heat Pump Dryers and Toploader Washer Combo

Proving that nothing is ever straightforward and easy to explain, a toploader washer and heat pump dryer breaks the above advice – maybe. You could probably get away with plugging a heat pump dryer and toploader washer combo into a single lead with a power board or even a double adaptor and using them at the same time. A top loading washer (most of which have no heating capabilities and draw heat from the hot water service) coupled with a heat pump dryer (which uses a compressor to generate heat, not a heating element) might just stay under the 10A socket and lead limit. So too is it likely that a frontloader washer set to wash on cold paired with a heat pump dryer would be likely to draw less than 10A. However, it would be close, and I recommend using a power board for added peace of mind, not a double adaptor. To be extra safe, use a plug-in wall power meter to check the washer’s power draw while on full speed spin and the dryer while it’s turning with the compressor running.

Conclusion

While it is technically possible to use extension leads, double adaptors, or power boards with high-demand appliances like washing machines, clothes dryers, and fridges, it comes with significant risks. The primary concern is ensuring that the total power draw does not exceed the 10 amp limit of the outlet and any extension leads, power boards or double adpaters you’ve plugged into it. Overloading can easily lead to overheating, electrical hazards, or even fires.

For safety and optimal performance, high-power appliances should always have their own dedicated outlets. You can use an extension lead to connect a high powered appliance to an outlet, as long as it has its own outlet. If this isn’t feasible, a power board with overload protection is the next best option, but it should never be used to power multiple high-draw appliances simultaneously. Always be cautious and consider consulting with a licensed electrician to upgrade your home’s electrical system to meet the demands of modern appliances safely.

Remember, the convenience of using these devices should never come at the expense of safety. By understanding the electrical load limits and using power boards with built-in safety features, you can make informed decisions to protect your home and family from potential hazards.

Posted on Leave a comment

Are Soap Nuts an Alternative to Laundry Detergent? Mostly No

We all want natural, affordable alternatives to everyday products, and it creates a bias within ourselves to want to believe they work. One such product is soap nuts, also known as soap berries or soapberries, a natural soap alternative used for centuries. But are soap nuts truly an effective replacement for traditional washing detergents? As much as we’d like it to be a yes, the answer, unfortunately, is mostly no. However, there is a silver lining that reveals a free and even more sustainable way to wash our clothes – using water only. Let’s dive in!  

What Are Soap Nuts?

Soap nuts, also known as soapberries, are the fruit of the Sapindus mukorossi tree, commonly found in India and Nepal. The fruit contains saponin, a natural surfactant that has been used for centuries as a cleaning agent. When soaked in water, soap nuts release saponin, creating a soapy solution that can clean clothes. Soap nuts were a valuable resource in regions where they grew naturally. They were used not only for laundry but also for cleaning jewelry and even as a natural remedy for certain skin conditions.

  • Sapindus mukorossi, often referred to as the Himalayan soapberry, is found extensively in the foothills of the Himalayas, ranging from Nepal to northern India and into parts of China. This species is particularly valued for its high saponin content, making its nuts ideal for use as a natural detergent.
  • Sapindus trifoliatus, known as the South Indian soapberry, is native to warmer southern parts of India. It thrives in coastal areas and is also used for its cleaning properties, though its nuts are generally smaller and slightly less saponin-rich compared to those of Sapindus mukorossi.

Traditional Use

Traditionally, soap nuts were used to wash clothes. Here’s how it was typically done:

  1. Collecting Soap Nuts: Fresh soap nuts were harvested.
  2. Preparation: The soap nuts were de-seeded and sometimes crushed to enhance saponin release.
  3. Soaking: The soap nuts were soaked in water to release the saponin, creating a soapy solution. Fresh, high-quality soap nuts require about 10-15 minutes of soaking, but those stored for a longer time or of lower quality might need half an hour or more.
  4. Washing: Clothes were scrubbed directly in this soapy water, often in rivers or streams, using hands or wooden paddles.
  5. Rinsing: The clothes were then thoroughly rinsed in clean water to remove the soap solution.

Modern Research on Soap Nuts

Recent studies testing the cleaning power of soap nuts have been less than encouraging. It seems that the effectiveness of soap nuts in these traditional contexts does not translate to the expectations and demands of modern laundry. Every scientific study we found on the topic indicated that soap nuts performed the same or worse than water.

  • A 2013 study in the journal Tenside Surfactants Detergents found that soap nuts performed no better than water alone, noting that using half the amount of regular detergent yielded a washing result almost as good as using the recommended amount.
  • A 2012 study in Household and Personal Care Today found that soap nuts performed no better than water alone in the washing machine.
  • Tests by the consumer advocacy group Choice found that soap nuts are less effective than plain water. Worse than using water alone. Yikes.

Tradition VS Science

On the one hand, soap nuts have been used as a traditional laundry staple; on the other, the science says no. Here’s what we think is happening, and it’s all down to context. If you are handwashing your clothes in the Himalayan foothills by a river with fresh soap nuts, they’re likely to help with washing. However, if you’re throwing soap nuts into a muslin bag and pressing go on your washer, it’s not going to work well for a few reasons.

Firstly, as we touched on earlier, soap nuts need time to soak to release their saponin. If you haven’t picked them fresh on your way to the river to do your washing, it’s probably a good guess that your soap nuts, which have come halfway across the world via a container ship are not fresh. Their quality will be degraded. You need to soak them for at least 30 minutes to give them their best chance. Many washing machines do have a soak option you could use for this purpose. Next—the hotter the water, the better—up to 90 degrees Celsius. More saponin is released in hotter water. However, using hot water contradicts the environmental benefits supposed by using soap nuts, unless one has access to environmentally friendly heating methods like solar or heatpump hot water systems.

If you’re not doing this vital preparation and just want to conveniently throw the soap nuts into your washer and press go on a short cold wash,  soap nuts might give you a worse result than if you used water alone. Saponin can make water a less effective cleaner in two ways:

  • Surfactant Interference: Saponins act as surfactants, but if they don’t fully dissolve or disperse, they can create a barrier that prevents water from effectively penetrating and cleaning fabrics.
  • Residue Build-Up: Incomplete dissolution of saponins might leave a sticky residue on fabrics, which could attract dirt and hinder the cleaning process.

Simply throwing soap nuts in a muslin bag and popping it in the washer is unlikely to get a result better than just washing with water, and may even yield a worse result, as Choice demonstrated in their results. Usually, this is how soap nuts are marketed as well—a convenient and easy alternative to laundry detergent. This is why in scientific studies, that appears to be what has taken place—the soap nuts are popped in a muslin bag and tossed in the washer. Complaints from the soap nut industry about unfair testing conditions are valid—but the industry has also reaped what it has sowed. You can’t on the one hand provide a set of instructions to make soap nuts appear as convenient and easy to use as laundry detergent, and then cry foul when studies following those instructions yield poor results. Further studies are needed to determine the efficacy of soap nuts when prepared correctly, but even so, their performance is unlikely to approach that of modern detergents—and at best—be a slight improvement when compared to water only.

Environmental Impact

The relatively poor washing performance of soap nuts is further complicated by their actual environmental impact. Soap nuts are biodegradable, chemical-free, and renewable, making them an appealing option for those seeking environmentally friendly alternatives. However, these benefits are significantly undermined by the fact that they are imported from regions like India and Nepal, involving considerable product miles and high embodied energy.

Moreover, the rising demand for soap nuts in Western markets can adversely affect the local economies and ecosystems in the regions where they are harvested. Often, this leads locals to switch to modern detergents, now cheaper than soap nuts as a result of the increased demand. Consequently, the use of soap nuts in the West has a high risk of shifting the environmental burden of detergent use to areas likely lacking support from robust sanitation and sewage systems, overall exacerbating the impact of detergent use.

If all this wasn’t enough, soap nuts pose a risk as an environmental weed in many parts of the world. A single viable seed escaping into a non-native ecosystem can have severe ecological repercussions. Given these considerations, the environmental benefits of using soap nuts are extremely debatable. Their efficacy in washing clothes remains uncertain, with no solid scientific evidence supporting their performance. On balance, the purported environmental advantages of soap nuts are questionable, and they probably don’t represent a better alternative to traditional detergents.

A Silver Lining

The silver lining is for those of you who have been using soap nuts all along and have been happy with the results. You’ve demonstrated to yourself that washing with effectively no detergent is good enough to clean your clothes. Not only do you not need detergent much of the time, but neither do you need soap nuts! Don’t believe me? Try a blind test at home and have someone else do one load of laundry with soap nuts, and one load with water only—you won’t be able to tell the difference!

Soap Nuts are Not an Alternative to Laundry Detergent

While soap nuts are a fascinating natural product with historical significance, their effectiveness as a modern laundry detergent alternative is unproven and likely limited at best. The complications around their sourcing, transportation as well as exporting pollution in a context where no scientific study has found them to be a viable alternative to laundry detergent is more than enough to bring into question their cleaning potential in a modern washing machine. The bright ray of sustainability sunshine in this exploration is that there is an eco friendly alternative – just wash with water only, and use washing detergent sparingly where water alone can’t do the job!

Posted on Leave a comment

How to Know if Plastic is Microwave Safe

Microwaving food in plastic containers offers convenience, but it’s essential to be able to identify safe plastic for microwave use. Heating unsafe plastics can lead not only to the container melting but also to the leaching of harmful chemicals such as BPA, phthalates, and styrene into your food. These substances are known to pose health risks, including hormonal disruptions and increased cancer risks. To safeguard your health and ensure safe food preparation, it’s important to understand the types of plastic and identify those that are microwave-safe.

Can You Put Plastic in the Microwave? - The Golden Rule

Whether you can put plastic in the microwave largely depends on the resin identification code marked on them. These are the numbered symbols found on plastic items, usually on the bottom. 

The Golden Rule for Identifying Whether you Can Put Plastic in the Microwave

  • It won’t be black and;
  • It will have the foodsafe logo and;
  • It will have the microwave safe logo or;
  • It will have the number 5 printed on it or;
  • It will have the number 1 printed on it and will be neither see through nor black.

If you want to get more complex about things


Caution with Black Plastics: Recent research has found high levels of toxic, cancer causing flame retardants in black plastic food items, and toys. These chemicals get into these products through the innapropriate recycling of eWaste. It’s best to avoid not only microwaving black plastic, but neither to eat off it at all. 

  • Plastic 5 (Polypropylene, PP): The only generally safe microwave safe plastic number, you will usually be ok to microwave plastic number 5 even if it does not have a microwave safe symbol.
  • Plastic 1 (PETE or PET): Avoid microwaving clear PET; however, opaque PET – known as CPET – is typically microwave safe.
    Plastic Microwave Safe Symbol: A container with this symbol is designed to be used in the microwave. There is a lot of variation in its design but the common element is horizontal wavy lines one over the other. Often there will be no symbol only the words Microwave Safe.
  • Food Safe: It’s also worthwhile checking that the container is food safe by looking for a cup and fork symbol, indicating it is certified for food use. Alternatively, it may be explicitly labeled as “food safe,” with no symbol.

Most other plastics fall into a risky category when it comes to microwaving and are best avoided.

The Food Safe Plastic Symbol
Symbol for Microwave Safe
One Variant of the Many Microwave Safe Symbols

Is Plastic 1 Microwave Safe?​

Plastic 1, or PETE (Polyethylene Terephthalate), is commonly used in the manufacturing of soft drink bottles and cooking oil containers. It is important to differentiate between CPET and APET:

  • APET (Amorphous PET): Transparent and used for cold food and drink. APET is not microwave safe as it may leach chemicals or melt.
  • CPET (Crystalline PET): Opaque and engineered for higher heat tolerance, making it suitable for microwave and oven use. This type is often used in ready-to-cook meal trays that are designed to withstand cooking temperatures.

Examples: Clear PET bottles are typically APET, while some frozen dinner trays and take-out containers are made of CPET.

Is Plastic 2 Microwave Safe?

Number 2 plastic is not microwave safe. Plastic 2, HDPE (High-Density Polyethylene), is used for its strength and resistance to moisture. HDPE is not typically recommended for microwave use as it can melt or deform.

Examples: Milk jugs, laundry detergent bottles.

Is Plastic 3 Microwave Safe?

Plastic 3, PVC (Polyvinyl Chloride), contains phthalates which can leach into food upon heating. It is perhaps the least safe plastic to microwave easily leaching BPA and phthalates. Beware of commercial cling film which is often still made with PVC.

Examples: Food wrap, cooking oil bottles, and plumbing materials.

Can You Microwave Plastic Wrap? Is Plastic Wrap Microwave Safe?

It depends on the type of plastic used. If the wrap is made from polyethylene (PE), it’s typically microwave-safe, as long as it doesn’t directly touch the food. But if the wrap is made from polyvinyl chloride (PVC), it’s a different story – PVC can release harmful chemicals when heated, so it’s not safe for microwaving. PVC is still commonly found in commercial plastic wrap.

If there’s no label on the plastic wrap you’re using or if you’ve received food wrapped in cling film, it’s best to remove the wrap before microwaving and use a microwave-safe container instead.

Is Plastic 4 Microwave Safe?

Number 4 plastic is sort of, not really, microwave safe. Plastic 4, LDPE (Low-Density Polyethylene), is often used in grocery bags and most cling film you would find available at your supermarket and PVC alternatives. While it is safer than some other plastics, it is not typically recommended for microwave use as it can melt at higher temperatures. It could better be described as microwave resistant rather than microwave safe.

Examples: Bread bags, freezer bags, PVC free cling wrap.

Is Plastic 5 Microwave Safe?

Number 5 plastic is microwave safe. Polypropylene, marked as Plastic 5, is the only inherently microwave safe plastic. It has a high heat tolerance and does not melt or leach chemicals easily under microwave conditions.

Examples: Yogurt containers, microwaveable meal trays, reusable microwave containers, single use takeaway containers.

Is Plastic 6 Microwave Safe?

Number 6 plastic is not microwave safe. Plastic 6, PS (Polystyrene), is commonly used in disposable coffee cups and take-out food containers. It can leach styrene’s when heated, a possible carcinogen. However, it is important to note that there are specially formulated types of polystyrene that are engineered to withstand higher temperatures and can be labelled microwave safe. Typical polystyrene containers, like those used for take-out food or coffee cups, are generally not recommended for microwave use unless explicitly labelled as microwave safe.

Examples: Disposable coffee cups, take-out food containers.

Is Plastic 7 Microwave Safe?

Number 7 plastic is not microwave safe. Plastic 7 is a catch all category for various types of plastics including bioplastics which do not fit into the other six categories, including bioplastics and polycarbonate. Many of these, especially polycarbonate, can leach BPA when heated and are not recommended for microwave use.

Examples: Some reusable water bottles, certain food containers.

Conclusion

Choosing the right type of plastic for microwave use can prevent health risks and maintain food safety. When in doubt, look for the microwave-safe symbol or opt for glass or ceramic containers, which are safer and do not pose the risks associated with microwaving plastics.

Posted on Leave a comment

The Danger of Microwave Ovens

Ever heard that one about microwaving water being bad for plants—and by extension proving microwaves are bad for our health? It’s a favourite example used by those peddling pseudoscientific claims regarding microwaves. There are some real harmful effects of microwave cooking, but most are malarky, and so is this one. The story goes something like this: water is microwaved and used to water a plant. The plant then grows poorly or dies when compared to a plant sitting next to it, which has been watered with boiled water. If you’re up for it, try this experiment at home. Water two plants over time, one with microwaved water and one with water boiled on a stove (both cooled down to room temperature, of course). Everything else—the amount of water, sunlight, and type of plant—should be the same. What you’ll find is no difference in the growth or health of the plants, debunking the idea that microwaved water is in some way poisoned. And when you do find this, please realise that whoever told you this isn’t really very credible and you should really question any other claims they’re making. We will set those myths straight, but first let’s cover how microwaves can actually be bad for your health.

The Real Danger of Microwave Ovens

Uneven Cooking and Food Poisoning

Perhaps the most significant risk associated with using microwave ovens is uneven cooking. Microwaves aren’t powerful enough to penetrate deeply into denser foods. As a result, only the outer layers are heated directly by the microwaves, with the inner warmth being achieved slowly through conduction. This can lead to cold spots in the food, particularly in the centre, where bacteria like Salmonella and E. coli can survive if the food isn’t heated through. This is a particular concern with dense, high-protein foods like poultry, eggs, and certain meats, where ensuring thorough cooking is vital in preventing food poisoning.

The danger of uneven heating extends to heating liquids, such as baby formula. The risk of scalding is particularly high with infants, as hot spots in the liquid can cause burns if the formula is not mixed well and tested before feeding. This potential for direct physical harm underlines why health professionals recommend against using microwaves for heating baby bottles or formula. The consequences of getting it wrong, especially with tired or distracted parents, can be lethal.

To combat uneven heating, a simple practice is to pause the microwave halfway through the cooking time to stir the food, rotate the dish, or even rearrange the items within the microwave. Additionally, allowing the food to stand for a few minutes after microwaving helps the heat distribute more evenly, as it naturally flows from hotter areas to cooler ones. This practice helps to ensures safer food consumption while also enhancing the food’s overall texture and taste.

Is a Microwave Dangerous when used for Heating Plastics?

Microwaving plastics is a cause for real concern – if not overblown. Heating food in some or even all plastics can be risky. The risks associated with using certain plastics in the microwave mainly revolves around chemicals potentially leached into food, such as BPA (Bisphenol A), styrenes and phthalates.

BPA (Bisphenol A), styrenes and phthalates are chemicals found in some plastics, like polycarbonate and PVC, which can leach into food when heated. These substances are known endocrine disruptors and carcinogens, mimicking or interfering with the body’s hormones. While typically the amount of these chemicals leaching from plastics is very small – often in quantities considered safe by regulatory bodies – the long-term effects of continuous exposure are still under scrutiny.

Plastic Recycling Symbol 5 PP
Resin Code 5
The Microwavable Plastic Icon featuring 3 wavy horizontal lines one over the other bounded in a square.
The microwave safe symbol has a lot of variations but will always have horizontal wavy lines

Fortunately, the likelihood of encountering harmful plastics like PVC or polycarbonate in microwave use is low – with the exception of polystyrene takeaway containers and commercially common PVC cling film. Most microwave safe containers – even single use takeaway containers – are made from polypropylene (PP), labelled with a resin code #5. This type of plastic is the only inherently microwave safe plastic, is unlikely to contain BPA or phthalates, and is chosen for its heat stability and safety properties. While polypropylene is generally microwave safe, the best practice is to use containers that are explicitly labelled as microwave safe. This label is a manufacturers assurance that the product can withstand microwave heat without degrading and that it does not contain or release harmful chemicals. This is especially important if you wish to ensure against any potential, albeit unlikely, contamination from BPA or phthalates. As well as polypropylene containers most meat is packaged in PET with a resin code of #1 which is not microwave safe, and clingfilm is usually low density polyethylene – resin code # which is closer to microwave resistant than microwave safe. Regardless, these plastics are extremely unlikely to contain phthalates or BPA, though are more likely to melt. Check out our full guide How to Know if Plastic is Microwave Safe for a more detailed guide.

A growing, and valid concern is the potential shedding of microplastics from plastic containers when microwaved, particularly from older or degraded containers. The health implications of ingesting microplastics are still being studied – they may carry toxins and accumulate in the body over time. If the potential risks associated with plastics are a concern for you, consider investing in microwave safe glass containers. Glass is very inert and poses no risks of chemical leaching or microplastic shedding. Glass can provide peace of mind to those seeking the safest microwaving option.

The Made Up Reasons a Microwave is Bad for Health

Microwave Radiation Risks

One enduring myth is that microwaves produce radiation that makes food radioactive, and which can and often does leak out of the microwave irradiating anyone nearby as well. Microwaves don’t change the chemical structure of food to make it radioactive. Microwaves use non-ionizing radiation, which does not have enough energy to change the chemical structure of food components or make them radioactive. This type of radiation is similar to radio waves or the light waves from your table lamp, and is far removed from ionizing radiation (such as X-rays and gamma rays). To make something radioactive, the radiation it is bathed in must be powerful enough to knock particles out of its atoms. Non-ionizing radiation, like visible light, infrared, and microwaves, does not have enough energy to remove tightly bound electrons from atoms or molecules and cannot make materials radioactive.

It’s true, microwave radiation can be dangerous. After all, the very principle of a microwave oven is to use this radiation to heat food quickly and efficiently. The concern though is not about radioactivity, but about a microwave ovens potential to cause burns in the same way as a direct flame can. On face value, concerns about this radiation leaking might seem reasonable. An analogy illustrates why it is not: a fire in a fireplace provides warmth and comfort, but sticking your head into it is likely to be lethal. Similarly, while a microwave oven is generally safe when used correctly, improper use—like tampering with its safety mechanisms—can be hazardous. The risk microwave radiation does pose is not a concern of radioactivity, rather in their ability to burn the same way a fire might. A stove poses a greater hazard.

Microwave are safe in that they are engineered with multiple safety features to prevent improper use, as well as to prevent significant radiation leakage. The small amount that might escape, which can sometimes interfere with Wi-Fi signals (which also uses microwave radiation) – while annoying – is harmless. Regulations ensure that the level of microwave leakage is far below that which could cause harm to humans. With over 50 years of widespread use and a strong safety record, it’s safe to say that microwaves are safe, when used as intended.

Does Microwave Cooking Kill Nutrients?

Yes – microwave cooking will remove nutrients from food. However, microwave cooking preserves nutrients better than most other conventional cooking methods. Water soluble vitamins like vitamin C and some B vitamins are particularly vulnerable to high heat and long cooking times. Since microwaving usually requires less time and heats the food up for a shorter period, it can help retain these heat sensitive nutrients more effectively. Microwaving broccoli, preserves its vitamin C and antioxidant content more than steaming or boiling for example. Boiling vegetables on the stovetop will cause some of their nutrients to leach into the cooking water, which is usually discarded. Microwaving vegetables usually uses less water and reduces this nutrient loss. Furthermore, the quicker cooking time in a microwave can help preserve antioxidants and vitamins that degrade or oxidise over prolonged exposure to heat

While all cooking can diminish some nutrients, it transforms food in several beneficial ways. It enhances digestibility, improves the availability of certain nutrients, eliminates harmful microorganisms, and reduces compounds that inhibit nutrient absorption. Consequently, despite the varying effects of different cooking methods on nutrient levels, the overall benefits of cooking, including microwave use, significantly enhance our diet by making food safer, more digestible, and generally more nutritious.

Microwaves Will Poison you

This pervasive myth largely stems from two widely discredited “studies” that have fueled misconceptions about microwave cooking.

The 1989 Lancet study: Aminoacid Isomerisation and Microwave Exposure

Actually, just a letter to the editor, and not a study. The author, Lubec, microwaved baby formula for 10 minutes and found that some amino acids in the formula had been converted to cis-3 hydroxyproline, cis-4 hydroxyproline, and D-proline amino acids which were thought to be possibly toxic at the time. Lubec failed to disclose crucial experimental details like microwave power and the temperature reached. He later admitted that the formula had been placed in a pressure vessel and heated to an extreme 175°C. Moreover, it’s since been proven cis-3 hydroxyproline, and cis-4 hydroxyproline are both a part of normal metabolic processes in humans, particularly in the synthesis and maintenance of collagen, and that D-proline isn’t toxic either and is found abundantly in commercial dairy products. Good work Lubec – If you seal formula in a pressure vessel and microwave it for 10 minutes to 175°C, it will convert some amino acids to slightly different ones that carry no danger.

The 1990 Franz Weber Study

This tabloid style report authored by Hertel and Blanc in Journal Franz Weber (Issue 19), lacked peer review and is a publication far from the scientific mainstream. It involved only eight volunteers consuming microwaved food and aimed to assess various blood markers. Not only was the sample size too small to draw any significant conclusions, but the claims made were also alarmingly sensational stating that “… microwave ovens are more harmful than the Dachau gas chambers…” and “… it is certain that you will die from cancer”. The data showed that all blood analysis results fell within normal variation ranges. One of the authors of the paper (Blanc) later stated “I totally dissociate myself from the … experiment carried out in 1989, which was published without my consent by the co-author of the study… The results obtained do not in any circumstances justify drawing any conclusions as to the harmful effects of food treated with microwaves”.

Actually, it Turns out Baking, Frying, Roasting, and Grilling Might Poison you

While the harmful effects of microwave cooking are entirely discredited, some foods when cooked at high temperatures, such as those in baking, frying, roasting, and grilling, can produce suspected and known carcinogens: acrylamide, heterocyclic amines (HCAs) and polycyclic aromatic hydrocarbons (PAHs).

Acylamide is most likely to form when starchy foods like potatoes or bread, are cooked at high temperatures through baking, frying, roasting, or grilling until browned or burnt. You don’t find acrylamide in uncooked, boiled, or microwaved food. Acrylamide is recognised by health authorities including the World Health Organization and the International Agency for Research on Cancer as a potential human carcinogen. This concern is based on studies conducted in laboratory animals, showing that high levels of acrylamide can cause cancer in these animals. However, it’s important to note that the levels of acrylamide in food are much lower than those used in these studies, and the direct link to cancer in humans is still not conclusively proven. To minimise acrylamide formation, cook food until it goes yellow, not brown or black, though if you cook at too low a temperature you are less likely to kill off bacteria, so there is more risk of food poisoning.

Besides acrylamide, cooking meats at high temperatures can lead to the formation of heterocyclic amines (HCAs) and polycyclic aromatic hydrocarbons (PAHs), which are chemicals found to increase cancer risk in animals and potentially in humans. HCAs are formed when meats like beef, poultry, and fish are cooked at high temperatures, especially during methods that involve direct contact with an open flame or a hot metal surface, such as grilling or pan-frying. These compounds develop as a reaction between amino acids and creatine within the muscle meats under intense heat. PAHs are produced when fat and juices from the meat drip onto the heat source, creating smoke. This smoke envelops the meat and deposits PAHs onto its surface.

Both HCAs and PAHs have been identified as potentially carcinogenic to humans. Studies in rats have shown that exposure to these compounds can cause various types of cancers, including stomach, colon, and breast cancer. While translating these results directly to human risk is complex, there is enough evidence to suggest a potential increase in cancer risk associated with consistent consumption of meats cooked by high-temperature methods.

Microwave cooking, in contrast typically does not reach the temperatures necessary to produce acrylamide HCAs and PAHs. Not only does microwaving help in retaining more nutrients by reducing cooking time, but it also avoids the formation of harmful chemicals that are associated with other cooking methods. While each cooking method has its pros and cons, microwave cooking stands out for both its efficiency in nutrient retention and its lower risk of generating food-related carcinogens, making it a sound choice for health-conscious individuals.

Posted on Leave a comment

Is it Safe to Put Metal in a Microwave? You’re Probably Already Doing it

A dramatic illustration of a small, vivid thunderstorm entirely contained within a microwave

Hello, curious kitchen adventurers! Today, we’re addressing a widespread myth: the danger of putting metal in microwaves. Contrary to popular belief, it’s not always a strict no. In fact, if you’ve ever microwaved a frozen pizza or a ready meal, you’ve likely already safely microwaved metal without even realising it. Let’s dive into why this metal myth persists and when you really can microwave metal.

A dramatic illustration of a small, vivid thunderstorm entirely contained within a microwave

What Happens if you Put Metal in a Microwave?

Microwave ovens heat food safely by energising water molecules in the food placed inside. When you try to microwave metal alone, because it contains no water, it reflects the microwaves rather than absorbing them like food does. In fact, microwaving metal without any food is essentially the same as running the microwave empty, which will also cause arcing and sparks. The reflected microwaves will “build up” leading to sparks or arcs, akin to mini lightning. This arcing can damage the microwave’s interior and be a fire hazard.  If you only put a metal spoon in a microwave it will definitely spark, but if the metal spoon is in a bowl of soup, it probably won’t because the microwaves have somewhere else to go once reflected by the spoon – into the soup. However, the spoon can still get very hot, posing a burn risk similar to a spoon left in a pot on the stove.

Can I Put Metal in a Microwave?

Yes. You can put metal in a microwave so long as the metal doesn’t have sharp points that are close to one another that can create an arc. Think the tines of a fork, a serrated knife, or crumpled foil. Thicker smoother pieces of metal are generally safe inside a microwave. A spoon, metal cup, metal plate or even metal microwave oven racks are perfectly fine because everything is smooth and rounded off. Foil can be used carefully, as long as it’s not crumpled, and Sharp even recommends using foil to shield parts of food to avoid overcooking in their microwaves. LG on the other hand, is more cautious with a strict no-metal policy in their microwaves.

In some cases, food manufacturers cleverly incorporate metal into microwavable packaging to enhance the cooking process. Microwave pizzas often sit atop foil-lined cardboard, which helps the base become crispy. Microwavable soups often come with a thin metallic layer beneath a non-metallic lid to evenly brown the top layer of the soup. Some frozen dinners use metallic film inside the box to facilitate even heating, ensuring the food cooks thoroughly and evenly. These strategies help direct the heat properly, improving the microwaving experience by ensuring better browning or crisping of the food.

It is Usually Safe to Put Metal in a Microwave but Best Avoided

Generally, it’s best to avoid metal in the microwave unless following specific manufacturer instructions or using microwave-safe metal objects or packaging. Personally, I’ve microwaved metal in my LG microwave without issues. I find it inconvenient to remove cutlery before reheating food, as there’s often nowhere to put it down without it getting dirty. Even though a knife and fork is precisely the type of thing you’re told not to put in a microwave, leaving it on a plate while reheating my food has never caused an issue for me.