Posted on Leave a comment

Error 37 – Washing Machine Not Draining

If your washing machine shows Error 37, it usually means it isn’t draining properly. In most cases, the cause is a blocked drain pump, not a failed one. The quickest way to sort this is to watch our short video guide below. The written guide further down is just here if you’d like extra detail. Most of the time customers can fix this themselves in a few minutes. If it doesn’t work for you, or you’d rather leave it to us, that’s fine too – we can arrange a service visit, just email [email protected] from the email address associated with your subscription to open a support ticket.

Step 1 - Drain the Water Safely

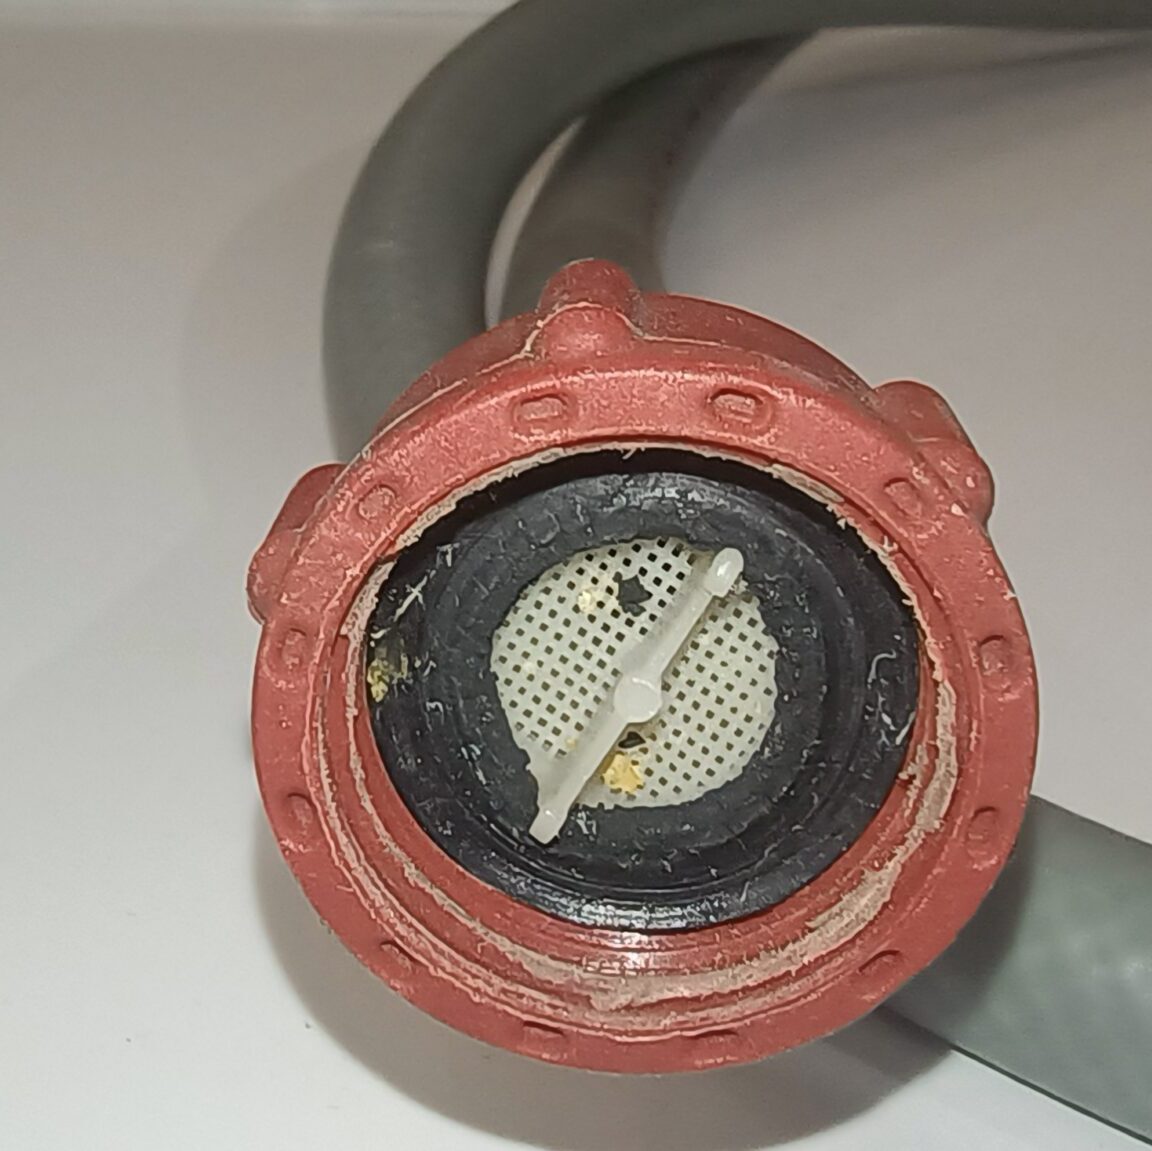
Method A - Use the little black drain hose (preferred, when it works)

  1. Open the filter flap at the bottom right of the washer using a butter knife or flat head screwdriver in the slot.
  2. Find the small black hose with a cap to the left of the circular filter.
  3. Pull the hose down/out – it’s kinked inside the machine, and straightening it lets water flow. A gentle tug is required. Some force, but not too much.
  4. Take off the cap and direct the water into:
    • a nearby floor drain,
    • 3–5 towels, or
    • A very shallow container swapped out as it fills.
  5. Recap the hose when it slows to drips.

Note: Sometimes the hose simply won’t work properly – often its too fiddly and nothing comes out at all. If that happens, switch to Method B.

Method B – Crack the filter open slightly (works even if the hose doesn’t)

  1. Slowly turn the filter counter clockwise until water seeps out. It may be hard to turn initially.
  2. Control the flow with towels, or a floor drain. The shallow tray won’t work here.

Be careful – if you turn the filter too far, the water can surge out uncontrollably. And if debris is stuck in the filter thread, it may not screw back in until cleared.

Step 2 - Remove Your Laundry

Once the water has been drained, turn the machine back on. The door lock will automatically disengage, and you can take your clothes out.

Step 3 - Check the Drain Pump Filter

Once the machine is drained and your laundry is out, check the drain pump filter. A blockage here is the most common cause of Error 37.

How to Check and Clean the Drain Pump

  1. Unscrew and pull the filter out completely.
  2. Inspect and clean the filter itself.
    • Use an old toothbrush if you have one, otherwise a cloth works.
    • Rinse it under a tap.
    • Pay special attention to the rubber seal around the filter – clean it so it seals properly when reinstalled.
  3. Look inside the filter cavity.
    • At the very back you’ll see a small four-bladed propeller (a little cross). This is part of the drain pump.
    • Shine a torch in if you need to.

What to Look For

Items in the filter are less likely to be the issue than items found remaining in the filter housing. Common items you’ll find:

  • Hair ties – very common, and often wrap around the propellor shaft behind the little propeller at the back.
  • Band Aids – Occassionally a bandaid in the wrong spot will cause issues.
  • Hairpins – are a best case scenario, easy to remove.
  • Aglets – the tips of drawstrings, especially metal ones, often wedge deep in the pump and most times you won’t even be able to see it. Usually accompanied by a very broken noise when the washing machine is attempting to drain.
  • Coins and nails – they turn up often but rarely cause a blockage unless in extreme volumes. If you pull more than $10 out of the machine, that’s the blockage.

Step 4 - Run a Test Cycle

Once everything’s drained and the filter’s been checked:

  1. Line up the two locator tabs at the top and bottom of the filter with the slots at the top and bottom of the housing and push the filter in.
  2. Screw the filter back in applying firm pressure and turing clockwise. The filter will stop turning when the line on its front is vertical. At that point a stop prevents overtightening.
  3. If you find that once you’ve started screwing the filter in, it  becomes very hard to keep turning before it reaches the vertical stop, the rubber seal may be pinching. Sometimes adjusting the seal is enough, but in some cases it may need replacement. Removing the filter and inspecting the seal it will appear wonky, and possibly even torn.
  4. Run a Quick 30 cycle (or Quick 15 on WashSmart models) with no clothes inside.
  5. If that completes without an error, run an Everyday cycle with Rinse Plus and Wash Plus – again, with no clothes.
  6. If both complete fine, it was likely just a blockage and you can return to normal use.
  7. If Error 37 appears again, it’s 100% a service call situation. Email [email protected] from the email address associated with your subscription to open a support ticket.
Posted on Leave a comment

Fridge Troubleshooting Guide

This guide is specifically created for Whybuy customers subscribed to our fridges. It includes some simple steps you can try to troubleshoot and possibly fix the issue without waiting for a service call.

1. Fridge & Freezer Not Cooling at All

If neither your fridge nor freezer is cold:

  • Make sure the fridge is plugged in.
  • If the light turns on when you open the fridge door it’s getting power.
  • Open a support ticket – [email protected]

2. Fridge Not Cooling, Freezer Is Fine

Check that the Door Hasn’t Been Left Open in the Past few Weeks

If the door has been open for an extended period (say 30 minutes or more continuously), too much humid external air may have entered the fridge and caused an ice build up in the ducting. Often this is caused by the fridge or freezer being overloaded and the door can’t close properly. It looks shut, and its shut enough that the door alarm thinks its closed – but its actually ajar by just the tiniest bit. The ice buildup this causes can block airflow, causing the fridge section to stop cooling effectively. Additionally, a fridge that has been running for a few years without a manual defrost may also have some ice buildup in the ducts in positions where it cannot be melted away through the defrost cycle.

Manual Defrost

Unfortunately the only way out of this is with a manual defrost. Empty the fridge and freezer. Turn the fridge off for at least 24 hours Put a towel near the back of the fridge and at the front of the fridge under the door to absorb any melt water. Turn the fridge back on. Usually your problem will be resolved, but requires a visit from one of our techs to check that the issue wasn;t caused by a defrost heater circuit failure, as if it is, then the issue will recur within weeks. Always open a ticket by emailing [email protected]

3. Noisy Fridge

If your fridge is making unusual noises:

  • Fridge beeps when the door has been left open for a minute or so: Normal function, this is the door alarm.
  • Fridge beeps when you open the door: When you open the door count the beeps. This will give you a fault code. See below.
  • Fridge beeps all the time and the fridge light is out: There is a fault with the door open alarm. Requires a service call.
  • Check the shelves: empty glass shelves can rattle—placing something on them usually stops the noise.
  • If the noise continues, it’s likely a mechanical issue that requires a Whybuy service technician. Open a ticket by emailing [email protected]

4. Fisher Paykel Fault codes

One of the neat things about Fisher Paykel fridges is that they will beep at you to tell you what is wrong. Don’t confuse a fault code alarm with a door open alarm. The door open alarm will keep going ad infinitum until you close the door, and when working properly, doesnt start alarming until the door has been left open for a minute or so. If its a fault code, the alarm goes off as soon as the door is opened. Fault codes are also accompanied by a flashing temperature controller (which will display the fault code in binary) and will stop after so many beeps. The most common codes by far are: 

  • F2 (2 beeps)       Defrost Issue
  • F15 (15 beeps)   Refrigerator Fan Issue
  • F16 (16 beeps)   Refrigerator Fan Issue
  • F17 (17 beeps)   Freezer Fan Issue
  • F18 (18 beeps)   Freezer Fan Issue

If you hear beeping immediately after opening the door, hold the door open and count the beeps, when you open a support ticket ny emailing [email protected], please tell us the number of beeps.

5. Contact Support

If you prefer to have a professional handle it – and you’re a customer – open a support ticket by emailing us at [email protected] and we’ll arrange a service call for you. Service is provided at no cost to you.

Posted on Leave a comment

What to Do If Your Washing Machine is Flooding

This guide is specifically created for Whybuy customers. If your washing machine is flooding, act immediately. Water damage can be serious. This article provides contact names and numbers and will help you stop the water and reduce damage.

What’s the Difference Between a Leak and a Flood?

First, it’s important to know the difference:

  • Leak: Small amounts of water escaping, usually around the door, hoses, or seals. Will potentially cause damage over time if unaddressed. If it’s a leak, see our Washing Machine Leak Guide. If it’s a flood, follow this article.
  • Flood: Large amounts of water spilling out, likely causing immediate damage to floors or nearby items.

1. Emergency Contacts – Call First

Whybuy Technician Direct Numbers

Time is critical. If you can’t stop the water by following our steps below immediately or need help.

First call our Whybuy technicians. If they do not answer their phones send an SMS.

  • Jeremy – 0434 351 198
  • Andrew – 0481 341 659

Authorised Contractor Direct Numbers

If you cannot contact our technicians try our authorised contractors. They can assist but will want to invoice for their time. Whybuy will pay their invoice. If they do not answer their phones send an SMS. 

  • Michael – 0423 771 507
  • Oscar – 0419 518 989
If they do not answer or are unavailable please call
 
  • RACV Emergency Home Assist – 13 46 63.

We will pay RACV Home Assist or reimburse you for the invoice. 

2. Turn Off the Washing Machine and Power

  • Stop the washing machine at the controls if possible.
  • Switch off at the powerpoint to cut power completely.
  • Switch off all powerpoints in the area and remove electronics and other valuables from the area immediately.
  • Switching off the power may stop water flow in some cases and keeps everyone safe from electrical hazards.

3. Turn Off the Water

Stopping the water is the most important step. DO NOT WAIT FOR ASSISTANCE. Most times you can have the water off well before anyone arrives to help you.

  • Turn off the taps to your washing machine. No water means no overflow.
  • If you can’t access the taps, locate your mains water supply tap.
  • Apartments – usually inside a utility cupboard. If there are several taps to several apartments – and you can’t determine which is yours – turn them all off. Once they’re all off you can start turning them back on, one by one in a process of elimination.
  • Houses – Usually in the front yard, close to the road, with a garden tap nearby.
  • Shut off the mains tap by turning it clockwise to stop water to the whole home if needed. Often it will be very stiff from lack of use.

If you can’t find or turn off the water, contact your property manager, landlord, or anyone who should know where the mains water tap is.

4. Control the Flood

Guide water to a drain if possible. Most bathroom and laundry drains do not slope correctly, so water might pool or escape the area entirely. If you have a drain, a towel can form a dam to encourage water to go down the drain.

Posted on Leave a comment

What to Do If Your Fisher & Paykel Front Loader Washing Machine Is Leaking

This guide is specifically created for Whybuy customers subscribed to Fisher & Paykel front loader washing machines. If your washing machine is leaking or flooding, here are some simple steps you can try to troubleshoot and possibly fix the issue without waiting for a service call.

Watch our step-by-step video that walks you through common causes of Fisher & Paykel frontloader washing machine leaks and floods

Is it a Leak or a Flood?

First, it’s important to know the difference:

  • Leak: Small amounts of water escaping, usually around the door, hoses, or seals. Will potentially cause damage over time if left unaddressed
  • Flood: Large amounts of water spilling out, likely causing immediate and significant damage to floors or nearby items.

If you have a flooding situation that could cause immediate property damage, please refer to our Flooding Washing Machine Guide.

Quick Troubleshooting Checklist

  1. Clean the door seal and glass thoroughly – dirt, hair, or even a small grain of sand caught in the seal can cause leaks.
  2. Dry the floor completely before running a cycle to spot any new leaks.
  3. Run an empty cycle without detergent to check if excess detergent is causing overflow leaks.

If the leak persists, it may be time to book a service call. But first, read on to try some simple fixes.

Washing Machine Leaks Even When Not in Use?

Most of the time if the washer is leaking – even when not in use – means there is a leak at the water inlet hoses or supply taps. Here’s what to do:

  1. Feel around the hose connections on the back of your machine and the taps. If you feel moisture, that’s your leak.
  2. Try turning off the tap for the leaking hose. Hoses are much easier to tighten when there is no water pressure in the hose.
  3. Tighten the hose connection. It shouldn’t need to be crazy tight but you can tighten it as much as you want/can to stop the leak.
  4. If tightening doesn’t stop the leak, the hose or seal may be damaged and will need replacement.

Tip: If it’s the hot water hose (red), turning off the tap is fine because your machine can heat cold water internally. We can still come and replace the hose if requested.

Washing Machine Leaks Only When Running?

This is often caused by detergent issues or door seal problems:

  1. Too much detergent, especially powder, can cause overflow during the fill cycle. To test this, run an empty cycle with no detergent and see if the leak stops.
  2. If the leak stops but then returns without changing detergent use, a faulty cold water valve might be to blame – we’d recommend a service call to fix this.
  3. Check and clean the door seal and glass door, especially at the bottom, for dirt, hair, and scum buildup. A single grain of sand in the wrong spot can cause a leak from the door.

Need More Help?

If you’ve tried these tips and your machine is still leaking, or if you prefer to have a professional handle it – and you’re a customer – open a support ticket by emailing us at [email protected] and we’ll arrange a service call for you. 

Posted on Leave a comment

Clayton – Suburb Profile

Located in Melbourne’s southeastern suburbs, Clayton is a dynamic and diverse community that showcases a rich tapestry of cultural influences shaped by waves of migration. Known for its culinary offerings, the suburb is a melting pot where Asian, Indian, and Greek cultures converge. With its proximity to Monash University, Clayton attracts a significant transient student population, enriching the local lifestyle. From affordable housing and authentic dining options to unique shopping experiences, Clayton offers a blend of urban sprawl and multicultural charm.

Key Takeaways

Pro's to Living in Clayton:

  • Cheap rent (for Melbourne anyway)
  • Easy to get around if you have a car
  • Well price authentic Asian, Indian, and to a lesser extent, Greek restaurants
  • Asian groceries

Cons to Living in Clayton:

  • Perhaps the very definition of urban sprawl
  • Very car centric
  • Heaps of parking though often not enough in peak times

Clayton's History

Clayton has always been a suburb centred around migration, international students, and academia. An amplified version of Melbourne’s broader immigration trends, Clayton is a melting pot of cultures shaped by successive waves of migration. Initially, Clayton was a hub for the Greek community in the mid 20th century, attracting many Greek migrants seeking economic opportunities and a fresh start after WWII. This early influx laid the foundation for a vibrant community that thrived in the affordable housing and job opportunities available in the area.

with the arrival of Asian migrants in the 1970’s, particularly from Chinese and Southeast Asian backgrounds, Clayton experienced a transformation. This demographic shift reshaped the cultural landscape of the suburb, introducing new customs, languages, and traditions. In more recent years, there has been a noticeable increase in the Indian community, which has further enriched the multicultural tapestry of Clayton and established itself as a vital part of the local demographic.

A key factor in this international diversity is Monash University, which attracts thousands of local and international students each year. The presence of the university creates a transient yet vibrant multicultural environment. While some Australian students choose to live locally, many reside on campus or commute from their home towns daily by train or car. This influx of students contributes to a dynamic community where long-standing cultures coexist with newer migrant groups, fostering an atmosphere of cultural exchange.

The blend of established communities, such as the Greeks and Asians, with newer arrivals and students makes Clayton one of the most diverse and dynamic suburbs in Melbourne today. This ongoing evolution reflects the suburb’s ability to adapt and thrive amidst the changing landscape of immigration and cultural integration.

Getting to Clayton

While Clayton does have a train station quite centrally located to Clayton Road shops, Clayton is a car dominated suburb, with cars first and public transport as an afterthought. f you need to get to Monash University you’ll need to transfer from a train to a bus at either Huntingdale or Clayton station. While neither trains nor buses run on time in Melbourne, during peak times trains and buses run every 10 minutes. As long as you go when it’s busy you won’t have any issues.

As of late 2024 there are also significant public works being carried out at Clayton train station to add a new train line that will run around the city of Melbourne, which is expected to be completed around 2050. Not a typo.

Defining Clayton

Clayton Road Shops

Clayton Road, while gritty, is renowned for its vibrant Asian shopping scene, featuring a wide array of supermarkets, restaurants, and specialty shops. The diversity of Asian cuisines represented is impressive, with offerings from Chinese, Vietnamese, Thai, and Malaysian cultures. Local residents enjoy everything from fresh seafood and vegetables to authentic dumplings and pho, creating a bustling atmosphere that reflects the community’s rich cultural heritage.

Following the Asian shops, there is a significant presence of Indian businesses in Clayton. These shops provide an assortment of spices, herbs, and ready-made meals, catering to both traditional recipes and contemporary tastes. The Indian restaurants in the area are popular for their flavorful curries, biryanis, and snacks, making it a go-to destination for those seeking a taste of India in Melbourne.

The Greek community, though smaller compared to the Asian and Indian influences, is still represented along Clayton Road. Greek shops offer authentic ingredients, deli items, and pastries, preserving the cultural legacy of the Greek migrants who settled in the area 70 years ago. 

Overall, Clayton Road serves as a vibrant hub for diverse culinary experiences, reflecting the multicultural identity of the suburb.

Two Coles Supermarkets

Proving definitively that two isn’t always better than one is the presence of two Coles supermarkets directly facing each other across a large car park just behind the Clayton Road Shops. The ongoing nature of this curious setup likely stems from strategic competition; the second store was originally a Bilo, a supermarket chain which was bought out by Coles a few decades ago. Unfortunately the whole exercise has proved why competition is important with both supermarkets lacking in many items and all checkouts being self service. For a more pleasant shopping experience, venture to Woolworths M-City or Oakleigh shopping centre which has both a Coles and a Woolworths and – surprise, suprise – far better service and selection.

The Longest Pedestrian Crossing in the Southern Hemisphere

Dandenong Road and North road intersection focusing on pededstrian crossing over Dandeong road on North side

Clayton has earned the perhaps dubious distinction of having one of the longest pedestrian crossings in the Southern Hemisphere. The crossing stretches across the busy intersection of North Road and Princes Highway at an angle, contributing to its impressive length. See that bus way off in the distance? Once you’ve reached it, you’re nearly over! While the crossing length might be impressive, crossing over is unpleasant at the best of times.

M-City

M-City is a modern shopping centre with an apartment building and hotel built on top. The apartment and hotel are typically home to more affluent students and visiting parents. Living in M-City is almost like living in a gated community. Everything an apartment dweller could need is basically downstairs in the shoppping centre, so there’s no reason really to step outside into Clayton except to make your way to classes.

Ikea

Technically located in Springvale, IKEA is much closer to Clayton and conveniently situated near M-City. The iconic Swedish retailer is a big deal for many, offering affordable furniture and home goods that appeal to students and families alike. Its proximity makes it a go to destination for those seeking stylish yet budget friendly options for their living spaces.

Monash University Clayton Campus

Monash University doesn’t really belong at the end of this list, but you already know about its importance to the suburb. As a prestigious academic institution, it plays a significant role in shaping the local community, bringing in a diverse student body and fostering educational opportunities. A well known landmark, its impact on Clayton is profound, contributing to the area’s multicultural vibrancy and economic development.


Posted on Leave a comment

The Best Clothes Dryers in Australia

Choosing the right clothes dryer can significantly impact your laundry experience, especially when it comes to energy efficiency, budget, and environmental considerations. In Australia, the options range from reliable vented dryers to innovative heat pump models. Whether you opt for a reliable vented dryer, a second-hand model, or a heat pump dryer, there are options available to suit all budgets. Budget friendly vented dryers offer simplicity and ease of repair, heat pump dryers stand out for their energy efficiency and cost savings over time – and can even be had quite cheaply.

This article is not sponsored or affiliated with any brands; these are our honest views based on years of experience maintaining our own fleet of dryers.

Table of Contents

Best New Budget Dryer for Ventilated Spaces - Vented Timer Dryers

When it comes to budget-friendly options for ventilated spaces, the Electrolux family of timer dryers are the only choice as long as you can open a window or have a good exhaust fan. These dryers include the Simpson SDV401 and Westinghouse WDV457H3WB. Both models are renowned for their simple construction, basic mechanics, and ease of repair, making them perfect for everyday laundry needs without breaking the bank. They are the very definition of cheap and cheerful. Don’t limit yourself to only buying the two above named models, model numbers come and go all the time. The key to spotting this dryer is the distinctive grille vent on the bottom left side, with the timer on the top right.

Best Second Hand Dryer for Ventilated Spaces - Vented Sensor Dryers

If you’re on the hunt for the best clothes dryers in the second-hand market, you want the Electrolux, and Westinghouse vented sensor dryers. These are the best dryers if you’ve got a well ventilated laundry, and you don’t mind buying second hand. Electrolux have been making this dryer for nearly 30 years, with many superficial tweaks but always with the same basic design. So again as above, don’t deal in model numbers, look for the distinctive grille on the bottom left side – it’s the reliable indicator that you’re dealing with the best dryer in Australia for reliability and serviceability. Just remember that if it has that grille, you’re getting a reliable dryer that’s been around in some form or another for decades.

The current showroom models as a the time of writing include the 7kg capacity Electrolux EDV705H3WB and the Westinghouse WDV556N3WB among other variants. These dryers share the exact same basic design as the timed dryers above, only instead of a timer, they have a humidity sensor and a smart little computer to work out when the clothes are dry. This feature can save you a heap of money because the dryer stops when your clothes are dry, not at whatever time you set. But – buying these dryers new doesn’t make any sense at showroom prices, because you’re better off buying a budget heat pump as outlined in the section below.

For the second-hand buyer these sensor dryers can be great value. Second-hand shoppers don’t really value the sensor dry function compared to the timer dryer models. While the sensor dryer versions may cost hundreds of dollars more than the timer dryer versions to buy brand new, expect to pay the same or only slightly more for the sensor dryer version on the second-hand market! Used prices are generally $50 – $150 in Summer and $120 – $300 in Winter – and that’s pretty much the rule for any vented dryer.

Best Dryer on a Budget for Any Space - Budget Heatpump Dryers

For those in search of a solution that will work in any situation – minimising room heating and humidity issues – a heat pump dryer is the best solution. It’s advisable to steer clear of condenser dryers entirely. While condenser dryers may be appealing with their premium look and feel compared to a vented dryer – and at a cheaper price point than most heat pump dryers – they are much more complex than a vented dryer and significantly more prone to failure, with their only benefit being humidity control. 

While heat pump dryers are slightly more complex than condenser dryers, and even more prone to failure, they are 200-300% more efficient than vented or condenser dryers, reducing power use by half or even a third to dry the same load of clothes. And because they use dry air rather than hot air to remove the moisture from clothes, they’re much gentler on your clothes extending the life of your wardrobe. They’re also less of a fire hazard as they don’t need heating elements. This justifies the added complexity of a heat pump dryer.

If you’re considering buying a name brand dryer vented or condenser dryer for less than $1000, instead consider a budget brand heat pump dryer. These 8kg capacity dryers can often be found for around $600 when on special, offering unbeatable value without compromising on performance when compared to their name brand counterparts. Heat pump dryer models from brands like Akai, Solt, Kogan, Esatto, Stirling, and Teka all fall into this category. These models will save you a small fortune over time. We recommend to never buy these dryers second-hand, or from someone claiming to be selling them as a factory second. Their complexity and lack of parts availability mean it’s important to have a manufacturer’s warranty. This is especially so as you won’t save much by purchasing these models used, they’re typically sold around $350 – $400 on the second hand market.

The significant drawback of most budget heat pump dryers is the lack of parts availability. Simple components, such as lint filters and other repair parts, are usually impossible to source. If anything goes wrong with these dryers during the warranty period, the retailer typically opts to issue a refund as they have no parts to provide. When these dryers encounter issues, it is typically more practical to replace the entire unit rather than attempt repairs. While the significant energy savings they provide can justify the initial investment, potential buyers should consider the long-term implications of limited serviceability and parts availability, and to consider whether they are comfortable contributing to a throwaway culture. Worse still these dryers use r134a refrigerant, which, unless recovered before scrapping – which very rarely occurs – contributes significantly to global warming when illegally released to atmosphere. R134a has a high global warming potential of 1430kg of carbon dioxide equivalent emissions for every kilogram released to atmosphere, with these models typically having around 150 grams. Usually we would tout any heat pump dryers as green heroes, but given the likely emission of r134a at the end of their relatively short service life, and their general throwaway nature we couldn’t recommend these dryers as ethical or environmental choices. For peace of mind, you’ll need to spend more money.

Best Dryer in Australia for the Ethical and Environmentally Minded

For those who prioritise environmental impact and sustainability, selecting the right clothes dryer goes beyond just energy efficiency. The choice of refrigerant, long-term durability, and ethical manufacturing practices are all key factors that should be considered.

The LG DVH5-08W Heat Pump Dryer

LG DVH5-08W heat pump dryer

The LG DVH5-08W is the standout choice for the environmentally conscious, and with a recommended retail price of $1,299 it’s good value. With a good Shop Ethical rating and high energy efficiency, it utilizes R290 (propane) as its refrigerant, which has a low global warming potential, making it the most sustainable choice.

The Miele TWF 720 WP

Miele TWF 720 WP Heat pump dryer

Although eye wateringly expensive with a recommended retail price of $2,999 , the Miele TWF 720 WP offers the best Shop Ethical rating of any dryer brand in Australia, and is the best choice if ethical manufacturing is your concern. Unfortunately it uses R134a refrigerant, which means it’s possibly not as environmentally friendly as the LG. 

Posted on Leave a comment

Don’t Choose A Stainless Steel Fridge: Why White is a Better Choice

Stainless Steel Appliances in a White Kitchen

When chosing a fridge for your kitchen, the finish can greatly influence both style and aesthetic, but  stainless steel is not the practical option that it seems, especially when compared to a white finish. 

Stainless Steel Appliances in a White Kitchen

Stainless Steel is Easily Damaged

Most domestic stainless steel refrigerators are constructed from 304 grade stainless steel, which is not as resilient as the higher quality 316 grade stainless steel that most consumers assume they are made of, the same stainess steel a kitchen sink or commercial kitchen bench is made of. Unlike 316 stainless steel, which is nearly rust-proof and requires no extra protection, domestic stainless steel fridges are typically coated with a clear finish. A stainless steel fridge is actually a painted fridge. This clear paint coating enhances the appearance of the stainless steel and provides defense against rust and stains. This clear coat can easily be damaged by abrasive cleaners or rough scrubbing pads, resulting in visible scratches that detract from the fridge’s polished look.

In contrast, white refrigerators often have a solid, painted surface that is less susceptible to damage from everyday use. Even if they do get scratched, the marks are generally less noticeable compared to those on stainless steel, making white a more forgiving option for busy households.

There's No Fixing Stainless Steel

Once a stainless steel fridge gets a dent or develops a rust spot, the damage is effectively permanent. You can try removing it using our guide here, but there’s a very limited prospect of success. The scratches and rust can become worse over time and are difficult to repair without causing additional marks. This makes the longevity of stainless steel appliances questionable, especially in high-traffic kitchens.

A white fridge on the other hand, can easily be touched up by someone with the right skills. Even dents can be filled and blended, restoring the fridge’s appearance without needing to replace the entire unit.

Dirt and Stains

Perhaps the worst drawback of stainless steel appliances is their tendency to show dirt, fingerprints, and smudges. While they may look modern and sleek, the shiny surface makes any blemishes highly visible. This constant need for upkeep can be frustrating, especially in a busy kitchen environment. If you’ve already got a stainless steel fridge you might be interested in how to keep it clean without damaging it using our guide.

White fridges do not suffer from this problem. A white finish hides minor dirt and stains better, allowing for a cleaner appearance with less frequent cleaning. I’ve yet to see a finger print or a smudge on a white fridge. 

Posted on

The Best Washing Machines in Australia: Why Fisher & Paykel Reigns Supreme

A Fisher Paykel WH9060 front loader washing machine with its door closed from front on

When it comes to washing machines, Fisher & Paykel consistently stands out as one of the top choices in Australia, both for consumers and appliance rental companies. While they tend to be more expensive than some budget models, their long-term reliability, ease of repair, and user-friendly features make them a worthy investment. In this guide, we’ll break down the best washing machines for various needs and explain why Fisher & Paykel sell the best washing machines in Australia.

A Fisher Paykel WH9060 front loader washing machine with its door closed from front on

Table of Contents

Why We Concluded Fisher & Paykel Make the Best Washing Machines in Australia

As an appliance subscription business, we have a few key reasons for our love affair with Fisher & Paykel washing machines. Fisher & Paykel is known for making incremental design changes rather than radical overhauls. This means that parts are highly compatible and interchangeable, so that whether you have a 5-year-old or a brand-new model, many parts can be swapped out with minimal hassle. This not only makes repairs quicker but also reduces costs in the long term. For us we know we don’t need to worry about parts being discontinued because the same appliance will likely still be being sold new in 5 years time, we know we can also fall back on stripping our own machines for parts if we need to.

Another big plus? These machines can largely be disassembled with nothing more than a Phillips head screwdriver. Unlike some brands, such as Miele, which require special tools and knowledge of secret hidden screws that only their own technicians know where to find, Fisher & Paykel is an open book. Almost any technician – or even a handy homeowner – can dive in and repair these machines with ease

Why You’ll Conclude Fisher & Paykel Make the Best Washing Machines in Australia

For the average consumer, Fisher & Paykel stands out for its:

Incremental Design Changes

As discussed above – Fisher & Paykel only make incremental changes to their new models, making it extremely unlikely you’ll get a model that’s got a design flaw – a lemon. If there was anything that was a reason to buy a Fisher & Paykel appliance, this is it. Other brands – Samsung and LG in particular come to mind – have the urge to radically overhaul their appliances every few years making it more likely you’ll get a model that’s a lemon. Neither will your washing machine go out of style in just a few years, allowing you to enjoy its functionality without feeling the need to replace it frequently. This commitment to gradual improvements means the latest Fisher & Paykel washing machine represents decades of lessons learned, rather than an attempt to capitalise on the current trend.

Water and Energy Efficiency

All front loaders come with excellent water-saving features and all washing machines have excellent energy ratings, helping to keep running costs down.

User Friendly Options

Settings like pre-wash, rinse plus, and delicate modes make these machines versatile for different laundry needs. I love throwing my dirty work pants in on a cycle with pre wash and rinse plus, knowing they will come out clean. I also love the allergy settings on some machines which makes sure that all of the detergent residue is washed off my clothes so I’m not having sneezing fits all day!

Repairability

Fisher & Paykel machines are known for their accessible design, meaning technicians across Australia are familiar with them, and parts are easy to source. Repairs are more straightforward and affordable compared to other brands, like Miele, which require specialised technicians.

Why We Don't Like Fisher & Paykel Washing Machines

While Fisher & Paykel is a brand we love and trust, they’re not without their flaws. One of the more frustrating aspects we’ve noticed, as specialists who work extensively with their products, is their somewhat dubious marketing around machine capacity.

For example; what was once sold as a 7.5kg front loader washer is now marketed as an 8kg model, the old 8kg front loader has been rebranded as a 9kg model, and even the 7kg top loader is labelled as an 8.5kg with a bigger price tag and sold concurrently and side by side on the showroom floor. This raises an eyebrow because, physically, these machines seem to us to be exactly the same – no changes to the drum size, motor, or overall design. The only difference? The sticker on the front and, unsurprisingly, often a higher price tag.

This phenomenon is likely prevalent throughout the industry – brands constantly jostle to appear more competitive by inflating specifications. But because Fisher & Paykel sticks to incremental design changes, it becomes glaringly obvious with them. It’s hard not to feel like they’re taking advantage of customers, and it does make you wonder: if they’re willing to stretch the truth about capacity, what else might they be less than transparent about? While this issue doesn’t detract from the overall reliability and functionality of Fisher & Paykel machines, it’s something to keep in mind when comparing models. You might be paying a premium for a capacity upgrade that doesn’t actually exist.

Another related issue is the distinction between the Quicksmart and Washsmart front loader washing machines. The Quicksmart is the base model, while the Washsmart is the optioned out upgraded version. Despite the Washsmarts many additional buttons which can come in handy, the big difference between the two is that the Quicksmart spins at 1100 RPM, whereas the Washsmart spins at 1400 RPM.

Physically, these machines are identical, with the only notable difference being that the Washsmart features a slightly thicker drum shaft to accommodate the higher spin speed, along with a different display. The additional cost for the thicker drum shaft is likely minimal – around $20 in materials, with the changed display cost being nothing. It’s perplexing that Fisher & Paykel doesn’t simply sell the Washsmart at a lower price and eliminate the Quicksmart altogether, or at the very least offer the additional cycles the Washsmart has on the Quicksmart – it would literally cost nothing. The likely reason for this decision lies in marketing strategies aimed at maximising profitability.

This approach leaves a sour taste in the mouth, reminiscent of BMW charging customers for subscriptions to heated seats that are installed in every car. Fisher & Paykel’s strategy feels somewhat sneaky. For me they’re undermining their reputation for quality and honesty, and putting short term profits ahead of long term profits, but alas, I am not on the board of directors at FIsher & Paykel. Not yet, anyway.

The Best Washing Machines in Australia: A Practical Guide for Every Situation

Choosing the right washing machine for your living situation is essential. Whether you’re someone on a budget, or who moves frequently, lives in a small apartment, or needs a washing machine for tricky floors, finding the best model can make your life easier. Let’s break down the top washing machines for different living situations and provide our expert comparisons to help you decide.

The Best Washing Machine for Frequent Movers or Small Apartments

When you’re frequently relocating, portability, and universal fit become critical. You need a machine that can handle multiple moves without breaking down and fits into standard washing spaces. 

Front Loader: Fisher & Paykel WH8060J or WH8060P Series

These 8kg front loaders are ideal for frequent movers because they are compact, fit under most benches, and perform well in tight spaces. They are easy to manoeuvre and won’t overwhelm small spaces, making them great for renters.

Key Features:

  • Compact design: Fits into standard washing machine slots and under-counter areas. Can stack a dryer on top if required.
  • Water and energy efficiency: These front loaders are incredibly efficient, saving you money on utility bills, which is particularly useful for renters who might be watching their expenses closely.
  • Special care required after moving: All front loader washing machines should have their drain pump filter removed before being relocated. Failure to do so often results in the washing machine flooding on its first cycle following relocation.

Top Loader: Fisher & Paykel MW513

The 5.5kg MW513 is a narrow and reliable top loader that fits easily into difficult spaces. It is almost certainly the most reliable washing machine on the Australian market. While it doesn’t fit under benches like a front loader, and you can’t stack a dryer on it, its taller, narrow design is perfect for squeezing into tight laundry areas. If you want to learn more about the differences between a front loader washing machine and a top loader, check out our guide to help you choose the right one for you.

Key Features:

  • Durability: Extremely reliable with minimal risk of breakdown, making it perfect for renters who need to move often.
  • Ease of moving: The MW513 doesn’t require much special care when relocating – just keep it generally upright, and it’s good to go.
  • Poor water efficiency: Although reliable, the MW513 is not the most water-efficient machine.

The Best Washing Machine for Bad Floors

If you’re dealing with uneven floors—whether timber stumps, cracked concrete, or floors prone to noise and vibrations—front loaders often struggle due to their higher spin speeds. Fisher & Paykel’s top loader models with self-adjusting feet are the perfect solution, providing stability and reducing vibrations on uneven surfaces.

Top Loader Fisher & Paykel WA7060G Series With Self-Adjusting Feet

The Fisher & Paykel WA7060 series (7kg Top Loader) is an excellent choice, featuring self-adjusting feet that ensure stability on uneven flooring.

Key Features:

  • Self-Adjusting Feet: This feature allows the machine to automatically adjust to uneven surfaces, significantly reducing vibrations and noise during the spin cycle.
  • Quieter Operation: With its enhanced stability, this top loader operates more quietly, making it suitable for households where noise is a concern, particularly in apartments with downstairs neighbors.
  • Compact Size: Although the WA8560G1 fits into standard 600mm washing machine spaces, it’s important to note that it is taller than many front loaders, which may limit installation options in tighter spaces. Additionally, you cannot stack a dryer on top of it, so keep that in mind when planning your laundry setup.
  • Value: This model is physically the same washer as the 8kg and 8.5kg models, so you’re almost certainly getting the same performance without paying extra for “additional capacity”. 

The Best Washing Machine for Those on a Budget

If you’re in the market for a budget friendly washing machine, two standout Fisher & Paykel options provide excellent value for money. Whether you’re opting for a new or used model, Fisher & Paykel machines are renowned for their reliability.

Fisher & Paykel MW513 (5.5kg Top Loader)

The MW513 is the most reliable budget washing machines on the Australian market. This no-frills top loader is compact, durable, and gets the job done without a lot of fancy features. It’s perfect for those who need a simple, straightforward machine at an affordable price.

Key Features:

  • Affordability: New or second-hand, the MW513 can typically be found for around $100 when bought used, making it an excellent choice for those with limited budgets.
  • Durability: Known for its long-term reliability, this machine is a workhorse that rarely breaks down, even after years of use.
  • Poor water efficiency: Although reliable, the MW513 will cost you more to run due to itrs poor water effciency when comapred with a front loader.
  •  

Fisher & Paykel WH8060J QuickSmart series

If you’re on a budget but still want the water and energy efficiency of a front loader, the Fisher & Paykel WH8060J Quicksmart is a fantastic option – especially if you buy second-hand where you can expect to pay around $350-$450.

Key Features:

  • Energy Efficiency: Front loaders like the WH8060 series are highly water and energy-efficient, helping you save on utility bills over time.
  • Affordability: These models can often be found new for $700 and second-hand for around $400, making them an excellent investment for budget-conscious buyers. When buying used, a hot tip is to look out for the top of the line WH8060P series which has a faster spin speed and usually sells for the same price as the WH8060J series.
  • Compact Design: Fits easily into most standard laundry spaces, making it ideal for small homes or apartments.

The Best Washing Machine for Infrequent Movers

For those who stay in one place long-term, a larger washing machine with premium features is a smart investment. In this case, bigger is better, but you also need reliability and efficiency.

Fisher & Paykel 9kg, 10kg, 11kg and 12kg Front and Top Loaders

If you’re settled into your home, investing in a larger capacity machine like the 9kg or 12kg front loader or 10kg top loader from Fisher & Paykel will make laundry day easier, especially for large families. These machines are designed to handle bigger loads, reducing the frequency of washing, and allowing for bulkier items like duvets and pet beds.

Key Considerations:

  • 7kg+ Top Loader: While the larger top loaders are excellent for big loads, they aren’t as reliable as the smaller MW513 due to suspension that can fail over time, especially with extended or heavy duty use. This is something to keep in mind if long-term reliability is your priority.
  • Resale Value: Top loaders, especially the larger models, tend to lose more value when they leave the showroom floor compared to front loaders. If you’re considering buying new and selling your machine second-hand down the road, this is an important consideration.
  • Size Limitations: Once you get past a certain size, larger washers may not fit into standard 600mm wide spaces, or end up sticking out from their holes, which can limit your installation options.
Posted on Leave a comment

How to Clean a Stainless Steel Fridge

A rust spot on a stainless steel fridge door

Keeping a stainless steel fridge clean and pristine can be a challenge. To clean stainless steel appliances you need the right approach to maintain their sleek, polished appearance without causing damage. While it’s tempting to use harsh cleaners or abrasive tools on tough stains, doing so can scratch the clear protective coating on most fridges, leaving highly visible marks that are impossible to remove. The key to keeping a stainless steel fridge looking its best is regular maintenance with gentle, non-abrasive cleaners. If you’re after a guide more focussed on cleaning your fridge check out our post here.

A rust spot on a stainless steel fridge door

What Not to Clean Stainless Steel Appliances With

To keep your stainless steel fridge clean or to clean stainless steel appliances generally, it’s essential to avoid certain products and methods that can cause lasting damage. It’s important to know that while some stainless steel surfaces—like sinks—are made from 316 grade stainless steel, which is more resistant to rust, while most household appliances, including fridges, are made from 304 grade stainless steel which is cheaper, but much more susceptible to rust. To protect the 304 grade stainless steel appliance manufacturers protect it with a clear coat of paint. This clear coat gives the appliance its shiny polished look and shields the stainless steel from the outside world, but it is easily damaged if cleaned improperly. Importantly too, if you scratch through the clear coat, you might expose the steel underneath, and this can also lead to rust spots developing over time. When using these abrasive cleaners, one of the big traps people fall into is that the scratches are not immediately visible when the surface is wet, it’s only when the surface dries that the scratches become obvious and evident.

Never Use Harsh Stainless Steel Cleaners

Some sources suggest using abrasive cleaners like Barkeepers Friend or Jif to keep a stainless steel fridge clean but this is very poor advice. Many use these abrasive cleaners because they’re labelled as stainless steel cleaners and work well on sinks or benchtops, only to find out too late they’ve ruined their stainless steel finish. These products will almost always damage the clear coat on your stainless steel fridge. Using abrasive cleaners will scratch the clear coat, and these scratches are awfully visible. Once the surface is scratched, it will be dull patchy, and look scratched. These scratches cannot be fixed short of replacing the fridge door.

Never Use Rough Sponges or Scourers

Lorem ipsum dolor sit amet, consectetur adipiscing elit. Ut elit tellus, luctus nec ullamcorper mattis, pulvinar dapibus leo.

Never Use Baking Soda

Baking soda is far too abrasive to use cleaning stainless steel and will scratch it.

Don't Even Use your Finger Nails

The clear coat on stainless steel fridges is so fragile that scratching the surface to remove sticky residue is enough to scratch it.

Frequent Maintenance Is Key

The best way to clean stainless steel appliances and avoid the need for harsh cleaners is to clean them frequently. This prevents stains and marks from setting in and becoming stubborn. If you let stains sit for too long, they may become impossible to remove without harsher cleaners or scrubbing pads.

What to Clean Stainless Steel Appliances With

Before diving into the cleaning process, it’s important to know what to clean stainless steel with. The best products for stainless steel are non-abrasive and free from harsh chemicals. Stick to gentle cleaners like:

  • Warm water mixed with a small amount of dish soap
  • White vinegar
  • Olive Oil
  • Baby Oil
  • Club Soda
  • Commercial cleaners designed specifically for appliance stainless steel

You’ll also need microfiber cloths or soft towels to prevent scratches.

How to Clean a Stainless Steel Fridge

Now that you have your supplies ready, it’s time to clean your stainless steel fridge. Follow these steps to ensure a spotless, shiny surface.

  1. Wipe Away Dust and Debris: Start by gently wiping down the surface with a dry microfiber cloth to remove any loose dust or dirt. This prevents scratches when you start scrubbing.
  2. Create a Cleaning Solution: For regular cleaning, mix warm water with a drop of dish soap in a spray bottle.
  3. Wipe with the Grain: Stainless steel has a grain—tiny lines that run across the surface. Always clean along these lines so that if you do scratch the surface it runs with the grain and will be much less visible. Spray your cleaning solution onto the fridge and use a microfiber cloth to wipe down the surface in the direction of the grain.
  4. Rinse and Dry: After wiping down the surface with your cleaning solution, use a damp cloth to remove any soap or vinegar residue. Follow this with a dry microfiber cloth to avoid streaks and watermarks.
  5. Avoid Watermarks: Always dry the surface immediately after cleaning to prevent watermarks and streaks.

How to Remove Stains from Stainless Steel

If your fridge has stains, you may need to put in a little extra effort. Here’s how to remove stains from stainless steel:
If your stainless steel fridge has stubborn marks or stains, tackling them can be tricky without causing damage. Here’s how to approach stain removal on stainless steel, keeping in mind the delicate clear coat most stainless steel appliances have.

Workshop Degreaser for General Stains

Commonly found in automotive stores like Repco or Supercheap, workshop degreaser is effective for many marks and is gentle enough to use on your stainless steel fridge. Apply a small amount to the stain, let it sit for a few minutes, and wipe it away with a soft cloth, making sure to follow the grain of the steel.

Eucalyptus Oil

Eucalyptus oil can work well for some stains, but be cautious as it can be aggressive enough to soften the clear coat if left on too long. Use sparingly, applying with a soft cloth and wiping it off promptly. It will also “melt” some plastics, and leave very visible permanent marks on clear plastics, so be sure to avoid plastic trims.

Acetone for Stubborn Stains

For tougher stains, acetone or nail polish remover can be effective, but use it sparingly. Acetone is quite aggressive and may leave a mark on the clear coat, so it really is a last resort. It will also “melt” most plastics and leave the same visible permanent marks on clear plastic parts that eucalyptus oil will, so be very sure to keep it away from plastic parts. Apply a small amount with a cloth or cotton bud in only the area of the mark, and wipe off quickly to minimise any potential damage.

Phosphoric Acid for Rust Stains

Clear coat damage with rust formation on top of a stainless steel fridge door

Phosphoric acid, available at most hardware stores often sold as concrete cleaner, can help reduce the visibility of rust stains. However, it’s important to note that it will usually leave a mark, the affected area will likely be a brighter shade and stand out more than the rust stain. If the rust is under the clear coat, phosphoric acid won’t work. In that case, the only way to treat the rust is to scratch off the clear coat and apply the acid directly, but this will almost certainly result in an even more visible mark than the rust itself. In many cases, it’s better to leave the rust spot alone to avoid worsening the appearance of your fridge.

Posted on Leave a comment

Washing Machine Repair – Basic Diagnosis and Repair Cost

Washing machine repair might feel daunting, but with a bit of understanding, many common issues can be identified and even solved by beginners. Issues like resolving drainage problems or addressing filling issues are often resolvable without professional help. However, more advanced problems, such as motor controller malfunctions or worn-out bearings, usually require the skills of a technician. In Australia, a service call typically costs between $150 and $200, with parts and labour adding to the expense.

This guide aims to help you identify some of the most frequent washing machine repair problems. While it provides simple troubleshooting steps, it’s essential to know when it’s time to call a technician—washing machines can be more intricate than they seem. This guide is not exhaustive, it covers around 95% of issues and serves as a practical starting point to help you evaluate the problem, decide if a washing machine repair is worth it, and get a sense of what the costs might be depending on the symptoms.

Are Parts Even Available?

Before scheduling your washing machine for repair with a professional, it’s important to first identify the potential issue using this guide and checking whether replacement parts are available for your washing machine model. If your machine is older or from a budget brand, finding parts might be impossible. You don’t want to spend $150 on a service call, only to discover that parts can’t be sourced.

To locate your washing machine’s model number, check these common spots:

  • Inside the door: Look for a label on the frame or around the door.
  • Back of the machine: Some models have the information plate on the back, typically near the top.
  • User manual: The model number is usually listed in the manual that came with your machine.

Once you have the model number, search online or contact a parts supplier to see if parts are still available. This simple step can save you from unnecessary costs down the line.

Table of Contents

Washing Machine Does Not Drain

One of the most common washing machine repair issues is that the washing machine does not drain. The causes differ between front-loaders and top loaders, so let’s break them down.

Top loader Washing Machine Does Not Drain

For top loaders, pump failure is the most common reason for drainage issues. Since top loaders don’t have filters like front loaders (at least not in Australia), they cannot become blocked. By a process of elimination, the drain pump is usually the culprit. Short of tipping the machine over, or using an external pump, there is no way to remove the water if the pump has failed.

Front Loader Washing Machine Does Not Drain

Sometimes this issue is described as – washing machine won’t drain or spin – but it is the same issue as the washing machine does not drain.  The washing machine won’t spin because the machine has detected it has too much water inside, or too much weight or both. So it won’t spin because it won’t drain. 

When a front loader washing machine does not drain, the problem is almost always a blocked drain pump filter or clogged drain pump. The most common culprits are small items left in pockets, usually coins, hairpins, band-aids, hair ties, nails, and screws. Rarely it can be a blocked drain hose. Here’s what to check.

Check the Door Boot

Push aside the rubber seal (door boot) with your hand and check for any small items near the bottom. Checking the door boot gives you a good idea of whether its more likely to be a failed pump or a blocked filter or obstructed pump. If you find bits and bobs in the door boot, its more likely you have a blocked filter than a failed pump.

Check the Drain Pump Filter

We’ve written a detailed guide about why you shouldn’t usually remove the drain pump filter and how to do it correctly if you must. This is one of those times where removing the filter is necessary. Be mindful that removing the drain pump filter will release all of the water in the machine and can go pear shaped easily and may require a service call if it all goes wrong. Often the drain pump filter will get jammed half out, impossible to screw back in and impossible to remove.

Recovering Clothes from a Front Loader Washing Machine that Does Not Drain

If your washing machine doesn’t drain, the door will likely remain locked due to the water inside. Follow the steps below to retrieve your clothes:

  1. Manually drain the water: Locate the small drain hose or access panel at the bottom of the washer. It’s usually next to the filter. Remove the hose plug and place a shallow tray or towel underneath, and slowly drain the water out.
  2. Open the door: Once most of the water is drained, turn the washing machine on, and try opening the door. If it’s still locked, wait for a few minutes and try again.
  3. Use the Emergency Release: If the door still won’t open you need to use the emergency release mechanism. It’s usually a plastic strap with a loop at its end. Pull down on this strip while pulling on the door, and the door should open. You may need to pull hard and sometimes a second person to pull the door while you pull the loop can help. Your washer may have a different mechanism, refer to the user manual or search online for specific instructions using your washers model number.
  4. Remove the clothes: After opening the door, carefully remove your clothes. They may be wet and heavy, so have a towel ready to manage any extra water.

Blowing Down the Drain Hose

If cleaning the filter doesn’t resolve the issue, the blockage may be deeper in the pump or hoses, which usually requires professional assistance. One unpleasant and unhygienic but often effective technique is to blow forcefully into the end of the drain hose to dislodge the blockage.

Faulty Drain Pump

If you didn’t find any obstruction its likely that you have a faulty drain pump. To check, once you’ve replaced the drain pump filter, try running the washing machine on an empty cycle. It’s a good idea to repeat the process a few times and monitor the machine closely to ensure it doesn’t overflow or flood. If the washer drains properly during these test runs, it’s likely that the initial problem was a drain pump filter blockage, and the issue may be resolved.

Keep in mind that drain pump failures can often be intermittent, meaning the problem might return later. If the machine stops draining again after a few successful cycles or doesn’t drain at all, it’s time to replace the drain pump.

Replacing the Drain Pump on Top Loaders and Front Loaders

Replacing the pump on frontloaders and toploaders is usually pretty straightforward once the water has been removed. It can be attempted DIY. Almost always located underneath the machine, a few hose clamps, a few screws or clips, and a couple of spade plugs to remove. Use your model number to search online for specific instructions. There can be some nuance to installing the new pump, so factor in some fiddling time and needing to take the appliance apart again after doing it wrong the first time. 

Washing Machine Repair Cost When it Does Not Drain

  • Replacement drain pump: $20 – $100
  • Professional drain pump and filter inspection including service call: $150 – $250
  • Professional drain pump replacement including parts and service call with aftermarket part: $150 – $300

Washing Machine Leaking (Not Flooding)

A small leak or drip can be tricky to diagnose, especially without experience. Here’s my pro tip: Don’t assume the water is leaking from the side where you see it. Unless your machine is perfectly level (which it probably isn’t), a small drip can cling to the underside and travel along the machine in any direction before falling off elsewhere.

Hose Connection Issues: Washing Machine Leaking from Tap or Back

If you’ve recently moved or your washing machine is leaking from the tap, the hose connections are often the culprits but it can be the taps themselves too. Over time, the rubber washers in the ends of the hoses can deteriorate, causing leaks. Washing machine hoses themselves rarely fail, but the washers in the ends of the hoses frequently deteriorate, causing leaks. Manufacturers recommend replacing water supply hoses every five years, so if yours are older, it might be time to replace them. Here’s how to diagnose and confirm the source of the leak.

  1. Turn the washing machine off at the taps.
  2. Leave the taps off for three days, and make sure the area underneath the machine has dried out.
  3. If the area doesn’t dry out when the tap is off, the tap itself is probably faulty, likely needing its spindle O-ring replaced, along with the washer and fibre washer. Repair the tap, then repeat the test.
  4. Turn the taps back on.
  5. Check every few hours to see if the leak has reoccurred. If it does, the hoses are either faulty or not tightened correctly.
  6. If it does not resolve then your hoses and taps are likely ok and the leak is elsewhere.

Washing Machine Repair Cost for Bad Hoses and or Tap Repair

  • Replacement washing machine inlet hoses X 2 : $20 – $50
  • Professional diagnosis and replacement of washing machine hoses including service call and parts: $150 – $200
  • DIY repair leaking tap X 2: $5 – $50
  • Plumber to repair leaking taps X 2including service call and parts: $100 – $200

Leaking Drain Pump Filter - Frontloaders Only

If you’ve recently removed the drain pump filter, the rubber seal can get pinched when you replace it, and dirt could prevent a proper seal, causing a leak. The leak will originate from the drain pump filter housing, but it may give the impression of the washing machine leaking from underneath, as water can cling to the bottom of the machine and drip elsewhere. Remove the filter, clean the rubber seal (a toothbrush works well), and replace it, then check again. If the drain pump filter is leaking the washing machine will leak in use and for an hour or two after the cycle has finished.

Washing Machine Repair Cost for Leaking Drain Pump Filter

  • Replacement drain pump filter: $20-$50
  • Professional diagnosis and replacement of drain pump filter including service call and parts: $150-$200

Washing Machine Leaking from Door - Frontloaders Only

Take these steps to work out why your washing machine might be leaking from the door.

  • Clean the Door Seal: Dirt or debris can prevent a proper door seal, leading to a leak that appears to be coming from underneath the door. Clean both the door seal and the back of the door thoroughly to ensure that nothing is obstructing the seal. If you notice water trickling down the front of the machine from underneath the door, the door is likely not sealing correctly.
  • Inspect the Door Seal: While cleaning the door boot, thoroughly inspect it for rips or tears. Even a small tear can cause a leak, especially if it’s on the lower part of the seal. If you find any damage, you’ll likely need to replace the washing machine door seal to prevent further leaks. Replacing a door seal is straightforward for a professional, but it’s generally beyond the skill level of most DIYers and usually requires removing the entire front face of the washing machine.
  • Inspect the Door: A cracked door hinge can also cause a leak from the door. To check for this, run your hand across the hinge area -cracks are often easier to feel than to see. If the door droops or needs lifting to close, this is a common symptom of a cracked door hinge, which can affect the door’s ability to seal properly, leading to leaks. 

If cleaning the seal and checking the door haven’t resolved the issue, the next area to check is the detergent dispenser, as excess detergent can also cause leaks that can appear to be from the door.

Washing Machine Repair Cost when Leaking from Door

  • Professional replacement of door seal including service call and parts: $300 – $400
  • Professional replacement of cracked door including service call and parts:  $200 – $300

Washing Machine Leaking from Detergent Drawer – Frontloaders Only

Worn out water inlet valves, particularly on Fisher and Paykel front loaders, can also cause small spurts of water from the detergent dispenser. This can also make it look like the door is leaking, as the water may flow into the door cutout and down to the bottom middle, or straight down the face of the machine. Diagnosing this means watching the machine through a full cycle to catch the leak in action – be patient, and try not to get distracted, or you’ll have to start over! This condition can also be caused by a blocked vent pipe on the detergent dispenser. While these issues are more DIY friendly, the diagnosis is a bit more nuanced, and you should consider professional assistance so you don’t waste time and money on the wrong diagnosis.

Excess detergent use can cause leaks from the detergent dispenser, especially with powdered detergents. If the detergennt drawer has too much detergent in it, the water can backup during filling and cause it to overflow. Most machines have overflow ports that direct excess water from the detergent dispenser down the inside wall of the washing machine, leading to a washing machine leaking from underneath. Let the area underneath the machine dry out and try running the washer with less detergent and see if it was just a one off.

Washing Machine Repair Cost when Leaking from Detergent Drawer

  • Professional replacement of water valve including service call: $200 – $350

Time to Call a Professional

If you’ve gone through these steps and haven’t had much success, it might be time to consider calling a professional. What we’ve covered above addresses 95% of all problems. The remaining 5% consist of countless small issues that rarely occur, leaving you chasing shadows—and that can be costly to fix due to labour expenses. Sometimes, that in itself is the information you need to make a decision about whether you should devote resources to repairing your washing machine.

Washing Machine Flooding

The first step when dealing with any flooding is to press stop or pause the machine. If the water continues to come turn off the machine, unplug it, and, most importantly, turn off the water supply. If the taps to the machine are difficult to access, locate your water meter and shut off the water from there. Without a water source, the flooding will stop.

Pressure Switch Issues

Flooding can happen due to a fault with the water measurement system. Most machines use a simple system that continuously calls for water until it gets feedback that enough water has filled the drum. Part of this mechanism includes a small rubber or plastic pipe inside the washing machine that connects to a pressure switch. If the small air pressure pipe that measures water levels falls off the pressure switch, or a hole wears through the tube, the washing machine never receives a signal to stop filling, and the machine can flood. While there’s sometimes a safety mechanism to prevent this, it may not kick in immediately. 

  • In front loaders, this issue commonly occurs when the tub moves violently due to an out of balance load, yanking the pipe off the pressure switch.
  • In top loaders, the problem tends to develop over time as a small hole is worn into the pressure pipe through repeated rubbing over many years. It is so small you cannot see it.

Sometime the pressure switch is integrated into the main control board, so if theres an issue with it, the whole control board needs to be replaced – usually an expensive part.

 Washing Machine Repair Cost when there are pressure switch issues
  • Replacement pressure tube: $10 – $40
  • Replacement pressure switch:  $20 – $50
  • Professional replacement of pressure switch and pressure tube including service call: $200 – $300
  • Professional replacement of main board with integrated pressure switch including service call: $300 – $400

Drain Hose Issues

A close up of a laundry sink plug hole half blocked with lint and debris
This half blocked laundry sink plughole is a flood waiting to happen.

If the drain hose isn’t properly secured it can fall out of the drain sink or stand pipe. When the washing machine begins to drain, water will now be pumped all over the floor instead of down the drain

Worse – improper drain hose height can cause a siphoning effect. If the drain pipe isn’t high enough, the machine may start siphoning water straight through itself, without the drain pump needing to activate. Water will now flow directly from the water supply, through the machine, and out the drain hose continuously, resulting in a persistent flood – until with some luck the washing machine will have a safety. Often this condition manifests in a “no tap” error which ultimately stops the flood when the washing machine thinks its not receiving water from the inlet. While the results of this condition can be pretty catastrophic the fix is pretty easy. Replace the drain hose into the outlet and secure it properly.

Flooding can also occur if the sewer pipe is blocked or if the sink’s plughole becomes clogged with debris and lint, where the drain hose empties. If the water has nowhere to go, it will back up and cause flooding around the machine or out of the sink. 

Door Opening Mid Cycle - Frontloaders Only

A faulty door lock can cause the door to open mid-cycle, leading to water spilling out. Often, the washing machine will continue the cycle blissfully unaware of the issue, calling for more water as it floods all over the floor. This tends to be an intermittent problem, and if it happens once, it’s likely to happen again. If you were lucky enough to experience only minor flooding the first time, don’t press your luck by continuing to use the machine. It will need a new door switch before it can be safely used again.

In rare cases, this issue can also be caused by a faulty control board, though this is a much more expensive repair. If you absolutely cannot risk the door opening mid cycle again, replacing both the control board and the door switch is the safest option – though most technicians would consider this as unnecessary and excessive in most cases.

Washing Machine Repair Cost with Door Opening Mid Cycle

  • Replacement door lock: $20 – $50
  • Replacement main board: $100 – $250
  • Professional replacement of door lock including service call and parts: $150 – $250
  • Professional replacement of door lock and main board including service call and parts: $300 – $500

Washing Machine Noisy on Spin

A noisy washing machine on spin is almost always caused by poor stability or bad bearing.

A Rhythmic Knocking Sound is Usually Poor Stability

If you’re hearing a rhythmic knocking noise when the machine is spinning the clothes, its usually because the machine is not sitting correctly, and the machine is able to rock, but it can also be caused by faulty suspension in a front loader washing machine.

 As theres a lot of bad information out there, It’s important to note that your machine doesn’t need to be perfectly level. As long as the machine looks level, that’s good enough. What really matters is that the machine is stable.

  1. Check that the washing machine isn’t making contact with anything that can rattle like a broom, clothes horse or ironing board. Nothing should be touching or on the washing machine.
  2. Run the machine empty: If the thudding is significantly lessened this points to a rocking washer.
  3. Test stability: Apply pressure to one corner of the machine, or even sit on it. If the noise stops or reduces, unstable footing is the issue, and you may need to adjust the feet or address the floor.
  4. Check the feet: Inspecting the feet can be tricky since the washer is sitting on them. However, try to feel for any wear or damage, especially to the rubber. This is particularly important after a recent move, as the feet can easily get damaged if the washer has been dragged. The rubber feet will also deteriorate over time as well, hardening and less effectively dampening sound and movement.
  5. Adjust the feet as necessary: The feet can usually be adjusted by screwing them in or out. Sometimes they rust in place though especially the left hand front foot. A spanner or shifter may be required.

Washing Machine Repair Cost doe to Poor Stability

  • 4 X Replacement washing machine feet: $40
  • Professional replacement of washing machine feet including service call: $200 – $300
A selection of washing machine feet damaged from dragging compared to a brand new washing machine foot

Bad Suspension - Front Loader Washing Machine Only

For front loader washing machines, a worn shock absorber, though relatively rare, can result in rhythmic knocking during the spin cycle similarly to a poorly levelled machine as above. A front loader with a bad shock absorber – or shock absorbers – will be much more prone to vibrating and even “walking” around your laundry, as its ability to absorb vibration and shocks during spin is diminished. In worst cases they can even smash walls and knock themselves onto their sides. This is more likely to happen in older machines or those that frequently run heavy loads.

Washing Machine Repair Cost with Bad Suspension

  • Replacement shock absorbers: $50 – $150
  • Professional replacement of shock absorbers including service call: $200 – $300

If it Sounds Like a Jet it's Usually the Bearings

Bearing noise and instability noise sound completely different. For simplicity’s sake, if you’ve ruled out stability issues and your washing machine is still noisy during the spin cycle, it’s most likely that the main bearing is failing. Unfortunately, replacing bearings is typically not cost-effective, as it can be an expensive repair and may lead to additional issues. In most cases, it’s better to consider replacing the machine rather than calling a professional to repair the bearings. Bearing replacement is a difficult labour intensive job and potentially calls for expensive parts like the drum or basket to be replaced. There’s also a lot that can go wrong and a good chance that your washing machine repair won’t last.

Bearings that have worn out or corroded due to water exposure often cause significant noise. Here’s what to look for:

  1. Listen for a constant, loud noise: The faster the spin, the louder it becomes – often compared to a jet engine.
  2. Has the washing machine become louder on spin than it was when you first got it? If the washing machine has become significantly louder, its likely the main bearing is failing. You should be able to stand next to a properly functioning washing machine on spin and have a conversation without shouting. If the noise has increased significantly, the bearings are likely corrorded or worn out.
  3. Check for recent overflows: If you have a front-loader washing machine that has recently overflowed, this can be a catalyst for bearing failure, as water may have leaked into the bearings during the overflow.
  4. Look for grease marks: Black or brown grease stains on your clothes suggest the bearing is leaking grease.
  5. Understand the long term risks: If left unfixed, the drum can eventually separate from the basket, making it impossible for the machine to spin. This failure usually occurs within months but can take years, depending on the severity of the bearing wear. It’s also important to note that if the noise is due to water damaged bearings, the bearings can completely seize, especially if used infrequently, locking the drum in place, never to turn again. 

Washing Machine Repair Cost due to Bad Main Bearing (Professional Only)

  • Replace washing machine main bearing and other parts as required: $500 – $1000

Washing Machine Leaving Marks on Clothes

If your washing machine is leaving marks on your clothes, there are two steps you should take to diagnose the issue:

  1. First, deep clean your washing machine: Over time, mould, detergent residue, and grime can build up inside the drum and other parts of the machine, staining your clothes. We have a detailed guide on how to deep clean your washing machine, and you can follow the link here. This process will help remove any mould, detergent buildup, or other contaminants to real it out as the cause.
  2. Check for greasy marks: If you’ve deep cleaned the machine and you’re still getting marks—particularly greasy stains that resemble car grease—it’s likely that the main bearing is leaking grease and beginning to fail. This grease can leak into the drum and mark your clothes.

Bearings that are wearing out will eventually lead to more serious issues, as outlined in the previous section. While the machine may keep running for a while, the drum will often separate, and you’ll likely continue seeing greasy stains on your clothes. Eventually, the washer may abruptly refuse to spin. If you notice greasy marks and the machine is getting louder during the spin cycle, it almost certainly requires replacement bearings, which, as discussed earlier, typically aren’t worth replacing.

Washing Machine Repair Cost due to Bad Main Bearing (Professional Only)

  • Replace washing machine main bearing and other parts as required: $500 – $1000

Washing Machine Won’t Spin, Turn, or Is Giving Excessive Out of Balance Errors

First, let’s distinguish between two issues:

  • Won’t turn: The drum refuses to rotate at all.
  • Won’t spin: The drum turns but won’t go into the high-speed spin cycle.

Let’s walk through the most common causes of both.

Washing Machine Won't Turn

  1. A broken drum spider is a common issue in older Samsung and LG models and can prevent the drum from turning entirely. The drum spider supports the drum, and if it breaks, the machine may suffer serious internal damage. This issue is often too costly to repair due to the extent of the damage.
  2. Motor or Motor Controller Issues: If the motor or motor controller fails, the drum may stop turning completely. If the motor isn’t receiving the correct signals or has worn out, professional repair or motor/controller replacement may be required.

Washing Machine Repair Cost when washing machine won’t turn

  • Replacement motor controller: $100 – $250
  • Replacement motor: $100 – $250
  • Professional replacement of door spider including service call and parts: $300 – $400
  • Professional replacement of motor controller or main board including service call and parts: $300 – $400 
  • Professional replacement of motor including service call and parts:  $300 – $500

Washing Machine Won't Spin

  1. Overloading and Uneven Loads: One of the most common reasons for a washer refusing to spin is an overloaded or uneven load. This is especially common in front-loaders, where an imbalanced load can prevent the spin cycle from starting. Try redistributing the clothes or reducing the load size to resolve this issue.
  2. Bad Motor Brushes, common in older models, can stop the drum from turning or spinning. In a brushed motor, brushes transfer electrical current to the motor, and when they wear out, the motor will lose power, causing it to stop working. A motor typically has one brush for turning at slow speed and one brush for spinning at high speed. Usually the high speed brush wears out first, but not necessarily. Brushes should be replaced in pairs but that won’t always be what has happened in the past.
  3. Drainage Issues: A washing machine that won’t drain properly can also stop spinning. Excess water remaining in the drum adds weight, preventing the machine from spinning. Refer above to Washing Machine Does Not Drain.
  4. Shock Absorber and Suspension Problems – Top loader washing machines only: In top loaders, shock absorber and suspension issues are more common over time. If the machine frequently gives out of balance errors, the suspension components may be worn out, especially if the machine seems to be capable of managing smaller and smaller spins as time goes by. In a front loader washing machine suspension issues are much rarer and unlikely to directly interfere with the spin cycle. Suspension issues in a front loader washing machine are much more likely to lead to a very loud washing machine that walks around the room.
  5. Control Board and Motor Controller issues commonly seen in Samsung and LG machines, spinning problems are typically accompanied by the E3 error code. This code generally indicates that the control board needs to be replaced as a result of fractured solder joints. While this issue is common with these brands, any washer with a malfunctioning control board or motor controller can refuse to spin.

Washing Machine Repair Cost when washing machine won’t spin

  • Replacement motor brushes: $10-$50
  • Replacement motor controller: $100 – $250
  • Replacement motor: $100 – $250
  • Replacement shock absorbers: $50 – $150
  • Professional replacement of motor brushes including service call and parts: $200 – $300
  • Professional replacement of shock absorbers including service call and parts: $200 – $300
  • Professional replacement of door spider including service call and parts: $300 – $400
  • Professional replacement of motor controller or main board including service call and parts: $300 – $400 
  • Professional replacement of motor including service call and parts:  $300 – $500
 

Washing Machine Door Locked

If your washing machine won’t open theres a few possible causes – either you have a drainage issue, and the door won’t unlock because the water level is too high, or there 

Wait for the Cycle to Finish

A washing machine door that won’t open is typically an easy and cheap washing machine repair. Most washing machines automatically lock the door or lid during the wash cycle and remain locked until the cycle is completely finished. Some washing machines will unlock the door or lid if paused during the cycle but only if certain conditions are met, usually:

  • The water level is low enough
  • The water temperature isn’t too hot
  • The machine isn’t spinning.

If your washing machine was interrupted mid cycle, the door may stay locked until the cycle has been completed.

Power Failure

If there is a power outage or tripped breaker mid cycle, the door may remain locked even with the appliance off. Once power is restored, turn the washing machine on, and see if the door unlocks. If not, select your machines shortest cycle, usually spin or rinse, and let the cycle complete. If the door still will not unlock there may be a more significant problem.

Drainage Issues – Front Loaders Only

If there’s still water in the drum, the door will usually remain locked to prevent water flooding out into your laundry. Try running a drain or spin cycle to empty the water, or letting the cycle complete if you have stopped the machine before the cycle completes. If the water will not drain refer above to Washing Machine Does Not Drain.

Faulty Door Lock

The door lock mechanism can wear out or fail, especially in front loaders. This can prevent the door from locking or unlocking even when the machine has finished its cycle. 

For front loaders you can manually unlock the door using the machine’s manual release feature located in the same compartment as the drain pump filter. Top loaders usually do not have an emergency or manual release. The release mechanism is usually a plastic strap with a loop at its end. Pull down on this strip while pulling on the door, and the door should open. You may need to pull hard and sometimes a second person to pull the door while you pull the loop can help. Your washer may have a different mechanism, refer to the user manual or search online for specific instructions using your washers model number.

A bad door lock can sometimes take the main control board with it, so if replacing the door lock doesn’t remedy the situation, the control board may – in rare cases – also need replacement.

Washing Machine Repair Cost with Washing Machine Door Locked

  • Replacement door lock: $20-$50
  • Replacement control board: $100 – $250
  • Professional replacement of door lock including service call and parts: $150 – $250
  • Professional replacement of door lock and control board including service call and parts: $300 – $500

Washing Machine Won't Turn On or Won't Start​

If your washing machine won’t start, there are several potential causes to consider, ranging from simple fixes to more complex electrical issues. 

Keylock or Child Locked Washing Machine

If your washing machine turns on but is otherwise unresponsive, you might want to check that it hasn’t been keylocked.  Nearly all washing machines have a keylock feature that disables all of the buttons as a safety feature to prevent children from interacting with the washing machine. A machine is usually keylocked by pressing and holding one or more buttons together for a few seconds. To check if your machine is keylocked, look for a button that reads keylock, child lock, or features a symbol of a padlock. Press and hold the keylock button or buttons until you hear a beep or some indication that the machine has done something. Check to see if you can now interact with the controls.

Power Issues

Ensure that the washing machine is properly plugged in and that the outlet is working. Try plugging another device into the same outlet to confirm power is being supplied. A USB charger and phone is often a handy way to check. If the outlet isn’t providing power, check your home’s circuit breaker to see if a fuse has blown or if the breaker has tripped. If you have just moved into a new home, sometimes there is another switch that needs to be on, usually to an exhaust fan, for the power point to receive power.

Water Issues

Most washing machines won’t start if there’s no water supply or if the water pressure is too low. Ensure that the water taps are turned on and the hoses are securely connected. Some washing machines like FIsher and Paykel frontloaders will give an error “No Tap” if they aren’t receiving water. Also check to make sure the drain hose drain point is high enough so that the water isn’t just siphoning through the machine – ie. going straight from the tap through the machine and out the drain hose.

Door Lock Issues

As covered in greater detail in the previous section, a faulty door lock can fail resulting in not only a washing machine that won’t open, but also one that won’t lock.  If the washing machine won’t close, neither will it start.

Washing Machine Repair Cost with Faulty Door Lock

  • Replacement door lock: $20-$50
  • Replacement control board: $100 – $250
  • Professional replacement of door lock including service call and parts: $150 – $250
  • Professional replacement of door lock and control board including service call and parts: $300 – $500

Button Issues

Sometimes the issue can be with the actual buttons themselves. Touch and mechanical buttons can fail making them non responsive. Sometimes you can spam the button and push it repeatedly to get a response.

Washing Machine Repair Cost with Button Issues

  • Replacement control board: $100 – $250
  • Replacement display or button replacement: $100 – $250
  • Professional replacement of main board including service call and parts: $250 – $400
  • Professional replacement of buttons or display including service call and parts: $250 – $400