Posted on Leave a comment

Clothes Dryer Burning Smell? Heres What to Check

If you’ve recently detected a burning smell coming from your clothes dryer, it’s important to investigate this issue immediately to prevent potential fire hazards and ensure the safety of your home. As an experienced appliance repairer, I will guide you through the troubleshooting process, from the simplest fixes that even a novice can handle to more complex issues that might require professional attention. Let’s explore the common causes of this problem and the steps you can take to diagnose and resolve it.
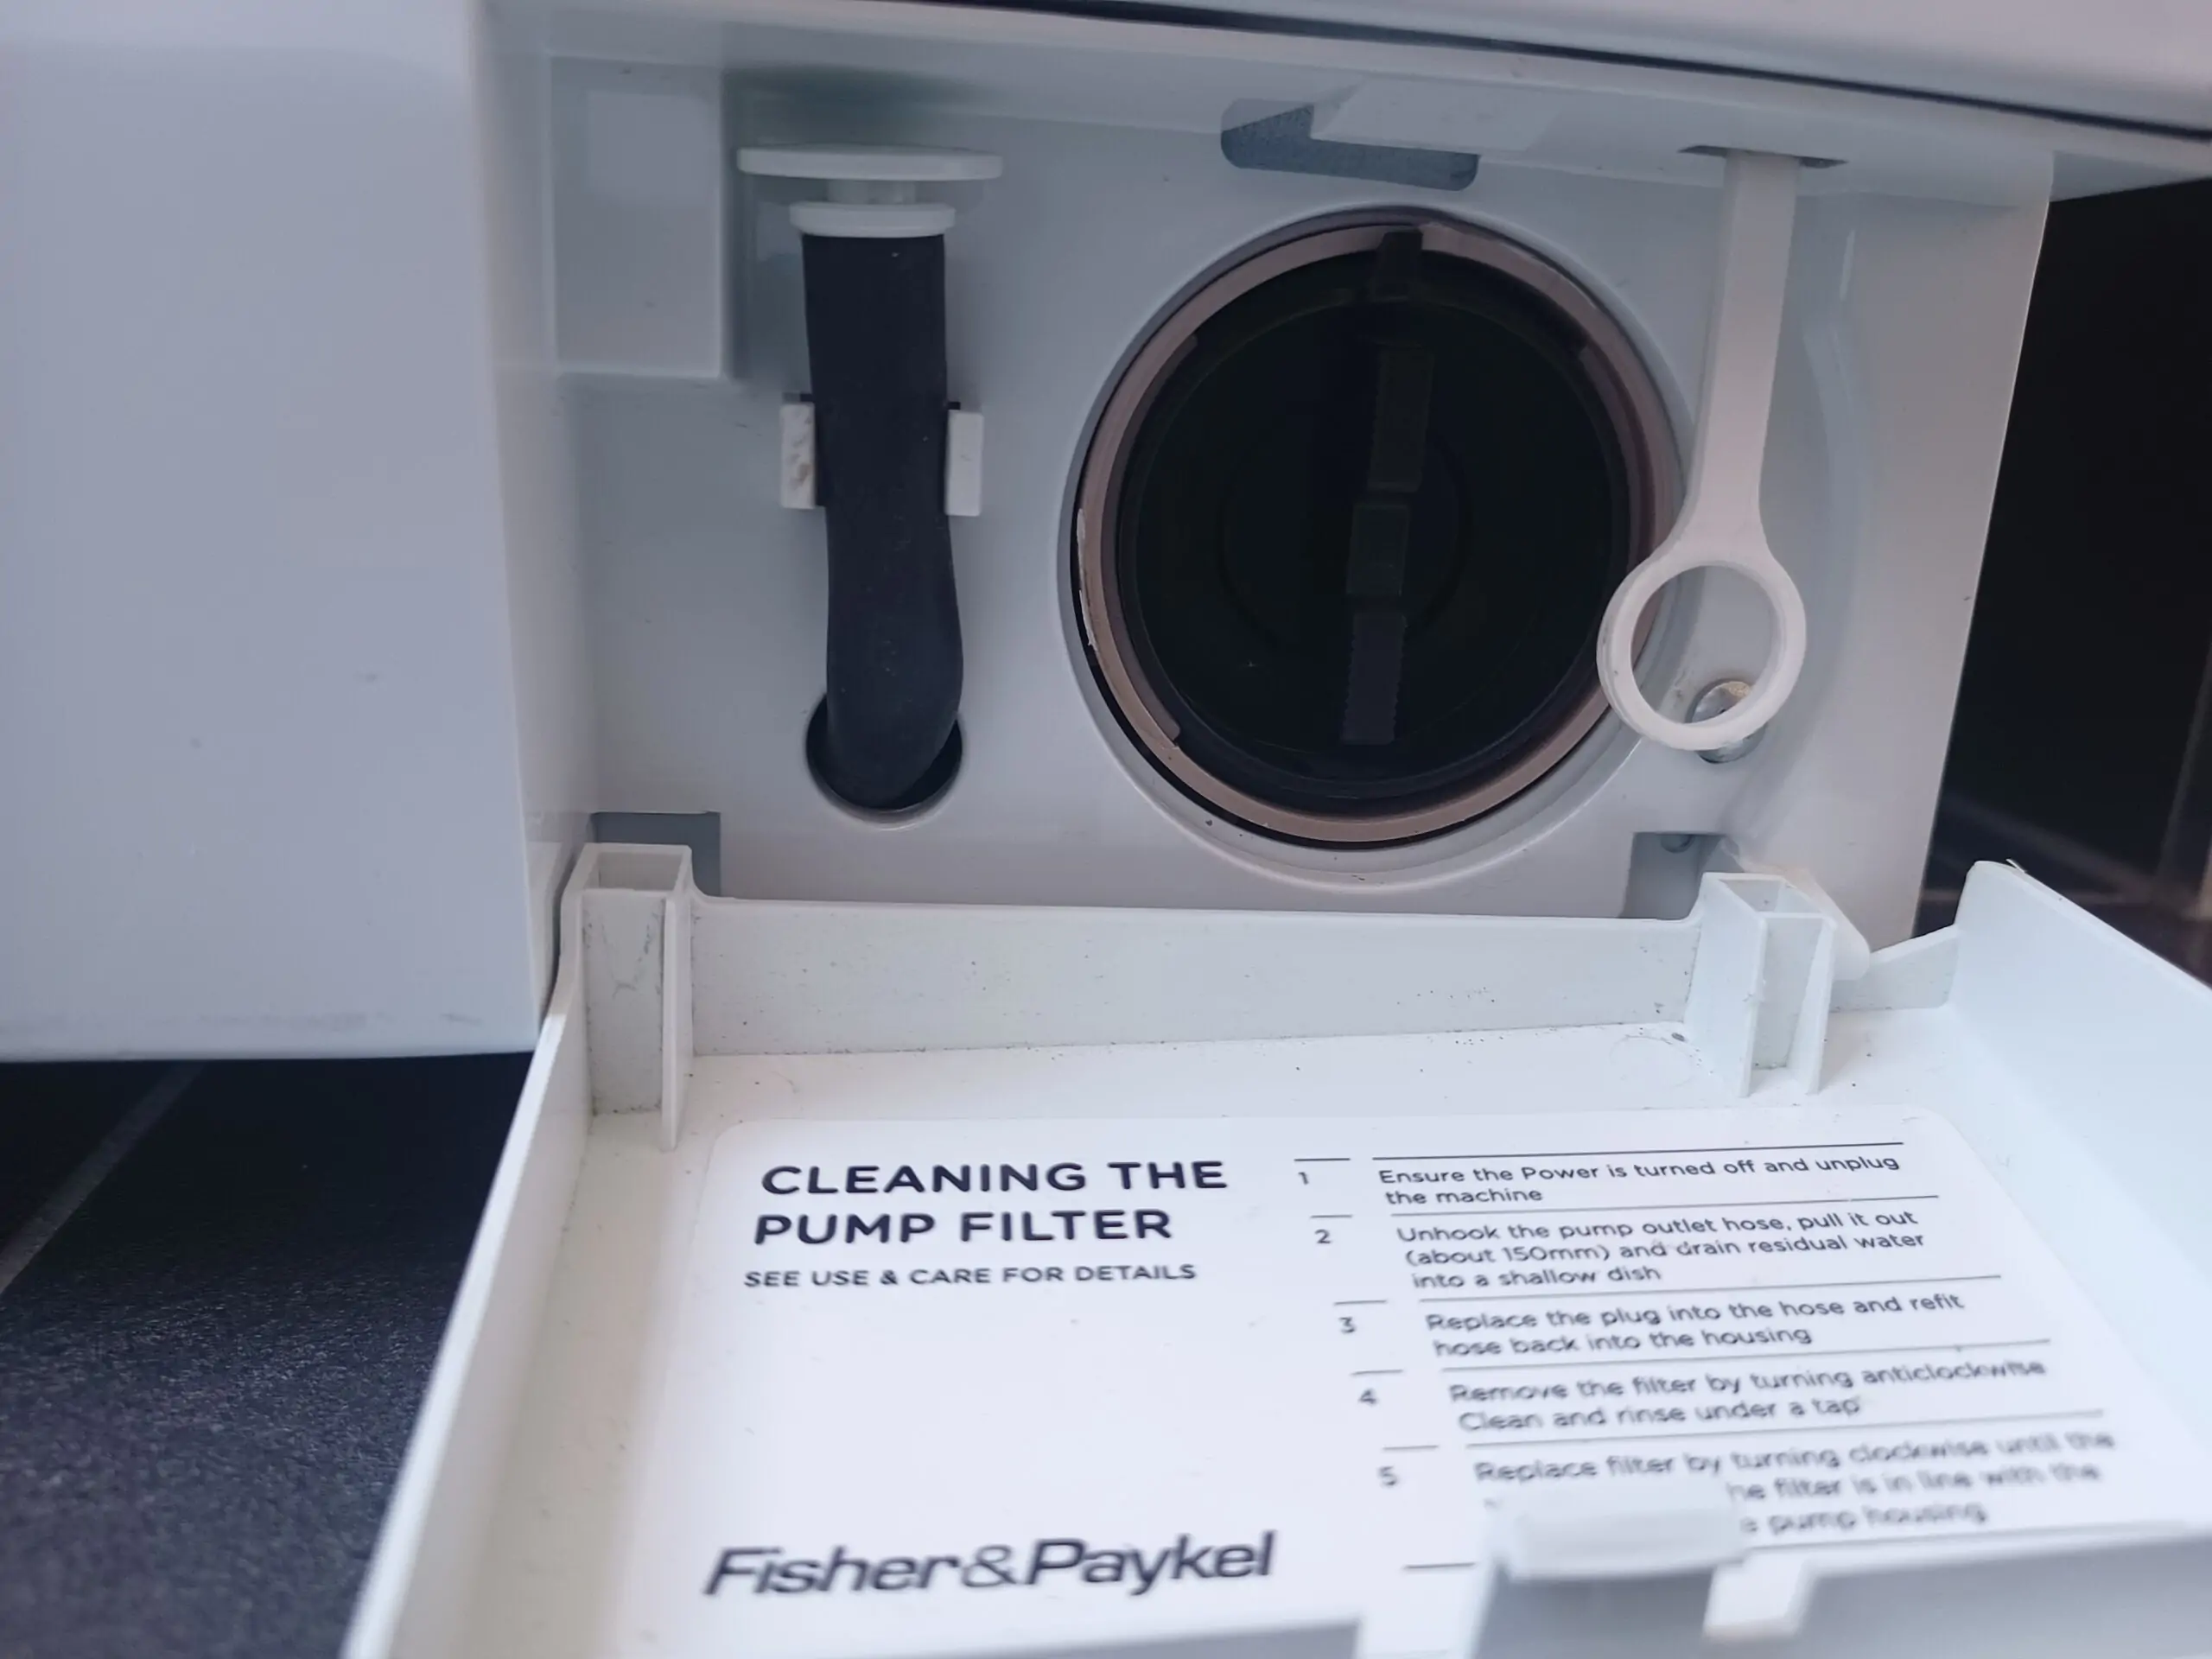
Lint Buildup

Lint buildup is the most common culprit of a burning smell coming from your dryer. Lint burning smells like burning hair, but a rubber belt burning will smell the same. Over time, lint can bypass the lint filter and accumulate within the dryer’s ducts. The older your dryer, the more likely it is that significant lint has built up. Occasionally, a piece of this accumulated lint may break off and fall into the heater, where it burns up. Typically, these pieces are so small that you might not even notice them. If you’ve recently taken a dryer out of storage and noticed a burning smell upon first use, this is fairly normal. Lint that has dislodged over time or due to movement may now be passing through the heater.

Prevention is the best approach here. Regular maintenance of your lint filter can significantly slow down the buildup of lint, though some accumulation is inevitable. The more lint that passes the filter, the more you will find in the heater eventually.

What To Do:

  1. Inspect your lint filter: Ensure the lint filter has no holes or cracks. Replace it if necessary; having a spare is always a good idea.
  2. Vacuum the ducts: Use a vacuum to remove as much lint as possible from the dryer’s ducts. Be thorough but gentle to avoid damaging any internal components.
  3. Monitor the dryer: After cleaning, it’s common to still detect a slight burning smell as any dislodged and unvacuumed lint clears out. This should decrease after a few cycles.
  4. If the smell remains, or the dryer isn’t turning or heating, proceed to the next step.

Motor Capacitor Failure

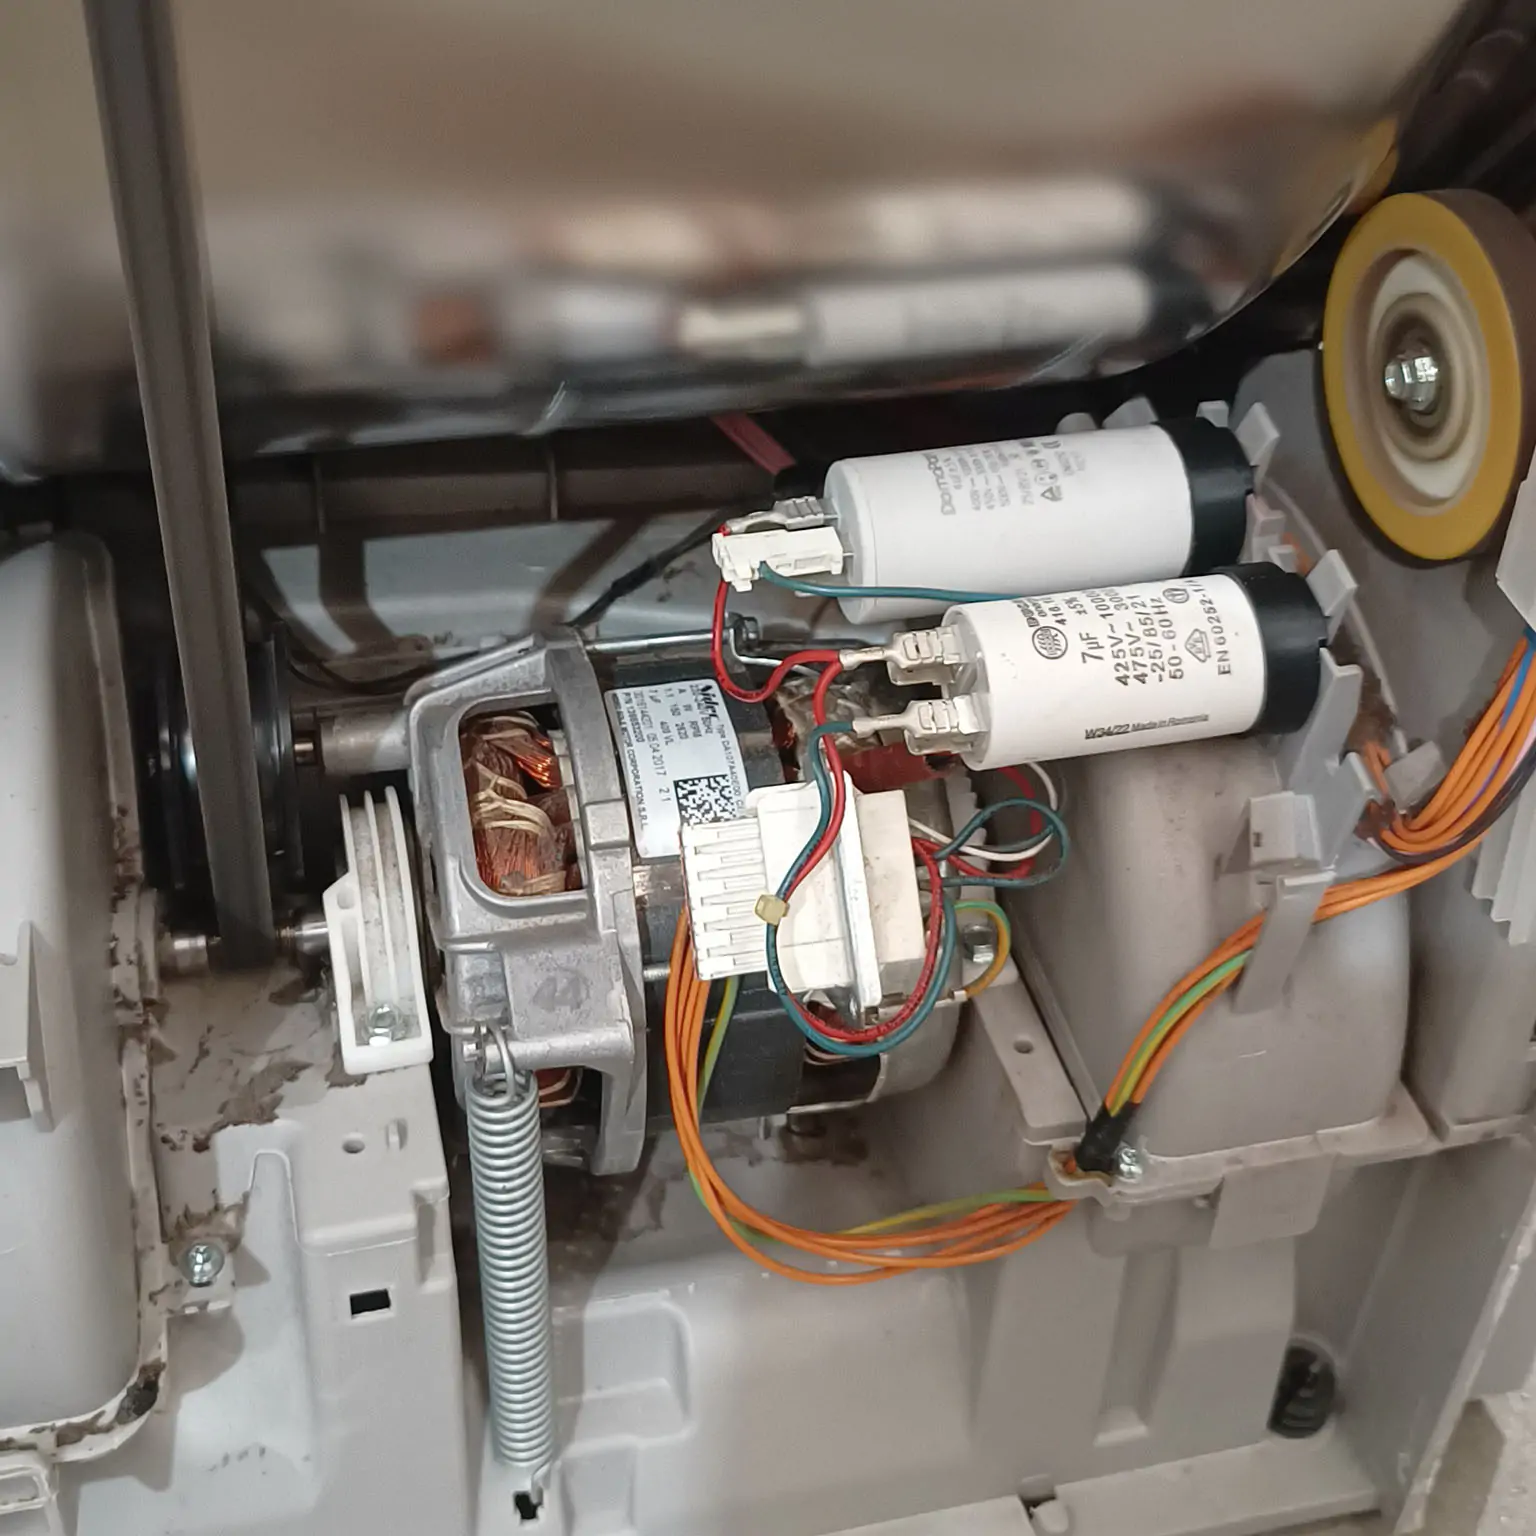
The motor run capacitor in your dryer is essential for helping the motor start and operate smoothly. To oversimplify its role – and not entirely accurately – you can think of it as a rechargeable battery. This “battery” doesn’t power the motor for extended periods but is crucial for delivering the quick burst of energy the motor needs to kickstart. Over time, similar to a rechargeable battery, the capacitor loses its capacity to hold a charge. If the charge becomes too weak, the motor that turns the drum will struggle to start turning. You might find yourself manually helping the dryer start by giving the drum a push before quickly closing the door. As the capacitor’s condition worsens, the drum might not turn at all, even when empty. In such cases, attempting to start the dryer might result in a buzzing noise from the motor area, but no physical movement – a clear indication that the capacitor might need attention or replacement. Usually when a capacitor is failing it shows no outward signs but if it fails catastrophically and blows a hole out its side or top, usually accompanied by smoke and a burning smell, and often tripping the safety switch as it shorts out internally. Smoke from a burning capacitor will usually smell acrid – like plastic burning. If the drum is not turning its also possible that other components are overheating like the heater or motor which is contributing to a burning smell.

What To Do:​

  1. Access the Capacitor: This task requires a bit more expertise, as you’ll need to open your dryer to access the dryer’s motor. First, unplug the dryer for safety. Generally, you will need to remove the top of the dryer by unscrewing two screws at the back (and occasionally a hidden screw at the front of the machine) and sliding it backwards. Then, unscrew the right side panel when viewing from the front. The motor run capacitor is typically located near the motor or attached to it.
  2. Identify the Motor Run Capacitor: First, ensure your dryer is unplugged and safe to inspect. Locate the motor run capacitor, which is usually attached near the motor. It’s typically cylindrical in shape with 2 or 4 terminals and a bit bigger than a D size battery. Not all motors have capacitors either so if you can’t find it, you might not have one. Do not get confused with an EMI filter which looks very similar to the motor run capacitor. If fitted, it can usually be found close to where the power cord enters the dryer and is usually labelled as an EMI filter.
  3. Look for Visible Damage: Check the capacitor for signs like bulging, leaking, or a burnt smell, which indicate failure. These are clear indicators that the capacitor has failed, but capacitors can, and usually do fail internally without any external signs.
  4. No Multimeter: Testing the capacitor with a multimeter is ideal for diagnostic purposes, but if you don’t have access to one, it can be simpler to just replace the capacitor. Aftermarket capacitors typically cost less than $10 each and tend to wear out over time anyway, also affecting the motor’s efficiency. These capacitors typically feature universal connections with blade terminals, making them easy to replace. However, be aware that some manufacturers use custom mountings to compel the purchase of their genuine, and often much more expensive, and often inferior replacements. 
  5. Replace if Necessary: Replace the capacitor if testing confirms it is faulty. Ensure the replacement matches the original’s specifications in capacitance and voltage. Connection orientation doesn’t matter for motor capacitors because they are non polarised but ensure correct wiring if dealing with multiple capacitors.
  6. Consider Professional Help: If you are uncomfortable performing these tasks or unsure about the diagnosis, consider hiring a professional. Handling electrical components can be hazardous without proper expertise and safety precautions.

Belt and Guide Wheel Issues

After capacitor problems, issues with the belt and guide wheel are the next most common cause of a burning smell in dryers. These components are critical for the smooth operation of the dryer, and both can be accessed near the motor capacitors, allowing for convenient inspection.

The guide wheel, typically made of plastic with a metal core, supports and guides the dryer belt as it rotates the drum. It helps maintain the belt’s alignment and tension, ensuring efficient movement. Over time, wear and tear or manufacturing defects can cause the guide wheel to deteriorate; it might even begin to melt if the friction becomes too great. This deterioration can cause the belt to misalign, fray, and eventually burn, leading to a noticeable burning smell.

Depending on the dryer model replacing the belt and guide wheel can vary in complexity. In many vented dryers, the process is straightforward, but in other models, particularly condenser dryers and heatpumps it may involve removing the motor, and feeding the belt between the drum and the housing without damaging it, a skill that is learned with practice.

What To Do:​​

  1. Release Tension: Before inspecting, use a pair of pliers to release the tension on the guide wheel by carefully unhooking the motor spring.
  2. Visually Inspect: Check the guide wheel for signs of wear such as melting, cracking, or delamination of the plastic from the metal core. For the belt, look for fraying, thinning, or any signs of burning.
  3. Test the Guide Wheel’s Integrity: Manually spin the guide wheel to ensure it rotates smoothly without wobbling or sticking. Irregular movement can indicate internal damage, suggesting replacement is necessary.
  4. Assess the Belt Condition: Feel along the belt for any rough patches, thinning areas, or signs of heat damage like brittleness or discoloration.
  5. Replace if Necessary: If you find any issues during your inspection, replace the parts. For the guide wheel make sure you clean the shaft very well and that the new wheel spins freely.  Sometimes the shaft needs to be sanded down to remove scratches and gouges caused by the bad guide wheel. And, let me give you an insider tip. You can usually get away with running a pretty messed up, frayed, cracked belt for many years on a good guide wheel. If you have a bad guide wheel it will trash a brand new belt in no time flat if the dryer will run at all.
  6. Consider Professional Help: Given the complexity involved in some models, particularly those requiring motor removal, it might be wise to hire a professional. But if the appliance is going to the bin otherwise, you might as well give it a go and learn something.


Other Potential Sources

There are many other potential sources of a burning smell in a clothes dryer, but the above will cover off 95% of them. The other 5% are many and varied but will cover things like: 

  • Failed electrical components on the control board or otherwise
  • Burned out wiring that has overheated or been abraided
  • Heating element issues
  • Drum seals becoming sticky and causing too much friction

If your burning smell is caused by one of the above it is a more specific problem that requires more specific advice tailored to your model. They are also more difficult to identify and diagnose, but if you can see a sooty burn mark you’re probably in the right place! 

Posted on Leave a comment

Does Size Matter? Our Dryer Buying Guide

Samd heatpump dryer

When it comes to selecting a new dryer, it’s easy to get lost in a sea of technical specifications and marketing jargon. Most buyers are well-versed in the basic criteria like budget constraints, available space, and noise levels. However, if you’re aiming to make an informed decision that goes beyond the surface, you’ll need to dive deeper. In this guide, we’ll debunk the common misconception that bigger dryers work faster and provide essential insights to help you choose between vented, condenser, and heat pump dryers. Get ready to uncover the key details that can dictate the best choice for your laundry needs, empowering you to pick a dryer that truly fits your lifestyle.

Samd heatpump dryer

The 3 types of dryers (plus some bonus types)

Vented Clothes Dryer

Cheap, cheerful, the cornerstone of the traditional Aussie laundry. With few parts and a tried and true design that hasn’t really changed in 50 years they are pretty bulletproof in terms of reliability and the first choice dryers for most households. If something does go wrong it’s usually cheap and easy to fix as long as you’ve bought from a well known brand that stocks parts. They work by taking in air from the room, heating it, and then blowing it through the clothes. The moist air is then meant to be vented outside which is where they derive their name. Vented dryer. In Australia we all seem to have universally decided yeah, nah, and cracked a window or turned on an exhaust fan. While this is generally passable, this approach can make a room very hot and humid, especially if its winter and you’ve decided not to crack that window. Properly venting a vented dryer means the room shouldn’t get hot or humid at all. But apparently, that’s just not how we roll!

Condenser Dryer

Roughly double the price of a vented dryer. These dryers use a closed-loop system that continually recycles the same air. Moisture is condensed into water when the humid dryer air passes through a heat exchanger cooled by air from the room. This method is more flexible in terms of placement since external venting is not needed, though it will still generate significant heat in the room. Their closed loop designs also minimises the amount of lint that escapes into the air and settles around your laundry room.

Heat Pump Clothes Dryers

Double to triple the price of a vented dryer. Heat pump dryers work by extracting moisture from the air at a relatively lower temperature compared to traditional dryers, resulting in better fabric care and much less energy use, but take around twice the time to dry the same amount of clothes. They are the most energy efficient to operate by far, using about half to a third the power of vented or condenser dryers. They operate within a completely closed system, minimising heat escape. Like with condenser dryers their closed loop designs also minimises the amount of lint that escapes, but are slightly better because there is no interaction with the external air at all. They will heat their surroundings the least out of all dryers. They come with the same warning as condenser dryers but with an additional layer of complexity. They are more likely to have a fault than a condenser dryer, and much more likely than a vented dryer, and if they do, it’ll be expensive. When buying a condenser or heat pump dryer it is worth considering purchasing an extended warranty.

My hot tip – There is a heat pump dryer you can often get for around $600 on special. Purchasing a heat pump dryer at the price of some vented models is unbeatable value. It will be branded Akai, Solt, Kogan, Esatto, Stirling, Teka, or even something else. It can be hard to tell exactly who has manufactured these cheap Chinese dryers but my research has led me to Smad and Midea. It seems like there might be a few manufacturers who are going to a big centralised parts bin and mixing and matching controllers and doors and drums. I’ve had one and it worked just as well as a Fisher and Paykel heatpump dryer, and even had some completely unadvertised albeit limited wifi smart functionality. The only noticeable difference that I noticed was that it sounded like a truck was idling in my laundry. Not while I was in the laundry, but when outside the laundry. Imagine you’re standing beside a brick wall, and on the other side is an idling truck. That’s what it sounded like, when outside the laundry. This shouldn’t be a deal breaker for most, especially in larger spaces where noise is less of an issue, but it’s something to consider if you live in a small apartment as I do. 

The main downside to my mind is that these dryers are not designed to be easily taken apart for repairs – and good luck sourcing spare parts – fuelling our throwaway culture. But – the energy savings over the life of the dryer could outweigh the environmental impact of its production and the  environmental damage when the high global warming potential r134a refrigerant in these machines is illegally, but inevitably released to atmosphere during scrapping. On the whole, it’s got my vote, but its a conflicted vote – It will probably save you money but the throwaway nature of the product coupled with the poor choice of refrigerant makes its environmental credentials questionable.

Combined Washer Dryers

A combined washer dryer will essentially be a washing machine first, with a compromised condenser dryer added as an afterthought. In my experience they are incredibly slow at drying clothes, but they are unbeatable for quiet operation, minimising lint escape, and with minimal heat escape the room stays nice and cool too. They flush the lint away with water meaning no lint traps, and they operate a completely closed system as with a heatpump dryer. I found they struggle with sheets and towels, and you shouldn’t expect to get through two small loads per day. They are the ultimate in convenience if you aren’t in any hurry. Check out our full review of the Fisher and Paykel combo washer and dryer here.

Natural Gas Clothes Dryer

Gas clothes dryers are becoming increasingly rare in Australian homes but remain prevalent in laundromats and industrial settings. Using natural gas as a fuel, they can produce significantly more heat than electric dryers because they are not constrained by the maximum capacity of wall outlets. This allows them to dry clothes quicker than any other dryer type. Their use is tempered by several factors: they cost about four times as much as vented electric dryers, require complex installations carried out by a plumber, including proper venting and gas lines, and face decreasing popularity due to a broader shift towards electric appliances.

The Importance of Sensor Drying

Opting for a dryer with sensor drying technology is far more important than its labelled capacity. Models with simple timers require users to estimate how long their clothes need to dry, which is inefficient and will always lead to either under dried or over dried clothes. Dryers equipped with sensor technology automatically measure the moisture level in the clothes and adjust the drying time accordingly. This not only saves time but also enhances efficiency, allowing you to process more laundry in less time with less effort. A smaller dryer with sensor drying will outperform a larger model without it, offering quicker and more energy-efficient operation.

Bigger Is Usually not Faster

Understanding Vented and Condenser Dryers

When it comes to choosing a clothes dryer, size doesn’t always equate to speed. Despite common beliefs, the capacity of a dryer doesn’t directly influence how quickly it can dry clothes. Electric heating elements, the primary component in vented and condenser dryers, are power-intensive yet straightforward and inexpensive for manufacturers to produce. They have remained largely unchanged for a century. Whether you opt for a 4 kg, 8 kg, or even a 20 kg dryer, the cost saving to a manufacturer to use a lower power heater in place of a higher power component would be as close to nothing as makes no difference. 

All vented and condenser dryers use heaters that tap out at the maximum power that Australian outlets can provide before no longer being guaranteed not to catch ablaze – 10A at 240V. Most of this power is consumed by the heating element, with only a minimal amount reserved for the motor and even less for controls and lighting. In practice, an 8 kg dryer does not usually have a more powerful heater than a 4 kg model. Counterintuitively, it might have a slightly less powerful heater to accommodate a more powerful motor needed to turn the larger, heavier drum while remaining within the 10A power outlet limit. Therefore, if both an 8 kg dryer and a 4 kg dryer have similar heating elements, the drying time per kilogram of clothing remains the same – everything else remaining the same. This means if you’re drying an 8 kg load, a 4 kg dryer could potentially finish in the same amount of time if you’re attentive and ready to quickly reload a second cycle after the first. 

There are some advantages to consider with larger models. More powerful fans and larger drums in bigger dryers improve airflow and allow more clothes to be heated at once, which can result in more efficient heat use and less loss to the surrounding environment. Everything considered, doubling your dryer’s capacity only yields a marginal speed increase when compared to running two consecutive loads in a dryer half the size, and only uses slightly more power.

The Real Advantage of High Capacity: Convenience

The true benefit of a larger dryer isn’t speed—it’s convenience. The capacity to dry larger loads at once reduces the frequency of loads, which can be a significant advantage. The drawback with smaller capacity machines surfaces when you miss the end of a cycle or are away, delaying the process of reloading and starting a new cycle.

Another important consideration is the size of the biggest item you will want to dry. A 4 kg dryer may struggle with large items like super king doona covers, as stuffing such bulky items will hinder air circulation, significantly prolonging drying times. Moreover, it may be practical to match the capacity of your dryer with that of your washer, particularly if you tend to use your machine to capacity. If your washer is an 8 kg model, a similarly sized dryer ensures that you can transfer the entire load directly for drying, enhancing convenience.

Double Trouble: When Two Dryers Are Better Than One

If you’re consistently running a 4 kg dryer back to back without catching up on your drying needs, upgrading to an 8kg dryer probably won’t help much – you need a second dryer, not a bigger replacement. In such cases, you probably need a second dryer rather than simply a larger one. Remember an 8 kg dryer has the same heater as a 4kg, capacity is just about convenience.

Heat Pump Dryers: Twice as Slow Triple the Efficiency

Heat pump dryers stand out from vented and condenser dryers due to their ability to recapture heat, which significantly enhances their energy efficiency. Typically, these dryers draw about 3A or less, meaning the wall socket isn’t a limiting factor for their power usage. One might consider doubling the compressor’s power to speed up the drying process, aiming to match the speed of traditional dryers. However, this approach would not be effective since heat pump dryers operate at relatively lower temperatures to extract moisture, which is gentler on fabrics and uses less energy. Doubling the compressor’s power would only raise the internal temperature, risking damage to delicate fabrics and diminishing the dryer’s efficiency in moisture extraction. This would undermine the careful balance of energy efficiency and fabric care that heat pump dryers are known for.

This approach though, while 2-3 times as efficient – per kilogram of clothes dried – as a conventional dryer, takes double the time. For example, if you’re using a 4 kg dryer nonstop and are considering switching to an 8 kg heat pump dryer to manage the workload, it’s going to make your problem much, much, worse. A heatpump dryer will take the same amount of time to dry 1kg of clothes as the 4kg vented dryer could dry 2kg in. I’m sure you can see the issue. However for most people this isn’t an issue – If your dryer use is limited to just once or twice a day, a heat pump dryer is an economic and environmentally friendly upgrade.

End of Cycle - Concluding Thoughts

Choosing the right dryer involves more than just considering the labelled capacity and bells and whistles; it’s about understanding the nuances of different dryer types and how they align with your lifestyle and laundry needs. Vented, condenser, and heat pump dryers each offer distinct advantages and drawbacks, from energy efficiency to repair costs and placement flexibility. By recognizing the real benefits of each type and considering aspects like capacity and drying time relative to your specific needs, you can make a well-informed decision that goes beyond the conventional sales pitch. Ultimately, the best dryer for you is one that balances performance, convenience, and energy consumption, ensuring that your laundry routine is as efficient and effective as possible.

Posted on Leave a comment

Fridge Buying Guide: How to Pick the Right Appliance for Your Home

Selecting a new fridge is a bigger decision than most realise. There are many factors to consider beyond just price and colour. Your lifestyle, family size, kitchen layout, and even your shopping habits should influence your decision. This guide will delve into the essential considerations for choosing a fridge that you won’t regret buying – one you’ll be content with for the next decade.

Size: The Biggest Consideration

Homeowners and Long Term Tenants

Choosing the right fridge size can be difficult but for many it needn’t be. For homeowners, or those who are unlikely to move anytime soon, go with the largest fridge that will fit in your space. This strategy leverages the laws of physics – the square-cube rule – larger fridges use space more efficiently and generally consume only slightly more energy than their smaller counterparts. For instance, a standard 100L bar fridge might use about 300 kWh per year, while a 500L+ fridge could use around 500 kWh annually. This small difference in energy use is offset by a significant increase in storage capacity, and only costing $20-$30 more a year to run.

Measuring mistakes

When measuring the space for your fridge don’t fall into the trap of overestimating your space. A common mistake is forgetting to account for skirting boards or door hinges.  Your fridge shouldn’t fit snug into the cavity at any rate.  You should have at least 20mm of space either side of it to run at its most efficient – modern fridges dump heat removed from inside the fridge on the sides and back of the machine. If you jam your fridge into the space it will probably run well, though might struggle on really hot days. It will also run less efficiently and shorten the compressors life. Leave a bit of room on either side for measuring mistakes and efficiency.

Consider Mobility and Flexibility

While the largest fridge that fits into your kitchen might be the ideal choice for long-term homeowners, it’s important to consider your lifestyle fully. For families or individuals who plan to stay in one place for many years, a larger fridge ensures you have ample space to meet growing needs and changes in your habits without needing to buy a second unit. This not only maximizes efficiency and storage but also minimizes power bills and environmental impact by reducing carbon emissions.

But for frequent movers the advice is more nuanced. A large fridge, especially models that are difficult to manoeuvre through narrow doorways or require disassembly, can become a liability. Big fridges are harder to move, more susceptible to damage during transport, and may not fit in your new space, leading to potentially costly losses. Additionally, the logistics and potential wear from frequently moving a large, cumbersome appliance might negate the benefits of having a bigger fridge. For renters and frequent movers, a smaller lighter fridge often makes more practical sense. For those looking to get the easiest fridge to move they should also bear in mind the general rule of thumb for fridge sizing:

  • Couples or individuals: 200-350 litres
  • Families of three to four: 350-500 litres
  • Larger households: 500+ litres

While the number of people in your home provides a basic guideline, your personal habits are equally crucial when choosing a fridge size. Do you buy in bulk, or frequently cook large meals that require storage? If so, a larger fridge will serve you better. Conversely, smaller households with less intensive storage needs might initially consider a compact model adequate. Remember, opting for a larger fridge might be more beneficial in the long run if your living situation is stable.

Fridge Types: Pros and Cons

Top Freezer: Traditional, efficient and budget friendly, best for minimal freezer use.

Bottom Freezer (Upside Down): Provide easy access to fridge contents at eye level, and typically offer much more usable space per litre in the freezer section because of their drawer design. This design allows for better organization and easier access to frozen items, making it a practical choice for those who utilize their freezer frequently. My personal favourite.

Side-by-Side: Equal fridge-freezer space spread across all levels but generally less energy-efficient. A common complaint among users is the narrowness of the compartments, which can make storing larger items, like pizza boxes or wide platters, impossible.

Quad Door: Stylish and flexible but more expensive.

French Door: Essentially a wider version of an upside down fridge, featuring two doors for the refrigerator compartment at the top. While currently in vogue, personally I find these models to be more cumbersome as you often need to open both doors to find what you want, unless you remember where everything is. It’s not a big thing, but it is an extra needless step to go through multiple times a day. Moreover, the French door design tends to be more complex and is consequently prone to more faults compared to standard upside down fridges.

Chest Freezer: Highly efficient and reliable for long-term storage.

Bar Fridge/Freezer: Compact and suitable for small spaces or supplemental use.

Energy Efficiency: More Insulation, Less Concern

Modern refrigerators haven’t seen significant leaps in energy efficiency for 20 years or more; they are essentially well-insulated boxes with compressors. Since the cost of insulation is relatively low, and the technology has not drastically changed, there’s minimal efficiency difference between high-end and budget models today. It’s a consideration, but not a hard one to satisfy. Opting for a more efficient fridge is a no brainer, it’s an appliance that usually runs 24 hours a day, 7 days a week. It’s unwise to save a few dollars now only to pay hundreds more in power later. While opting for a more efficient model is a wise choice, it’s also important not to overspend for marginal gains in efficiency, as the extra cost may not justify the small increase in performance, and be more a way of justifying a prestige model.

Features, Brand, and Longevity

Simplify Your Tech

Avoid fridges that are overloaded with smart features and electronic add ons. While these technologies may appear appealing, they introduce unnecessary potential points of failure, possibly shortening the lifespan of your refrigerator, especially so for budget models which are unlikely to have parts available after a few short years. Simple designs are often more reliable and easier to maintain over the long term. Components embedded in doors, like water dispensers and digital displays are particularly vulnerable due to repeated stress from door movements.

Brand

When it comes to purchasing a refrigerator, the brand can significantly impact the long-term viability and maintenance of your appliance. Opting for a well-known brand often ensures that replacement parts will be readily available, even many years after your purchase. For example, Fisher and Paykel are known for maintaining a supply of some parts for their appliances (though notably not fridge doors) dating back as long as 25 years. This availability of parts makes it less likely that a minor fault will require a full appliance replacement.

Conversely, choosing a lesser known brand might save money upfront but could lead to challenges in finding parts down the line. While economical, such brands tend not to support their products with a long-term supply of parts, making repairs difficult or impossible. Regrettably, given the high labour costs in countries like Australia, it is often more cost-effective to purchase a new, inexpensive appliance from imported from abroad than to pay for repairs in countries like Australia. Moreover, the variable quality of local appliance repairs can make maintenance less reliable and economically viable when accounting for the risk of poor workmanship. Despite the allure of investing in high quality products, the financial rationale for maintaining them can be hard to justify.

Cyclic vs Frost Free Refrigerators

Cyclic Refrigerators (Manual Defrost)

Cyclic refrigerators allow natural ice buildup which must be manually defrosted every 6-12 months by emptying and turning off the fridge for 24 hours. These models are made of significantly fewer components, making them cheaper and less prone to faults. This actually forms the basis of the perception that older fridges that predated widespread use of frost free technology were more reliable, because they were – but not because they were necessarily built better, but because there was less to go wrong. Cyclic technology is less common in modern combined fridge freezer units but remains prevalent in bar fridges, standalone fridges, and standalone freezers including chest freezers.

Frost Free Refrigerators

Frost-free models use a fan to circulate air and a heater to prevent ice accumulation, eliminating the need for manual defrosting. This convenience means consistent temperatures and less maintenance but are less reliable than cyclic models. Frost free technology is standard in most contemporary refrigerator designs due to its convenience and consistent cooling.

Consider Shelf Design and Material

The level of adjustability in refrigerator shelves can vary significantly from model to model. Some fridges offer only a few possible shelf positions, limiting your ability to customize storage space, while others provide much greater flexibility, allowing you to easily accommodate items of varying sizes.

Additionally, pay close attention to the material of the shelves. Clear plastic, though commonly used, is more susceptible to breaking compared to other materials like tougher plastics or glass. If a shelf breaks, replacement can be challenging—especially if the specific part is no longer available or is prohibitively expensive. In such cases, the inability to replace a shelf can render the entire fridge less functional, and it might even end up being discarded prematurely. Therefore, choosing a fridge with durable shelves not only enhances usability but also contributes to the appliance’s longevity.

Compressor Quality: The Heart of Your Fridge

The compressor is the heart of any refrigerator, crucial for its functionality and logevity. A failure in the compressor often renders the refrigerator beyond economical repair, as replacements can be prohibitively expensive. Surprisingly, many shoppers overlook this vital component when selecting a new fridge.

Performing a simple brand check on the compressor before purchasing is a small step that can save you from significant expenses and inconvenience. Look for models equipped with Japanese or Korean compressors from brands such as LG, Samsung, Panasonic, or Matsushita. Chinese compressors have significantly improved in recent years, yet they do not have the long-standing reputation for reliability that other brands boast. While they are becoming more competitive, they still lack the historical track record of established Japanese and Korean compressor manufacturers.

Door Hinge Placement

An often overlooked but important aspect of refrigerator usability is the direction in which the door opens. If your fridge is positioned with a wall on its left, it is typically more practical to have a door that hinges on the left. Conversely, if the wall is on the right, a right-hinged door is preferable. This prevents awkward openings and closings, particularly in a tight kitchen. Similarly, when a kitchen is designed to have the fridge enclosed within a cupboard, it’s essential to choose one with hinges on the same side as the cupboard’s opening to ensure seamless access. It’s a common misconception that refrigerator doors are easily reversible. In reality, reversing the door is not straightforward; it often requires replacing the doors themselves and at best usually involves buying new hinges, handles, and other components. The process is also labour intensive. Get the hinge direction right from the start.

Budget

Navigating your refrigerator purchase within a budget doesn’t mean compromising on quality. One strategy to consider is buying a used, high-quality appliance. This approach allows you to access better features and larger sizes that might otherwise be out of reach financially if purchased new. It’s an open secret in the appliance market that refrigerators depreciate quickly; a fridge that’s just left the showroom is only worth 30-50% of its sticker price. This depreciation curve suggests a smart opportunity: let someone else bear the brunt of this initial loss. Purchasing a gently used refrigerator can offer substantial savings. This option requires a bit more effort in terms of arranging pickup and installation, but the financial benefits can be considerable. However –  it’s also prudent to approach this market with caution, as scams are rife. Check out our guide here to avoid being scammed. My insider tip – buy a used FIsher & Paykel fridge in place of a brand new no name, the Fisher and Paykel is likely to be half the price and easily outlive the cheapy.

Posted on Leave a comment

Vinegar in Washing Machines is Probably Safe: Myths Debunked

Fisher Paykel part H0020300797 on a white background

Vinegar is widely appreciated for its versatility and eco-friendliness as a natural alternative to harsh chemicals, but there’s also a lot of misinformation out there. Some of this includes dramatic stories about damaged hoses or seals from vinegar use. As an appliance repair specialist with deep experience in servicing washing machines, especially Fisher and Paykel models, I am here to debunk these myths. While concerns about vinegar damaging washing machines may have had some basis in older models -which often used natural rubber components less resistant to acidic substances—the narrative has persisted beyond its relevance. Today’s machines typically use more durable materials that can withstand much more aggressive chemical exposure. I’m not claiming that vinegar is entirely harmless under all circumstances, but in my extensive experience with both modern and older machines, I have yet to encounter an example of vinegar causing damage.

Fisher Paykel part H0020300797 on a white background

Debunking “Evidence” that Vinegar can Damage your Washing Machine

Anecdotes and unverified claims often fuel the myth that vinegar damages washing machines. For example, one widely circulated story on social media and picked up by mainstream media includes a claim that vinegar has disfigured a rubber washing machine hose from a Fisher and Paykel washing machine with included photographs as proof. As a Fisher and Paykel specialist, I have examined the image in question and can confirm that the hose is not damaged; rather, it is in its correct operational shape. This is precisely what that hose is supposed to look like.  It is part number H0020300797 “Hose Dispenser Tub” which connects the soap dispenser to the washing machine tub on all newer FIsher and Paykel frontloaders. You don’t have to take it from me, you can Google the part number to see a wide selection of photographs showing the part brand new from parts suppliers. It might be a bit out of shape where it is being held in the photograph, but it could also easily have been manipulated to look like that before the photo and then held in place for the photo. In any case, the hose pictured is perfectly serviceable.

This widely circulated image purports to show a washing machine hose damaged by vinegar - Credit: Cleaning & Organising Inspiration Australia/Facebook
Fisher Paykel part H0020300797 installed on the basket attached to the soap dispenser photographed from the front
Fisher Paykel part H0020300797 installed on the basket with the soap dispenser removed, photographed from the top

This misinformation appears to be a case of misunderstanding, where individuals without technical expertise are misinterpreting normal appliance parts as damaged. There’s likely no actual Fisher and Paykel technician involved in this claim—just a fabrication or a misinterpretation of the facts. Additionally, even if we were to consider the possibility that the hose had been damaged, there is no concrete evidence here linking vinegar to the damage. The assertion that the washing machine’s owner used vinegar to soften their towels does not substantiate vinegar as the cause. The quality of such a claim is questionable at best. Such speculative reasoning underscores the importance of scrutinising and verifying claims before accepting them as facts.

The anecdotal evidence frequently cited in arguments against the use of vinegar in washing machines often lacks scientific rigor and is typically based on individual, unverified accounts. It is unreasonable to attribute the failure of a washing machine component, such as a seal, to vinegar alone, especially when this usually occurs after extended use involving various substances over many years. To conclusively blame vinegar without considering other factors is overly simplistic and unfounded.

The Past Concerns of Vinegar Damage in Washing Machines

While certain types of rubber can be susceptible to degradation from vinegar when exposed over long periods, this concern is largely irrelevant for modern washing machines. It is important to recognise that the technology and materials used in the manufacturing of washing machines have significantly advanced over the years. Historically, older washing machines may have utilised natural rubber components that were not as resistant to acidic substances like vinegar. Long-term exposure to vinegar in these machines could potentially lead to the deterioration of the natural rubber components. However, if you own a washing machine that predates this millennium and its rubber components are miraculously still intact, it would be wise to avoid using vinegar.

The Resilience of Modern Washing Machine Components

The evolution of materials in the past two decades means that the potential for vinegar to damage modern washing machines is not a realistic concern. During this period, washing machine manufacturers have turned to more durable materials such as Ethylene Propylene Diene Monomer (EPDM) and silicone rubber. These materials, while more expensive than natural rubber, are chosen for their superior resistance to a wide range of environmental stresses, including chemical exposures from detergents and cleaning agents like vinegar and bleach. Although these materials cost more than natural rubber, they are preferred for their outstanding resistance to a variety of environmental stresses, including exposure to chemicals found in detergents, cleaning agents like vinegar, and bleach. Given these advancements, it would be highly unusual for manufacturers to choose materials vulnerable to vinegar-induced damage. Using such susceptible materials could lead to consumer dissatisfaction and potential legal claims, as the products might not be considered fit for purpose.

Washing machine components are routinely subjected to high temperatures, ranging up to 95°C (203°F), and interact with a cocktail of cleaning agents including highly alkaline detergents, fabric softeners, oxygen bleaches, and even chlorine bleach. Washing machine components are designed to endure much harsher treatments than exposure to a dilute vinegar solution during the rinse cycle. The idea that vinegar – which is comparatively mild – could cause damage seems unlikely.

To illustrate this resilience and from my extensive experience in the second-hand appliance sales industry, it’s common practice to remove heavily moulded door boots of all brands and soak them in strong commercial bleach. Remarkably, seals that were once rigid and seemingly beyond repair emerge from the bleach solution supple and impeccably clean, as if they were new. Given that these rubber components can endure such intense bleach treatments and come out in better condition than they went in, the idea that vinegar, a much milder substance, could cause harm seems extremely unlikely. In fact, the reason that the door seal is not soaked in vinegar is that it is not aggressive enough – that should tell you everything you need to know!

Furthermore, I have not seen any verifiable evidence that suggests that a dilute vinegar solution used during rinse cycles presents any risk to washing machine components. I would even go so far as to wager that using your washing machine daily with undiluted vinegar in place of water would not cause any issues other than pungent clothes. I have tested the claim somewhat by running a cycle with double-strength vinegar at high temperatures and observed no adverse effects on the washing machine rubbers or drum. This experiment does not address the potential long-term effects of vinegar contact.

So – Can you use Vinegar in Washing Machines?

The evidence strongly supports the use of vinegar in washing machines as a safe and effective cleaning agent in modern washing machines. While historical concerns about the impact of vinegar on natural rubber components were valid, advancements in material science have rendered these worries obsolete for modern appliances. Today’s washing machines are equipped with more durable materials, which are well-suited to withstand the mild acidity of vinegar. Anecdotal claims and unverified stories continue to circulate, but they lack scientific rigor and often stem from misunderstandings or misinterpretations of the facts. My professional experience, coupled with proactive empirical testing, reaffirms that vinegar, even when used in higher concentrations, does not harm the structural integrity or functionality of contemporary washing machine components. You should feel confident in incorporating vinegar into your laundry routines, benefiting from its natural cleaning properties without fear of damage to their appliances.

Let me also assure our Whybuy customers: We will never provide you with a washing machine that cannot handle vinegar. If you choose to run your machine with pure vinegar, feel free to do so. The idea that a modern washing machine could be damaged by vinegar is frankly ludicrous. Any machine that can’t withstand such a mild agent is simply not up to standard. So go ahead and use vinegar as you see fit!

Posted on

Fridge Dripping Water? Here’s How to Fix it

Dealing with a fridge dripping water or a leaking fridge can be frustrating, especially when you’re unsure of the cause. As an appliance repair specialist, I’m here to demystify this common issue and provide actionable advice for both identifying and solving the problem. It’s essential to differentiate between the normal operation of your fridge, which might include some dripping sounds, and the signs of an actual leak.

Why is Water Coming out of my Fridge?

First – it’s crucial to differentiate between the normal operation of a refrigerator, such as dripping sounds, and an actual leak. It is normal for all fridges to produce a dripping sound, and so too it is normal for water to be coming out of a fridge. We run into problems when that water is not going where it is meant to.

Some refrigerators naturally produce a dripping noise due to the circulation of their refrigerant, which is a normal aspect of their operation and not a cause for concern. Additionally, refrigerators generate water as part of their functioning. At the heart of this process is the evaporator, the component where the cooling occurs, some fridges only have one in the freezer including most frost free models, while others have one in the fridge and one in the freezer, including most cyclic models. Working below freezing temperatures when the compressor is running, the evaporator causes moisture in the air to freeze upon contact whenever the fridge door is opened. In non-frost-free or cyclic models, the ice that forms on the evaporator within the fridge section periodically melts away—approximately every 30-40 minutes when the compressor cycles off. In the freezer section of these models, ice continues to accumulate until manually defrosted by the user. Frost free fridges, on the other hand, are designed with a defrost heater in the freezer that activates periodically to melt away any accumulated ice on the evaporator. In a frost free fridge, these drips may hit the heating element directly, creating a sizzling noise. So, if you’re hearing these sounds or seeing drips but there isn’t actually a problem, rest assured that your fridge is likely just doing its job.

Normal Fridge Dripping

You probably do not have a problem if you can see or it sounds like:

  • fridge dripping water with or without a sizzling noise
  • water dripping from the back of fridge into a pan
  • fridge dripping water from top
  • fridge leaking water inside from top
  • fridge leaking inside from top
  • fridge leaking water from freezer
  • fridge leaks water every few days
  • fridge keeps leaking water, but the water is not ending up somewhere unwanted

A Leaking Fridge

You have a problem if you’re dealing with unwanted puddles, or water where there should not be water:

  • fridge leaking water inside bottom shelf
  • fridge leaking water inside under crisper vegetable drawers
  • fridge leaking water from front
  • fridge leaking water from door
  • fridge dripping water inside and it’s making a mess
  • water is coming out of your fridge and resulting in puddles or damage
If you are dealing with a leak, a frost free fridge fridge leaks water every day or few days, when, and shortly after the defrost heater is activated.  A cyclic model will leak water every hour or so as the compressor cycles on and off.

The 5 Causes of a Dripping Fridge

1: A Cracked Evaporation Pan

If you have a cracked evaporation pan the most likely symptoms you will encounter are:

  • fridge freezer leaking water underneath
  • fridge dripping water underneath
  • fridge leaking water from back
  • water dripping back of fridge
  • the leak started after the fridge has been moved

Water produced by a fridge has to go somewhere. In most refrigerators the water is meant to drip into a drip tray located beneath the evaporators. This tray collects melted ice and funnels it into a drain, which empties into an evaporation pan either atop the compressor outside the fridge or beneath it. Here, the water is evaporated by the heat the fridge expels. Should this tray crack, it can lead to water leaking onto the floor. If your refrigerator starts leaking post move, the cause is likely a drain pan that has been damaged by the trolley during the move. The tray can usually be replaced without much trouble, or it can be removed and repaired with silicone, providing a practical fix when replacements are too costly or not readily available.

This is a common issue with newer Fisher and Paykel refrigerators, whose drain pans are particularly prone to snapping from their mounts when trolleyed from the back. The damage might remain unnoticed for a few hours or even days after the fridge is turned on, with water leaking onto the floor from underneath the fridge, or from the back of the fridge.

The freezer of a Fisher and Paykel fridge with the back panel removed exposing the evaporator

2: An Improperly Levelled Fridge

Many people are unaware that properly leveling your fridge is essential to prevent leaks. Recall the water produced during the fridge’s operation; it naturally follows gravity from higher to lower points. If your fridge leans forward, even slightly, water may not drain correctly but instead flow forward, resulting in the:

  • fridge leaking water inside bottom shelf
  • fridge leaking water inside under crisper vegetable drawers
  • fridge keeps leaking water inside
  • fridge leaking water from front
  • fridge leaking inside from top of the fridge section
  • fridge leaking water from freezer into fridge

Most are unaware that properly leveling your fridge is essential to preventing leaks. That water from earlier, remember how it needs to go somewhere? Well it also needs to obey the laws of physics so it will flow from high to low. And if your fridge is leaning forward even the tiniest bit, the water may not flow into its drain as it should but rather it can come forward, resulting in leaks that are inside the fridge, not coming from outside the fridge. Fridges are always designed to lean back, never forward. For fridges with the freezer at the top this usually manifests as water under the crisper vegetable drawers, dripping from the top of the fridge, or leaks that appear to come from the freezer. Usually there is also a puddle at the front of the fridge that may come and go. For refrigerators with the freezer on the bottom, it usually manifests In the generation of sheets of ice on the bottom of the freezer, which can often go unnoticed because it doesn’t cause many problems. To check if your fridge is tilted forward open the freezer door about a third of the way. Does it fallback toward the fridge, stay in place or open further? If it opens further your fridge is tilted forward, if it stays in place the fridge is probably not tilted back enough, and if it falls towards the fridge the tilt is sufficient.

Theoretically, the solution to this dripping fridge is straightforward: ensure your fridge has a slight backward tilt. A minimal incline is sufficient; overly tilting it backward is unnecessary, but you won’t hurt a fridge tilting it back too far. Fridges are equipped with two adjustable front feet: turning them counterclockwise extends them, and clockwise retracts them. It’s easier to adjust these feet with the fridge empty to avoid having to lift the stored food as well. Ideally, two people should perform this adjustment: one slightly tilts the fridge back and the other adjusts the feet until a slight backward lean is achieved. To check the adjustment, slightly push the fridge door open; it should swing back on its own to some extent, but needn’t necessarily close by itself.

However, if your fridge has been leaking for a while, simply re-leveling it might not resolve the issue. Extended periods of leakage can lead to water refreezing in places it shouldn’t, obstructing proper drainage. In such cases, the best course of action is to empty the fridge, turn it off, and allow it to defrost completely for 24-48 hours with the doors open, ensuring all ice buildup melts. Placing towels on the floor will help absorb any water that leaks out during this process.

3: A Blocked Drain

A blocked defrost drain, situated beneath the fridge’s evaporator, will have symptoms similar to those of a fridge that’s not level – primarily water leaking from the inside. A drain can become blocked when common culprits like a pea, soggy piece of cardboard, or fragments of glass or plastic fall into the drip tray. While theoretically straightforward to resolve – in practice – the blockage becomes more complicated. Ice accumulates behind the debris, creating a sort of mini-glacier, because the defrost heater continues to operate without anywhere for the melted ice to go. This ice encases the obstruction, making it impossible to remove without first dealing with the ice buildup.

To clear a blocked drain, turn the fridge off to allow it to defrost over 24-48 hours with the doors open. If you’re pressed for time, applying heat with a hairdryer or heat gun can melt the ice faster, but be careful to avoid damaging plastic components in the process. Boiling or hot water may also work and is less prone to damage, but can be messy and more dangerous.
For frost-free models, removing the panel inside, and at the back of the freezer is usually required to access the evaporator, drip tray, and drain, and specific to each fridge’s design. To find the correct procedure for your model, it’s advisable to search online using your refrigerator’s brand and model along with phrases like access evaporator or remove back freezer panel for guidance. Typically, this panel is secured with screws, which may be concealed beneath caps, as well as hidden plastic clips. You need to carefully pry the panel off after unscrewing, being mindful not to break the plastic components, but usually with more than enough force to break them. This is a task that requires experience unfortunately, and if you’re having your first go at this, expect some breakage of the back panel. Additionally, attempting to remove this panel without first allowing any accumulated ice to melt can complicate the process, as the ice may effectively ‘glue’ the panel to the rest of the refrigerator, making removal more challenging. For beginners its better to wait for the ice to melt out naturally with a doors open defrost. Once the back panel is removed if required, and the ice is melted out, you’ll see the obstruction sitting in the drip pan over the drain hole. Stab it out using a flathead screwdriver and some satisfaction or use a vacuum cleaner to suck it out. Once unblocked, pour a glass of water into the drain tray. The drain isn’t meant to handle large volumes of water quickly, but a couple hundred millilitres should drain in less than thirty seconds if it’s clear.

An alternative but ill-advised approach is to come from the drain hole’s exit underneath the fridge. This can usually be found above the compressor. Using a cut coat hanger to poke up the hole or using compressed air can be effective at temporarily removing the blockage after a defrost, but often the debris will fall back into the hole in days or weeks leading to the same issue.

A completely iced up drip tray with blocked drain. This fridge would be leaking water inside.
An ice free drip tray showing the drain hole and a wire that goes into it to transfer heat from the defrost heater and prevent it from plugging with ice.

4: A Leaking Water Connection

If your fridge has a water connection, for an automatic ice maker or chilled water dispenser, this is an obvious source of leaks you should consider, and one that is very easy to diagnose. Simply find the tap that the fridge is connected to and turn it off.  If the leak stops, you have found the issue.  If the leak continues, turn the tap off, and disconnect the line running to the fridge, we want to rule out a tap that isn’t closing properly too. If the fridge doesn’t leak when the water is off, theres your problem

A faulty icemaker or joint in the pipe work can easily create a leak. Because there is so much variation in water connections and how they are made to and within a fridge, this article will not attempt to cover all of the various ways you might narrow down the issue – we’ve got you some of the way there, now you need to head to Doc Google for more specific information related to your appliance.

5: A Badly Designed Fridge

Sometimes, the root cause of a refrigerator’s leak isn’t a simple fix or maintenance issue but rather an inherent design flaw. When a refrigerator leaks internally despite all efforts to correct it, the design may be at fault, and options for a fix can be limited.

Samsung French door refrigerators exemplify how unique designs can contribute to persistent issues. Unlike more traditional frost free models that feature a single evaporator located in the freezer from which cold air is distributed, these units have separate evaporators for both the fridge and freezer sections. Somehow they have made a mess of the drain in the fridge which often develops leaks which just cannot be resolved.  You can lean it, clean it, doesn’t matter – it leaks. 

Another case that comes to mind involves a friends LG bottom mount refrigerator, where no amount of leveling or drain clearing seems to prevent ice sheet formation in the freezer. It didn’t matter what I did, the drain always froze over and blocked itself. This scenario suggests a design or component flaw that defies typical maintenance or adjustment efforts. Owners of such models might find themselves manually removing ice buildup on a regular basis, but there simply is no other choice.  Sometimes a model is a lemon, and the best way to avoid these lemons is to check online reviews before you buy, and steering clear of new untested models.  Samsung have been making their same badly designed model for more than a decade now, don’t be a sucker and buy one of their bad french doors new.

Posted on Leave a comment

How to Clean A Washing Machine Drain Pump Filter and Why You Probably Shouldn’t

You might come across recommendations suggesting the removal of the drain pump filter for periodic cleaning. Our advice is don’t. While manufacturers will often suggest it be done frequently and provide video instructionals showing the procedure carried out on a gleaming new machine that hasn’t done a days work in its life, reality paints a different picture. The process can be messy, fraught with complications, and potentially time-consuming, risking days without a functioning washing machine. In this article, we will guide you through the removal of your drain pump filter, should you choose to proceed despite our recommendations. We’ll also explore a more effective method for maintaining a clean washing machine drain pump filter, offering a simpler solution to ensure a clean appliance.

The drain pump filter and rubber drain hose on a FIsher Paykel front loader washing machine

The Role of the Drain Pump Filter

At its core, the drain pump filter’s purpose is to protect the drain hose and in particular the drain pump from blockages by trapping forgotten items in pockets that are too big to pass through like coins, bobby pins, screws and nails before they get to the pump. Without this safeguard, objects could travel into the pumps propellor jamming it, or potentially though less likely wedging and blocking the drain hose impairing functionality or necessitating costly repairs.

When to Remove the Drain Pump Filter

The removal of the drain pump filter should not be a routine step undertaken lightly. It is advisable only in specific circumstances:

  • To prevent mould growth when the machine will not be in use for an extended period (exceeding a month), such as during long-term storage, international shipping
  • When there are evident problems like slow draining or a failure to drain, which indicate a blockage. The headaches that can be caused by unnecessary removal of the filter generally do not outweigh the benefit.
  • For some households it ought to be said, the drain pump filter will require regular removal – those households where pockets are frequently filled with forgotten items and not thoroughly checked. For those households it may be best to have a replacement filter on hand to avoid downtime.

Step 1: Prevention is better than Cure

Often, items left in clothes don’t actually reach the drain pump filter; they get caught in the washing machine’s drum or the door seal (also known as the door boot). By adopting a routine of checking pockets before loading the machine, and inspecting the door seal after each wash, you can intercept most of these items before they progress into the drain pump filter. 

Step 2: Locating the Washing Machine Drain Filter

Top Loaders

Top loader washing machines, particularly those in Australia, are unlikely to have a drain pump filter. The design of top-loader washers typically prevents larger items from passing between the bowl and basket, rendering a drain pump filter unnecessary. I cannot see any reason why it would be different internationally, but my research for writing this article seems to indicate that overseas things may be different, though I cannot fathom why.

Front Loaders

Every front loader washing machine I have ever seen has had the drain pump filter in the same place. Whether it’s an older washing machine or a newer washing machine, the drain pump filter is located behind a flap on the lower front of the machine. Often you need to insert a butter knife or screwdriver into a slot to open it.

Step 3: Removing the Drain Pump Filter

If removal is necessary, you may want to turn off the water supply to the machine to avoid accidents. Wait a few hours after the last use, especially after hot cycles, to let any hot water remaining in the machine to cool down and prevent burns.If removal is necessary, you may want to turn off the water supply to the machine to avoid accidents. 

Upon opening the flap, the circular front on the filter will be revealed, which unscrews counterclockwise. Preparing for a potential watery mess is wise; have a towel ready and begin to unscrew the filter gently. This action will release any water trapped at the bottom of the machine. Turning the filter initially might be challenging; using a pair of pliers can be helpful, but be cautious to avoid causing any damage.

For a tidier method of draining residual water, you may find a small capped rubber outlet hose near the filter. Positioning a tub or bowl below this hose and then removing the cap with a twisting motion will allow for a controlled flow of water. Do not just tug the cap off, you risk damaging the hose, its important to twist while pulling gently to break the seal. This approach comes with its own set of challenges. The hose inside the washer is usually deliberately kinked from factory as a second measure to prevent leaks. A moderate pull is necessary to straighten the hose and enable the water to drain efficiently. Excessive force risks damaging the hose, leading to potential replacement needs, while insufficient force could prevent water from draining altogether. In some instances, the machine might not have a separate rubber hose, instead featuring an outlet integrated into the drain filter itself. This can usually be activated with a flathead screwdriver to enable water release.

Dealing with a Stuck Washing Machine Filter

Removing the filter isn’t always straightforward, either. Objects such as coins, bobby pins, and screws can jam the filter, complicating its removal or reinsertion. For some models, such as Fisher and Paykel front loaders, the front of the filter can easily detach from the body, particularly if pulled too forcefully. If the filter becomes jammed or the front detaches during removal, and it’s confirmed to be fully unscrewed, you essentially have two options. If there’s enough space, a long flathead screwdriver can be used to wedge between the filter housing and the filter’s inner front face. Carefully – and often forcefully – leveraging the screwdriver can ease the filter out, though the significant force required risks breaking it. This technique is recommended for Fisher and Paykel front loader washing machines.

For machines where inserting a screwdriver could cause damage to the machine’s front, attempting to use pliers to grasp the front of the filter and pull it out may work. However, this approach can be problematic for some models, like the Fisher and Paykel front loader, where it might only result in pulling off the face of the filter, leaving you in basically the same situation but with nothing to pull on. In such cases, persistence, patience, and careful manipulation of the filter might get the job done, or you might need to consult a professional to remove the pump filter housing and push the filter out from behind.

Step 4: Cleaning the Drain Pump Filter and Filter Housing

Removing Lint and Debris

Start by manually removing any tangled lint and visible debris from the filter with your fingers. This step is repellant even for a seasoned service tech but there is no way around it.

Rinsing the Filter

Place the filter under running water to wash away residual grime. Ensure the water flow reaches all parts of the filter to remove as much buildup as possible.

Detailed Cleaning with a Toothbrush

For a deeper clean, use a toothbrush to scrub the nooks and crannies of the filter. A toothbrush is particularly effective at dislodging stubborn particles that water rinsing alone might not remove.

Cleaning the Rubber Seal

Pay special attention to the rubber seal around the filter. It often accumulates a ring of buildup that can prevent proper sealing, leading to potential leaks. Gently clean the seal with the toothbrush or a cloth to ensure a proper seal when reinstalled.

Cleaning the Filter Housing

Use a damp rag to clean the area from which the pump filter was removed – the pump filter housing. It’s important to clean inside thoroughly, as debris tends to accumulate here as well.

Checking for Obstructions

Feel around inside the filter housing for a hole on one side where water enters from the washer’s drum. Probe for any debris that might be blocking this entrance and remove it carefully. Be careful as the debris may be sharp – nails or screws for instance.  If space allows, tilting the washing machine to one side and gently shaking it can help dislodge any trapped debris. This method can be effective for removing objects that are proving difficult to remove. 

Checking the Propellor

While we’re here, it’s wise to inspect the drain pump propeller for any obstructions, particularly if you’ve taken out the filter due to slow or non-draining issues with the washer. Shine a torch into the back of the drain pump filter housing to spot the four-blade propeller. It’s common for items like hair ties or bandaids to wrap around the propeller shaft, causing failure. Although these may be challenging to see, try your best to inspect closely. If you discover any obstructions such as a hair tie or bandaid, you can typically remove them using long tweezers or needle-nose pliers. In some cases, a utility knife may be necessary to cut away the debris before gently pulling it off with the tweezers or pliers

Step 5: Reinserting the Drain Pump Filter

After cleaning the filter and ensuring that the drain pump propellor is free of debris, the next task is to replace the filter into its housing. It’s important to note that most filters are designed with two locator tabs. These tabs must be aligned with the corresponding notches in the housing for the filter to be pushed into the housing. When screwing the filter back into place, it should twist smoothly and come to an abrupt stop once it’s fully tightened. This sudden stop indicates that the filter is correctly positioned and securely fastened, and will usually be accompanied by the turning grip on the filter being positioned straight up and down. When screwing the filter back in, if it becomes increasingly difficult to turn, feeling tighter without reaching that definitive stopping point, usually it means that the rubber seal on the filter has become pinched. A pinched seal will not be watertight. Addressing a pinched seal can sometimes be as simple as exercising patience; removing and reattempting the insertion of the filter multiple times can sometimes resolve the issue. The correct solution however is to replace the filter entirely. Generally, the rubber washer or seal is not available as a standalone replacement part. If the seal is damaged or worn, buying a new filter is necessary.

A Better Option

Instead of opting for removing the drain pump filter for cleaning, there’s a more efficient and less intrusive method worth considering: using bleach to clean the filter and eliminate mould. This approach involves adding approximately 500ml of generic bleach directly into the drum of your washing machine. Now select the longest cycle excluding pre washes and extra rinses, and select the hottest temperature available. Start the machine.

It’s advisable to use cheaper bleach options for this purpose, as pricier alternatives tend to include additional detergents that might lead to oversudsing, which could overflow and potentially flood your laundry area. The goal of this bleach cycle is to tackle and eliminate mould, mildew, and bacteria not just in your drain pump filter, but throughout your washing machine. The bleach will also work to dissolve lint that has accumulated in the drain pump filter. For those looking to ensure a thorough clean, allowing the bleach solution to soak in the washing machine before running the cycle can be particularly effective. While this method won’t address non-organic materials such as coins, screws, and nails, it effectively kills mould and dissolves all the lint, addressing two of the main concerns related to washing machine maintenance.

Opting to clean your washing machine with bleach offers a significant advantage over manually removing the drain pump filter. It circumvents the potential issues discussed earlier, such as the filter becoming stuck during removal or the rubber seal getting pinched and compromised. This bleach cleaning method provides a straightforward, hassle-free solution to maintain your washing machine’s cleanliness and functionality, without the drawbacks associated with physical filter removal, and can also be combined with a deep clean if your washing machine, check out our full guide here.

Posted on Leave a comment

How to Deep Clean Your Washing Machine with Bleach and Descaler

As an appliance technician, I often encounter front loader washing machines that need more than just a basic clean. Over time, these machines can harbor bacteria, mould, and limescale, affecting their performance and lifespan. If you’ve noticed visible mould or your machine is smelling musty, it’s a clear indicator that it’s time for a comprehensive deep clean. This process is not only crucial for maintaining hygiene but also for ensuring your machine continues to operate at its best. Today, I’ll guide you through a comprehensive deep cleaning process using bleach and descaler. For those seeking preventive maintenance tips rather than an immediate deep clean, I recommend exploring our guide on vinegar washes for washing machines, which offers a gentler approach to regular upkeep.

Step 1: Checking the Door Boot

Begin by inspecting the door boot for any foreign objects. It’s not uncommon to find coins, hair ties, nails, screws, and bobby pins lodged here. Extracting these objects will prevent damage to the basket the drum rotates in; a single dislodged coin or screw for example can puncture it, resulting in a costly repair. Similarly, during the cleaning process, these items can become fragmented or dislodged by the vigorous action of chemical cleaners, potentially blocking the drain pump or migrating to sensitive areas where they may cause issues.

Step 2: Deep Clean Your Washing Machine With Bleach

Next, set your washing machine to the highest temperature and longest cycle available, excluding extra rinses or prewashes. Add approximately 500ml of generic bleach to the drum. Opt for cheaper bleach, as the more expensive types often contain additional detergents that can cause oversudsing and potentially flood your laundry. This bleach cycle aims to eliminate mould, mildew, bacteria, and remove any staining on rubber door seals.

Step 3: Using a Descaler or Washing Machine Cleaner (optional)

Bleach is highly effective at killing bacteria and removing stains, but its cleaning prowess does not extend to the elimination of limescale or mineral deposits. These deposits can originate not only from hard water but also from the detergents used. This is where the critical need for a quality descaler becomes evident. In areas with hard water, the accumulation of deposits that bleach cannot address makes descaling indispensable.

For many, running a cycle with bleach alone is enough to keep their washing machine clean and functioning well. While it’s beneficial to perform a descaling cycle when possible, it’s not always strictly necessary for achieving satisfactory cleaning results. Identifying the need for descaling, however, can be challenging without disassembling the machine to inspect the basket directly. It’s wise to lean towards descaling, but there’s no need for excessive worry.

The Role of a Descaler

The complementary roles of bleach and descaler stem from their differing pH levels. Bleach, being alkaline, excels at sanitising the washing machine by targeting a broad spectrum of bacteria and moulds, including removing mould stains from the door boot. In contrast, descalers, with their acidic nature, excel at dissolving the stubborn mineral buildups like limescale, which are immune to the effects of bleach. This acidic condition also proves fatal to microbes that may have adapted to the alkaline conditions fostered by bleach.

By using bleach and descaler in tandem, you cover a more extensive range of cleaning challenges. This dual approach ensures a more hygienic, efficient, and durable washing machine, preventing the survival and adaptation of various microorganisms. Together, bleach and descaler deliver a comprehensive cleaning solution that addresses both bacterial contamination and mineral buildup, ensuring the long-term health of your appliance.

Choosing the Right Descaler

When it comes to selecting a descaler for your washing machine, it’s important to be aware that all that glitters is not gold. Many products advertised as descalers are merely repackaged oxygen bleach, offering little in the way of true descaling properties. To ensure you’re getting an effective product, look for those containing significant amounts of citric acid, sulphamic acid, or, optimally, a combination of both. The synergy between citric acid and sulphamic acid is what sets them apart as an ideal descaling duo.

Citric acid, a natural and potent chelating agent, excels at binding to minerals and metal ions, particularly calcium, found in hard water. This ability not only allows it to effectively dissolve limescale but also to prevent its formation. Citric acid’s organic nature makes it less corrosive and safer for use on a variety of surfaces, which is why it’s a preferred ingredient in many eco-friendly cleaning products. However, its gentle nature means it might not always be strong enough to tackle more stubborn or long-standing mineral deposits.

This is where sulphamic acid comes into play. Sulphamic acid is a stronger acid with excellent descaling properties. It’s particularly effective against the toughest limescale deposits and can work in a wider range of temperatures. Its addition to the cleaning mix enhances the overall potency of the descaling process, ensuring that even the most persistent build-ups can be effectively removed.

By combining citric acid’s chelating properties with the robust descaling capabilities of sulphamic acid, you create a comprehensive cleaning solution that tackles both fresh and entrenched limescale deposits. This combination ensures a thorough clean without the need for excessively harsh chemicals, making it a safer choice for both the appliance and the environment.

For those purchasing citric acid and sulphamic acid in bulk, the cost-effectiveness is matched by their broad utility around the home. Citric acid, a natural and environmentally friendly substance, has a wide range of applications beyond just descaling. It can be used to remove limescale from kettles and coffee makers, polish brass and copper items to a brilliant shine, and even act as a natural fabric softener in laundry, eliminating the need for chemical-based products. Furthermore, its gentle yet effective acidic properties make it an excellent choice for homemade surface cleaners. Mixed with water, it can safely clean kitchen countertops, faucets, and bathroom surfaces, cutting through grease and soap scum without the harsh chemicals found in many commercial cleaners. Citric acid’s versatility extends to being an ingredient in natural dishwasher detergents and window cleaners, offering a streak-free finish.

Sulphamic acid, stronger than citric acid, excels in areas where tougher mineral deposits persist. It’s particularly effective for deep cleaning toilet bowls, dissolving hard water stains in tile grout, and restoring the cleanliness of dishwashers and other appliances affected by limescale. Its robust descaling properties make it invaluable for intensive cleaning tasks where citric acid might need a boost.

Avoid Washing Machine Cleaner With Sodium Percarbonate Listed as the Active Ingredient, it is Overpriced Oxygen Bleach
A Good Quality Washing Machine Cleaner and Descaler With a High Percentage of Sulphamic Acid and Citric Acid

Directions for Using Descaler

If you’re using a store-bought, pre-packaged descaler, adhere to the instructions provided on the packet. For those who have opted to purchase citric acid and sulphamic acid in bulk, a tablespoon of each added to the soap drawer is sufficient. Opt for the highest available wash temperature on the longest wash cycle.

The use of citric acid requires careful moderation. While beneficial for descaling, excessive use can compromise the washing machine’s rubber components. Notably, the door seal may become overly soft, increasing the risk of it detaching from the machine’s front. Typically, the rubber regains its normal firmness after several wash cycles. Excessive citric acid can also cause permanent white stains on rubber parts, such as the door seal. Finding the right balance between effective descaling and preserving the machine’s components is crucial for its longevity and performance.

Step 3: Cleaning the Soap Drawer

Soap drawers are common places for the accumulation of mould and soap scum. To clean, gently pull the drawer out to its full extension; you should find a button or release mechanism that allows you to completely remove it. Use Jif, a cloth, and a toothbrush for a thorough cleaning, ensuring you reach all the small spaces and corners. Additionally, inspect and clean the cavity from which the drawer was removed, applying Jif and using the toothbrush to scrub both the compartment and the water inlets on the top of the compartment, which are particularly prone to mould.

For a less hands on approach, particularly effective against mould, consider using a hand sprayer filled with either undiluted bleach or a solution diluted to 50%. Directly spray the problematic areas and allow the solution to work its magic for 24 hours, repeating the process if necessary. Be aware that bleach will quickly damage internal metal components of the sprayer, so be sure to rinse it thoroughly after use. For a comprehensive clean, the soap drawer itself can be immersed in a bleach solution, offering a simple way to address heavy buildup. Should you come across scale buildup that doesn’t hinder the drawer’s functionality, it may be wise to leave it untreated. The aggressive acids required for removal could introduce unnecessary risks without providing proportional benefits.

Step 4: Removing and Cleaning the Drain Pump Filter (Not Recommended)

This step is generally not recommended unless you’re experiencing issues with water drainage. Removing the drain pump filter can sometimes cause more problems than it solves. If necessary, follow our detailed guide for this process, understanding the risks involved.

Step 5: Drum Clean Cycle

With our cleaning tasks complete, it’s time to perform one last cycle to ensure all residual traces are removed. If your washing machine is equipped with a drum clean cycle, now is the moment to use it – simply select this option and start the cycle. When your washer next signals it’s time for a drum clean, you’ll know it’s time to go through this cleaning process again. For machines without this feature, choose a standard wash cycle at the highest temperature setting available to thoroughly cleanse the drum.

By following these steps, you’ve not only tackled visible dirt, mould and grime but also preventing the buildup of harmful bacteria and limescale. Remember, the key to a clean washing machine is consistent care and the right cleaning agents.

Posted on Leave a comment

Mouldy Washing Machine Rubber Door Seal – Can a Vinegar Washing Machine Clean Beat Bleach?

A very dirty and mouldy frontloader washinmg machine door seal before being cleaned

As a professional washing machine technician, I’ve encountered abundant myths and misconceptions about how to effectively clean and maintain washing machines. My advice to customers is always grounded in practical experience and empirical evidence. One of the most persistent debates is the efficacy of vinegar versus bleach for cleaning the washing machine, particularly the door seal (aka the washing machine rubber door seal of a front loader, or door boot), which is prone to mould and mildew buildup. With my professional experience guiding me, I embarked on an experiment to not only explore the truth behind these cleaning methods but also to challenge the widespread belief that vinegar can damage your machine by rusting the drum.

A very dirty and mouldy frontloader washinmg machine door seal before being cleaned
The washing machine door seal before cleaning

The Experiment

The goal was straightforward: compare the cleaning power of vinegar and bleach on a dirty, crusty, mould stained washing machine door seal. I documented the condition of the seal before any cleaning took place, photographing the initial extent of mould infestation, then after being cleaned first with vinegar, then with bleach. I also documented the whole process in a moderately long, quite boring video for those who want to see the results at each step.

Will Vinegar Clean a Mouldy Washing Machine Rubber Door Seal?

I started with vinegar, a popular natural cleaning solution praised for its eco friendliness and safety. I had a bias formed from my own professional experience as an appliance technician. I fully expected vinegar to be useless. I wanted to give vinegar every chance of success to put this myth to bed once and for all. I used 4L of 8% double strength pickling vinegar, the equivalent of 8L of standard vinegar. In one wash. Since I was using such an insane amount of vinegar in the wash, I thought it was also a good opportunity to test the myth that vinegar will rust your washing machine drum.

I added the vinegar to the soap dispenser, and ran a long cotton wash at 90°C (194 °F) for 167 minutes. Then I waited. After the cycle finished, I cleaned the rubber door seal with Jif (creme cleanser) to remove any dirt that had been softened enough by the vinegar to be removed and then took photos of the outcome. Despite the cleaning process, the seal remained significantly stained with mould. I was surprised that vinegar had any effect at all.  It was capable of softening the surface detritus enough that it could be removed with the creme cleanser, but unable to tackle the deeper ingrained mould.

A frontloader washing machine door seal before being cleaned with bleach and after being cleaned with vinegar bottom
A frontloader washing machine door seal after being cleaned with vinegar bottom
A frontloader washing machine door seal before being cleaned with bleach and after being cleaned with vinegar
A frontloader washing machine door seal after being cleaned with vinegar side on

Does Vinegar Damage Washing Machines?

After using the equivalent of 8 liters of regular-strength vinegar, there was no damage to the drum. The reason is simple: vinegar isn’t potent enough to harm stainless steel drums, even in its undiluted form. However, it might affect drums that are already compromised by chemical wear. This outcome was anticipated, based on a straightforward rationale. If washing machine drums and their internal parts couldn’t resist the corrosive effects of vinegar, then they’d fail against the harshness of laundry detergents, let alone bleach, and putting it bluntly, a washing machine that can’t handle bleach is essentially unfit for its intended use. It’s as absurd as suggesting that the use of laundry detergent could void a washer’s warranty. Ridiculous. For those readers who are Whybuy customers, rest assured, you’re welcome to use any amount of vinegar or bleach in our machines.

Will Bleach Clean a Mouldy Washing Machine Rubber Door Seal?

Next, I tested bleach, a powerful chemical often warned against for fear of damaging the washing machine, and being bad for the environment – a claim we tested here. I used approximately 250mL of double strength commercial bleach, ensuring it was a basic formula without added detergents that could lead to oversudsing and potential flooding of the machine. It’s crucial to select the right type of bleach – inexpensive, and free of added detergents — to avoid any issues with oversudsing. Following the same cleaning cycle as with vinegar, the results were significantly better. Though minor mould stains persisted, the overall appearance of the door seal improved significantly. To tackle the remaining mould, I applied the commercial double-strength bleach directly to the affected areas several times over a period of days, a timetable more dictated by my own schedule than necessity. The bleach could have been reapplied at around two hour intervals, eliminating the need for extended waits between applications. For those using standard household bleach, achieving comparable results on heavy staining is possible with more frequent applications spaced about two hours apart, thereby enhancing the bleach’s concentration as the water component evaporates from the door seal. Using bleach succeeded in removing nearly all the mould stains effectively.

A frontloader washing machine door seal after being cleaned with bleach bottom
A frontloader washing machine door seal after being cleaned with bleach side

Final Thoughts - Bleach vs Vinegar

The results of this experiment are clear and carry important implications for both appliance maintenance and the use of cleaning agents. Vinegar is an excellent eco friendly and gentle preventative, stopping mould from getting a foothold in your washing machine if used regularly – as suggested in our weekly washing machine maintenance guide here. Unfortunately though it simply lacks the potency to eradicate an established mould infestation. In contrast, bleach, when used carefully and appropriately, proves to be the superior choice for eliminating mould from washing machine seals and the washing machine more broadly.

Posted on Leave a comment

What Size Washing Machine Do I Need?

Washing machine capacity is typically measured in kilograms (kg), representing the weight of dry clothing the machine can comfortably wash in a single cycle. Capacities range widely, from compact 5kg models, up to large 12kg+ models.

Washing Machine Capacity by Household Size - A Rule of Thumb

As a guide, the larger your household, the larger the capacity you’ll need:

  • Washing machine average size is around 7kg
  • The best size of washing machine for two people is 5kg to 7kg
  • The best size of washing machine for a family of 4 is 7kg to 9kg
  • The best size of washing machine for a family of 6 is 10kg+

The above rule of thumb simplifies washer selection, but it is not very reliable. Household size is not a reliable measure of what size washing machine is most appropriate for your needs. You should place more importance on how frequently you like to wash, and the largest items you’ll wash.

Laundry Frequency

Individuals who do laundry frequently, including those from large families, may find a 7.5kg washing machine to be more than sufficient. For example, a 7.5kg machine can accommodate the laundry needs of a single person washing twice a week or a family of six managing two loads on a weekday and six over the weekend. This equates to over 16 washes or more than 120kg of laundry weekly. Considering that a standard wash cycle lasts about an hour, running the machine continuously could process over 1000kg of laundry in a week. This capacity is ample for the entire streets needs, and probably the next one over as well. Therefore, the necessity for a larger capacity washer does not necessarily increase with family size; it’s more dependent on the laundry frequency.  

Bulky items

If you’re dealing with bulky items like duvets, blankets, or doonas, a larger washing machine may be necessary if you frequently need to wash these items. For less frequent washing, you can usually cajole a smaller machine into doing the job albeit slowly and with intervention. Although an 8.5kg washing machine, such as the Fisher Paykel front loader, can accommodate a super king duvet, it will struggle to balance the heavy load prior to the spin cycle and may attempt to do so for up to 45 minutes before conceding defeat with an Out of Balance error. Running 3 spin cycles is the way to get a result, starting at a lower rpm (500 RPM), then increasing to 800 RPM and finally 1100 RPM. While an 8.5kg machine suffices for occasional large loads, anyone regularly washing substantial items should consider a machine with a capacity of 10kg or more not only to streamline their laundry process, but to avoid premature wear on their washing machine.

Space Considerations

When selecting a washing machine with a capacity over 8.5kg, or a toploader design, it’s important to consider the unit’s dimensions, particularly for those who frequently move house. Standard washing machine spaces typically accommodate units up to 600mm in width and 850mm in height. Front loaders with a capacity over 8.5kg and all top loaders are not guaranteed to fit into a standard space.

Budget Considerations and Efficiency

For those who do laundry less frequently, opting for a washing machine with a larger capacity can be more time-efficient, enabling the washing of more clothes in fewer loads. While these larger machines are generally pricier to buy and run – owing to increased water and energy consumption – maximizing their capacity can lead to greater efficiency per kilogram of laundry compared to fully loading a smaller machine. On the other hand, if you find yourself doing laundry more frequently, a smaller machine fully loaded will be more economical to run than a larger machine half full, and with a lower initial purchase price.

Marketing Hype

Claims about washing machine capacity by manufacturers often prioritise marketing over genuine functionality. For example, Fisher and Paykel marketed both 8.5kg and 8kg front loaders that were, in fact, identical in every way, including drum size and mechanics, with the 8.5kg variant priced higher. More recently, they rebranded their 7.5kg models as 8kg and similarly upgraded 8kg models to 9kg without any actual physical changes. Samsung’s 10kg bubble washers, too, were advertised as 10kg machines, yet the manual specifies a 2kg limit for sheets. I don’t mean to single out Samsung and Fisher and Paykel; as a specialist in repairing these machines, especially Fisher and Paykel, I’m particularly familiar with their intricacies. So too is it worth noting that Fisher and Paykel machines are well built and, it’s possible they initially underreported their machines capacities for better customer satisfaction, but market competition has forced a reassessment of their strategy.

Nevertheless – I have no doubts these marketing strategies are common across the industry. This makes it especially difficult for consumers to select the right washing machine for their needs. A practical tip for consumers is to measure the drum’s diameter and depth themselves, offering a more accurate assessment of capacity when compared to other models.

The Last Cycle: Summing Up Washing Machine Wisdom

Choosing the right washing machine capacity involves more than considering your household size; it’s more important to understand your laundry habits, the frequency of washes, and the types of items you’re washing. Space, budget and efficiency are also important factors. Be mindful of marketing gimmicks and assess the machine’s capacity independently to ensure it meets your needs. Ultimately, selecting the appropriate washing machine capacity will lead to more efficient and economical laundry management, saving time, energy, and resources in the long run.

Posted on Leave a comment

Top Load Washing Machines vs Front Load Washing Machines – Which is Right for You?

Choosing between a front load washing machine and a top load washing machine depends on your family’s specific needs and priorities. If you’re looking for efficiency and space saving options, front loaders might be the way to go. But if ease of use and lower upfront costs are more your speed, a top loader could be your best bet. Remember, the right washing machine is the one that fits seamlessly into your family’s life, making the never-ending battle with laundry a bit more manageable. Let’s break it down, considering washing machine capability, efficiency, space, and cost.

Capability as Washers

Front Load Washing Machines

Front load washing machines are renowned for their gentle treatment of clothes. The tumbling action is less abrasive than the agitator in traditional top loaders, resulting in less wear and tear on fabrics. This can extend the life of your clothes, keeping them looking new for longer.
Front load washing machines usually also have on board heaters, even those with both a hot and cold water connection. They have better control over the wash temperature, and can heat the water to a set temperature as required to kill microbes.

Top Load Washing Machines

Top load washing machines with an agitator are harsher on clothes, which can lead to quicker wear. Some newer top loaders with impellers (instead of agitators) offer a gentler wash that’s more comparable to front loaders. That said though Fisher and Paykel changed from an agitator to impeller design, and then changed back after a few years after poor user satisfaction.

Top load washing machines are usually faster than front load washing machines. If you have a lot of washing you need to get through quickly, a top load washing machine is the better option – with one caveot. When washing bulky items like sheets or bath towels, if they don’t settle out properly at the end of the final rinse, the washer can end up off balance. When this happens after a few tries it gives up and calls for help. If you’ve gone out for the day, and you’re expecting to come home to a finished wash cycle, not so much. So while top loaders can be faster, they can also need your intervention to balance out the load making them slower, and less convenient

Top load washing machines rarely if ever come with on board heaters. There’s no reason why they couldn’t (other than long cycle times while the washer heats the ocean of water within), but they just don’t seem to. This means the hottest a wash can be is as hot as your hot water service is, which in newer buildings is usually regulated to 50 degrees Celsius (122°F). This is not hot enough for sanitation washes. Additionally if you only have a cold water connection for your washer, which is becoming more and more common, a top loader washer will not be able to do anything but a cold water wash, which is a real invitation for mould and microbes.

Efficiency and Water Usage

Front Load Washing Machines

Front load washing machines are celebrated for their efficiency, particularly in terms of water and energy use. They work by tumbling clothes through a small pool of water, which significantly reduces water consumption and the volume of water needed to be heated, which is the most significant energy requirement of a washing machine. Their washing action also requires less detergent and heats water more efficiently, leading to savings on your utility bills.

Top Load Washing Machines

Traditional top loading machines use significantly more water than their front-loading counterparts. They operate by filling the drum with water and using an agitator or impeller to move clothes through the water. While they’ve improved over the years, top loaders will always lag behind front loaders simply by their design.  If you use hot washes, much more water will need to be heated, so you can expect a toploader to cost you significantly more on your energy and water bills.

Space and Accessibility

Front Load Washing Machines

Front load washing machine offer a sleek design that fits well in most modern homes. They can be stacked with a dryer, a crucial feature for those with limited laundry room space. However, bending down to load and unload can be a drawback, especially for those with back issues. Pedestals are available to raise them to a more comfortable height.

Top Load Washing Machines​

Top load washing machines are easier on your back, thanks to their waist-high opening. They’re ideal for those who prefer not to bend over when doing laundry. However, they take up more vertical space and can’t have a stacked dryer, which might be a consideration if you’re tight on space. You could consider hanging a dryer from the wall above a top loader washing machine, but only a lightweight vented dryer can be hung, which means heat pump dryers and condenser dryers won’t be an option.

Another consideration is the type of floor the washer will be installed on, and its condition.  Top load washing machines are better suited to stump floors especially if the floors are in poor condition. A front load washing machine installed on a stump floor can cause a lot of vibration especially when it spins.  These vibrations can not only be very loud and annoying but also carry the potential to damage your floor, and exacerbate existing damage.  Top load washing machines are gentler on stump floors, with front load washing machines being better suited to concrete slab floors.

Cost and Longevity

Front Load Washing Machines

Front load washing machines tend to be more expensive upfront. However, their efficiency can lead to cost savings over time. They also typically offer more settings and features than top loaders, providing a more customizable laundry experience. Durability varies, but front loaders often have a longer lifespan due to their gentle washing action. Front load washing machines also tend to have better resale values, going for around 30-40% of their new price depending on condition.

Top Load Washing Machines​

Top load washing machines have historically had a lower purchase price than front load washing machines but some current models are more than double the price of an equivalent front load washing machines. In some respects they have become more of a premium item, for those who can afford the space to have them. They are generally less expensive to repair, making them attractive to budget-conscious families, but due to their low resale value of 10-20% of their new price, you’re usually better off finding a reputable used model with a warranty and replacing the machine.

Top load washing machines can be more durable, with some models lasting many years with minimal issues. However, the cost savings on the purchase price might be offset by higher water and energy bills, more wear on fabrics and a lower resale value if you need to sell it.