Posted on Leave a comment

How to Move a Washing Machine: A Comprehensive Guide from an Appliance Removalist Specialist

Moving a washing machine can seem daunting, but with the right know-how, it’s a task you can handle with confidence. As an appliance delivery professional at Whybuy, I move washing machines every day. My experience has taught me the ins and outs of safely transporting these essential household appliances. Here, I’ll share with you the in depth steps and precautions you need to take to ensure a smooth move. I recommend you read this guide from start to finish before you attempt your move, sometimes you may want to proceed with one step before another, or you’ll pick up a tip later in the guide you may want to use earlier.

A Fisher Paykel front loader washing machine on a movers trolley on a white background

Uninstalling a Washing Machine

Table of Contents

Find the Taps and Turn Them Off

Generally the taps will be directly behind the washing machine or in a cupboard next to the washing machine. If you have a dryer stacked on top of your washer you may need to bring it down to access the taps. 

Disconnecting the water inlet hoses

Method 1: Remove the Hoses to Minimise Mess

Sometimes it can be quite difficult to remove the water inlet hoses, especially if they haven’t been disconnected in years. To detach the inlet hoses, you will need to turn the fitting counterclockwise, as viewed from the back of the hose. If minimising water spillage is a priority, begin by disconnecting the hose fitting at the lowest point. This approach allows for more effective management of the release of trapped water. By disconnecting only one end of the hose initially, the water remaining in the hose will stay contained due to air pressure and vacuum formation, provided you handle it gently. Removing the lowest connection first offers more flexibility in choosing where to release the trapped water. After detaching one end of the hose, lower it into a sink, the washing machine, a drain, bucket or bowl – ensuring it is positioned at a lower elevation than the still-attached end of the hose. Then, proceed to unscrew the still-attached end of the hose; the trapped water should flow out in a controlled manner.

Once the hoses are removed its important to check the taps are not leaking. Because they are seldom turned off, they often seize up and become difficult to turn off properly or a drip goes unnoticed because it cannot leak while the hose is attached to it. Ideally you should cap off the water supply taps with a 20mm (3/4”) female pipe cap with a rubber washer inside before vacating the property to avoid damage from a leaking tap on the floor, or turn off the water at the mains when you leave.

Method 2: For Removing Stubborn Hoses

Sometimes containing water spillage isn’t a priority, especially when the hose refuses to budge or if you cannot access the hoses from the back of the machine. Particularly for under bench installations you may bee to remove the hoses from the taps first, as you cannot access the hoses on the back of the machine and you cannot pull the washer out from underneath the bench as the hoses are not long enough.

If you’re facing a stubborn hose, it’s crucial first to ensure you’re turning it the correct way. You should be directly facing the connection from behind it and then turn it counterclockwise. If you’re viewing the connection from above, side on, or directly in front, and you’re turning it counterclockwise from your perspective, you might actually be tightening it further. A helpful trick if you’re uncertain is to use a socket wrench, if available. Set it to turn counterclockwise, position it behind the fitting as though you’re about to use it for removal, and then turn. This method can help you orient yourself and ensure you are indeed loosening the fitting.

If you’ve confirmed you’re turning the right way but still face difficulty, it’s likely the hose has been over-tightened. Over time, hoses can become even tighter than when first installed. This issue is often compounded by the rubber washer inside the fitting adhering to both the hose and the inlet valve on the machine, creating a seal you need to break. Additionally, the water pressure within the hose can further secure it in place. If removal proves challenging, start with the hose end that’s more accessible. Loosening one end can make removing the other end significantly easier by releasing the water pressure in the hose. If manual efforts fail, it’s time to use a tool. A self-adjusting, pipe, or strap wrench can efficiently handle the task.

For those without tools or a preference not to purchase them, there’s another technique, albeit with some risk of damaging the hose. Washing machine hose ends typically differ—one is straight, and the other has a 90-degree plastic elbow, which is usually connected to the washing machine’s back. However, it can be found on either the tap or the machine’s back. By gripping both the elbow and the hose’s rotational end and turning counterclockwise, you can gain the leverage needed to loosen the hose. After turning as much as possible, hold the rotational part to prevent it from tightening and twist the elbow clockwise with your other hand. Repeat these steps until the hose is loose enough for removal. Be cautious, as this method may lead to breaking the plastic elbow, damaging the rubber washers, or the hose itself.

Inspect and Clean the Hoses

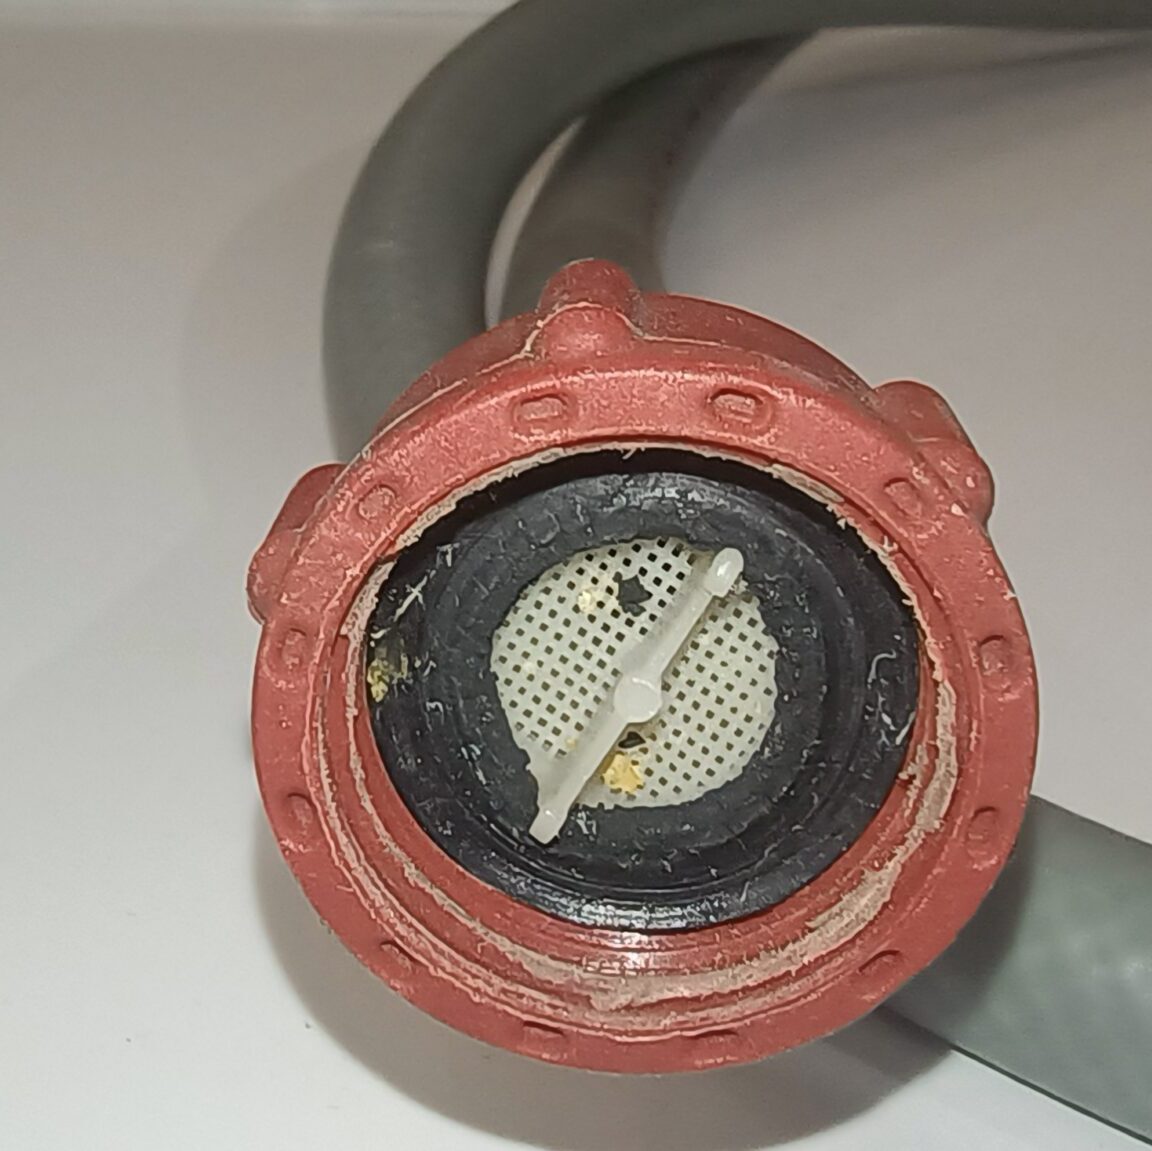
Once removed, inspect the hoses for signs of wear, such as cracking or damage. Hoses older than five years, or those showing signs of damage such as cracking or wear, should likely be discarded. Within one end of the hose, you should find a small filter screen. This is an ideal time for an inspection, especially if your water comes from a tank, you have old rusty pipes, or your water supply is prone to dirt. If the filter is clogged with debris, a toothbrush and soapy water can often clean it effectively. Alternatively, soaking the hose end in a bleach solution for a few hours may dissolve the debris, but be cautious as this can damage the metal coupler connecting the hose to the fittings.

The filter is typically removable but handle it with care, it’s usually made of plastic, and is fragile and prone to breaking. Before removing the filter, the rubber washer must be taken out. Use a small flathead screwdriver to gently pry under the rubber washer, being cautious not to damage it. Aim to flick the washer out of the fitting. Once removed, a small pair of pliers can usually grasp the flat bar in the middle of the filter, allowing it to be pulled out easily. Alternatively, use the screwdriver to pry the filter out by working it from one of the edges where it meets the body of the hose fitting. However, if the filter is severely blocked after years of use, it might be more practical to replace the hoses entirely rather than attempting cleaning.

Examine the Water Valves

We should also examine the water valves located where the hoses attach to the back of the washing machine. Often, you’ll find an additional screen filter made of metal or plastic in this area. These filters can usually be removed by gently using a pair of pliers to pull on the filter’s tab. Sometimes, you may need to use a small flathead screwdriver to pry out the screen. Removing these filters can be a delicate task; they are easily bent or damaged, so proceed with caution. If a filter becomes damaged, the most cost-effective solution might be to source a replacement from a defective valve, potentially with the help of a second-hand appliance repair professional who could offer a budget-friendly option. Alternatively, you might find yourself needing to replace the entire water valve. Running the machine without these filters is not recommended due to the potential for damage to the appliance. Washing machines have these screen filters in their hoses and inlet valves because the water valve mechanisms are fairly delicate pieces of engineering. It only takes a small bit of debris in the wrong spot and the water valve gets jammed open and the washing machine floods. I wouldn’t take the risk.

Disconnecting the Waste Water Hose

The waste water hose or drain hose can usually be identified as a corrugated pipe, which is wider than the inlet hoses. It’s better to disconnect the water inlet hoses before tackling the wastewater hose, as the latter is likely to be slimy and mouldy, particularly towards its end. Removing it first means you’re more likely to touch it more than you need to and spill unsanitary water on yourself, making things yuckier than they need to be. Sometimes though, you might need to disconnect the wastewater hose first to give yourself better access to remove the water inlet hoses.

There are generally two ways this hose is connected to the sewer system: either simply inserted into a standpipe, or a hole in your laundry trough, or hooked over the side of a laundry trough. Ideally it ought to be secured with a plastic U-bend bracket, or it might be connected via a barbed hose connector on the trap (U-bend) of the laundry sink adjacent to the machine. In the first scenario, the hose should pull out with minimal effort. In the second, removing the hose from the trap requires caution to avoid breaking the barbed connector, necessitating replacing the trap.

Removing the Drain Hose from a Barbed Connector on the Trap

Method 1: Try this First

The drain hose is typically secured with a clamp. Examine the clamp to determine whether you need a socket, flathead screwdriver, or Phillips screwdriver to loosen it. Turn the clamp screw counterclockwise to loosen. This step can be tricky as the clamp may rotate, requiring you to hold it steady while unscrewing, ideally without stabbing yourself with the screwdriver.

Once the clamp is loose, slide it down the pipe to access the seal between the drain hose and the barbed connector. The hose usually has adhered to the connector over time, making the seal difficult to break. Exercise care at this stage to avoid snapping the connector. Avoid yanking the hose; instead, try twisting the end of the hose to break the seal, being careful not to twist from the corrugated section, only the rubberised end. If the hose rotates on the connector, you’ve successfully broken the seal. Gently pull and twist the hose to remove it, being prepared for a small amount of residual yucky water to spill out.

Method 2: For Stubborn Drain Hoses

If the above proves difficult, another method involves using a flathead screwdriver. Carefully insert the screwdriver under the lip of the drain hose at the connection point, working it further in gently to avoid puncturing the hose.  Ideally you want the screwdriver to go all the way in to the end of the barbed connector, but this might not always be realistic, so just work it in as far as you can. Now lever the hose off by pulling the screwdriver gently outward, and work it in and out a few times as required, each time coming further out. This technique, while counterintuitive for beginners, effectively removes the drain hose without damaging the connector, but does carry risks in damaging the drain hose, which might not matter particularly, if at the new installation the drainhose will be connected via a standpipe or simple u bend bracket instead.

Sealing the Barbed Connector

Sealing the resultant hole left in the trap by the drain hoses removal is crucial to prevent leaks if the laundry sink is used. Options, ranging from average to good include sealing with duct tape, a rubber chair leg tip with a hose clamp, silicone sealant, or replacing the trap. When vacating a property, it’s often wiser to do nothing and leave the setup as is, since the next tenant is extremely likely to be installing their own washing machine the same way and your sealing it off just makes their life needlessly difficult. It’s wise to inform the landlord though to mitigate your liability and advise against using the sink.

Snapped Off the Barbed Connector - What Now?

If you’ve accidentally snapped the barbed connector on the sink trap, it’s usually not a major issue. Older traps are more likely to break due to the PVC they’re constructed of becoming more brittle with time. For newer homes, the trap is typically a standard component that can be easily replaced for under $10 at most plumbing or hardware stores. In cases involving older sewage systems where the correct part is no longer available, a plumber may need to modify the sinks drainage for a new trap. Alternatives for a temporary fix include using self-fusing silicone tape or silicone, or attempting a repair with PVC cement, though such repairs are unlikely to withstand reconnection of a drain hose in the future.

Stowing the Drain Hose

Securing the drain hose properly is ideal to prevent the spillage or syphoning of dirty water during relocation. Allowing the drain hose to drag on the floor almost guarantees water leakage. Many washing machines are equipped with specially designed clips on their backs for securing the drain hose. If these clips are unavailable or damaged, a practical solution is to secure both the drain hose and the power cable together. Create a ‘U’ shape with the drain hose just above the top of the washing machine, then wrap the power cord around this loop. Use a secure knot, such as a half hitch, or cable ties to keep it in place.

Draining the water from the machine for long term storage (front loader washers only)

Draining water from your front loader washing machine is a crucial step if it won’t be used for a month or more, particularly to prevent mould growing on and around the rubber door boot. However, the process requires careful consideration to avoid potential problems.

Don't Drain Top Loader Washing Machines

For top loader washing machines, unfortunately, there’s no straightforward method to drain any remaining water. While it might be tempting to tip the washer onto its side to remove some of the water, this approach often leads to more problems than solutions. Such an action can result in water and dirt coating internal components, such as the suspension system and control boards, which could lead to damage. Additionally, the drum might dent the case during this process, far from an ideal outcome. This method risks damaging the machine and is unlikely to remove all the trapped water, potentially leading to further issues down the line. A top loader washing machine is unlikely to leak during transport unless it is tipped over, so long as the drain hose has been properly secured, and isn’t laid on the ground which can lead to the water syphoning out of the machine.

When to Remove the Drain Pump Filter

Some sources recommend removing the drain pump filter to eliminate any residual water in the machine, preventing it from leaking onto other items during relocation. We would suggest this is bad advice, because it often causes more problems than it solves for the uninitiated. You should only remove the filter to prevent mould growth if the machine will not be used for longer than a month: if the machine will be placed in long-term storage, if the machine is being shipped internationally, or if the machine exhibits issues with draining slowly or not at all, indicating a blockage in the filter or an obstruction in the drain pump. 

Risks of Not Draining the Machine

Opting not to drain the water from the machine carries its own problems, but they’re easier for a novice to manage. Failure to remove residual water can affect the machine’s water level sensors, leading to misreadings and potential overflows. This is especially crucial for front loaders, as overflows can damage the bearings—an expensive problem often not worth the repair cost. Upon reinstallation, closely monitor the machine during its initial fill cycle. For front loader machines, stop the cycle if water levels rise above a third of the machine’s door; for top loaders, stop if it exceeds the pre-set water level. Switch the cycle to ‘spin’ before commencing a new cycle and repeating the above. You should only need to do this once, then the machine should fill correctly on the second attempt, but a third may be required. Once the machine has stopped filling at the correct height and the wash cycle has commenced, the risk has passed.

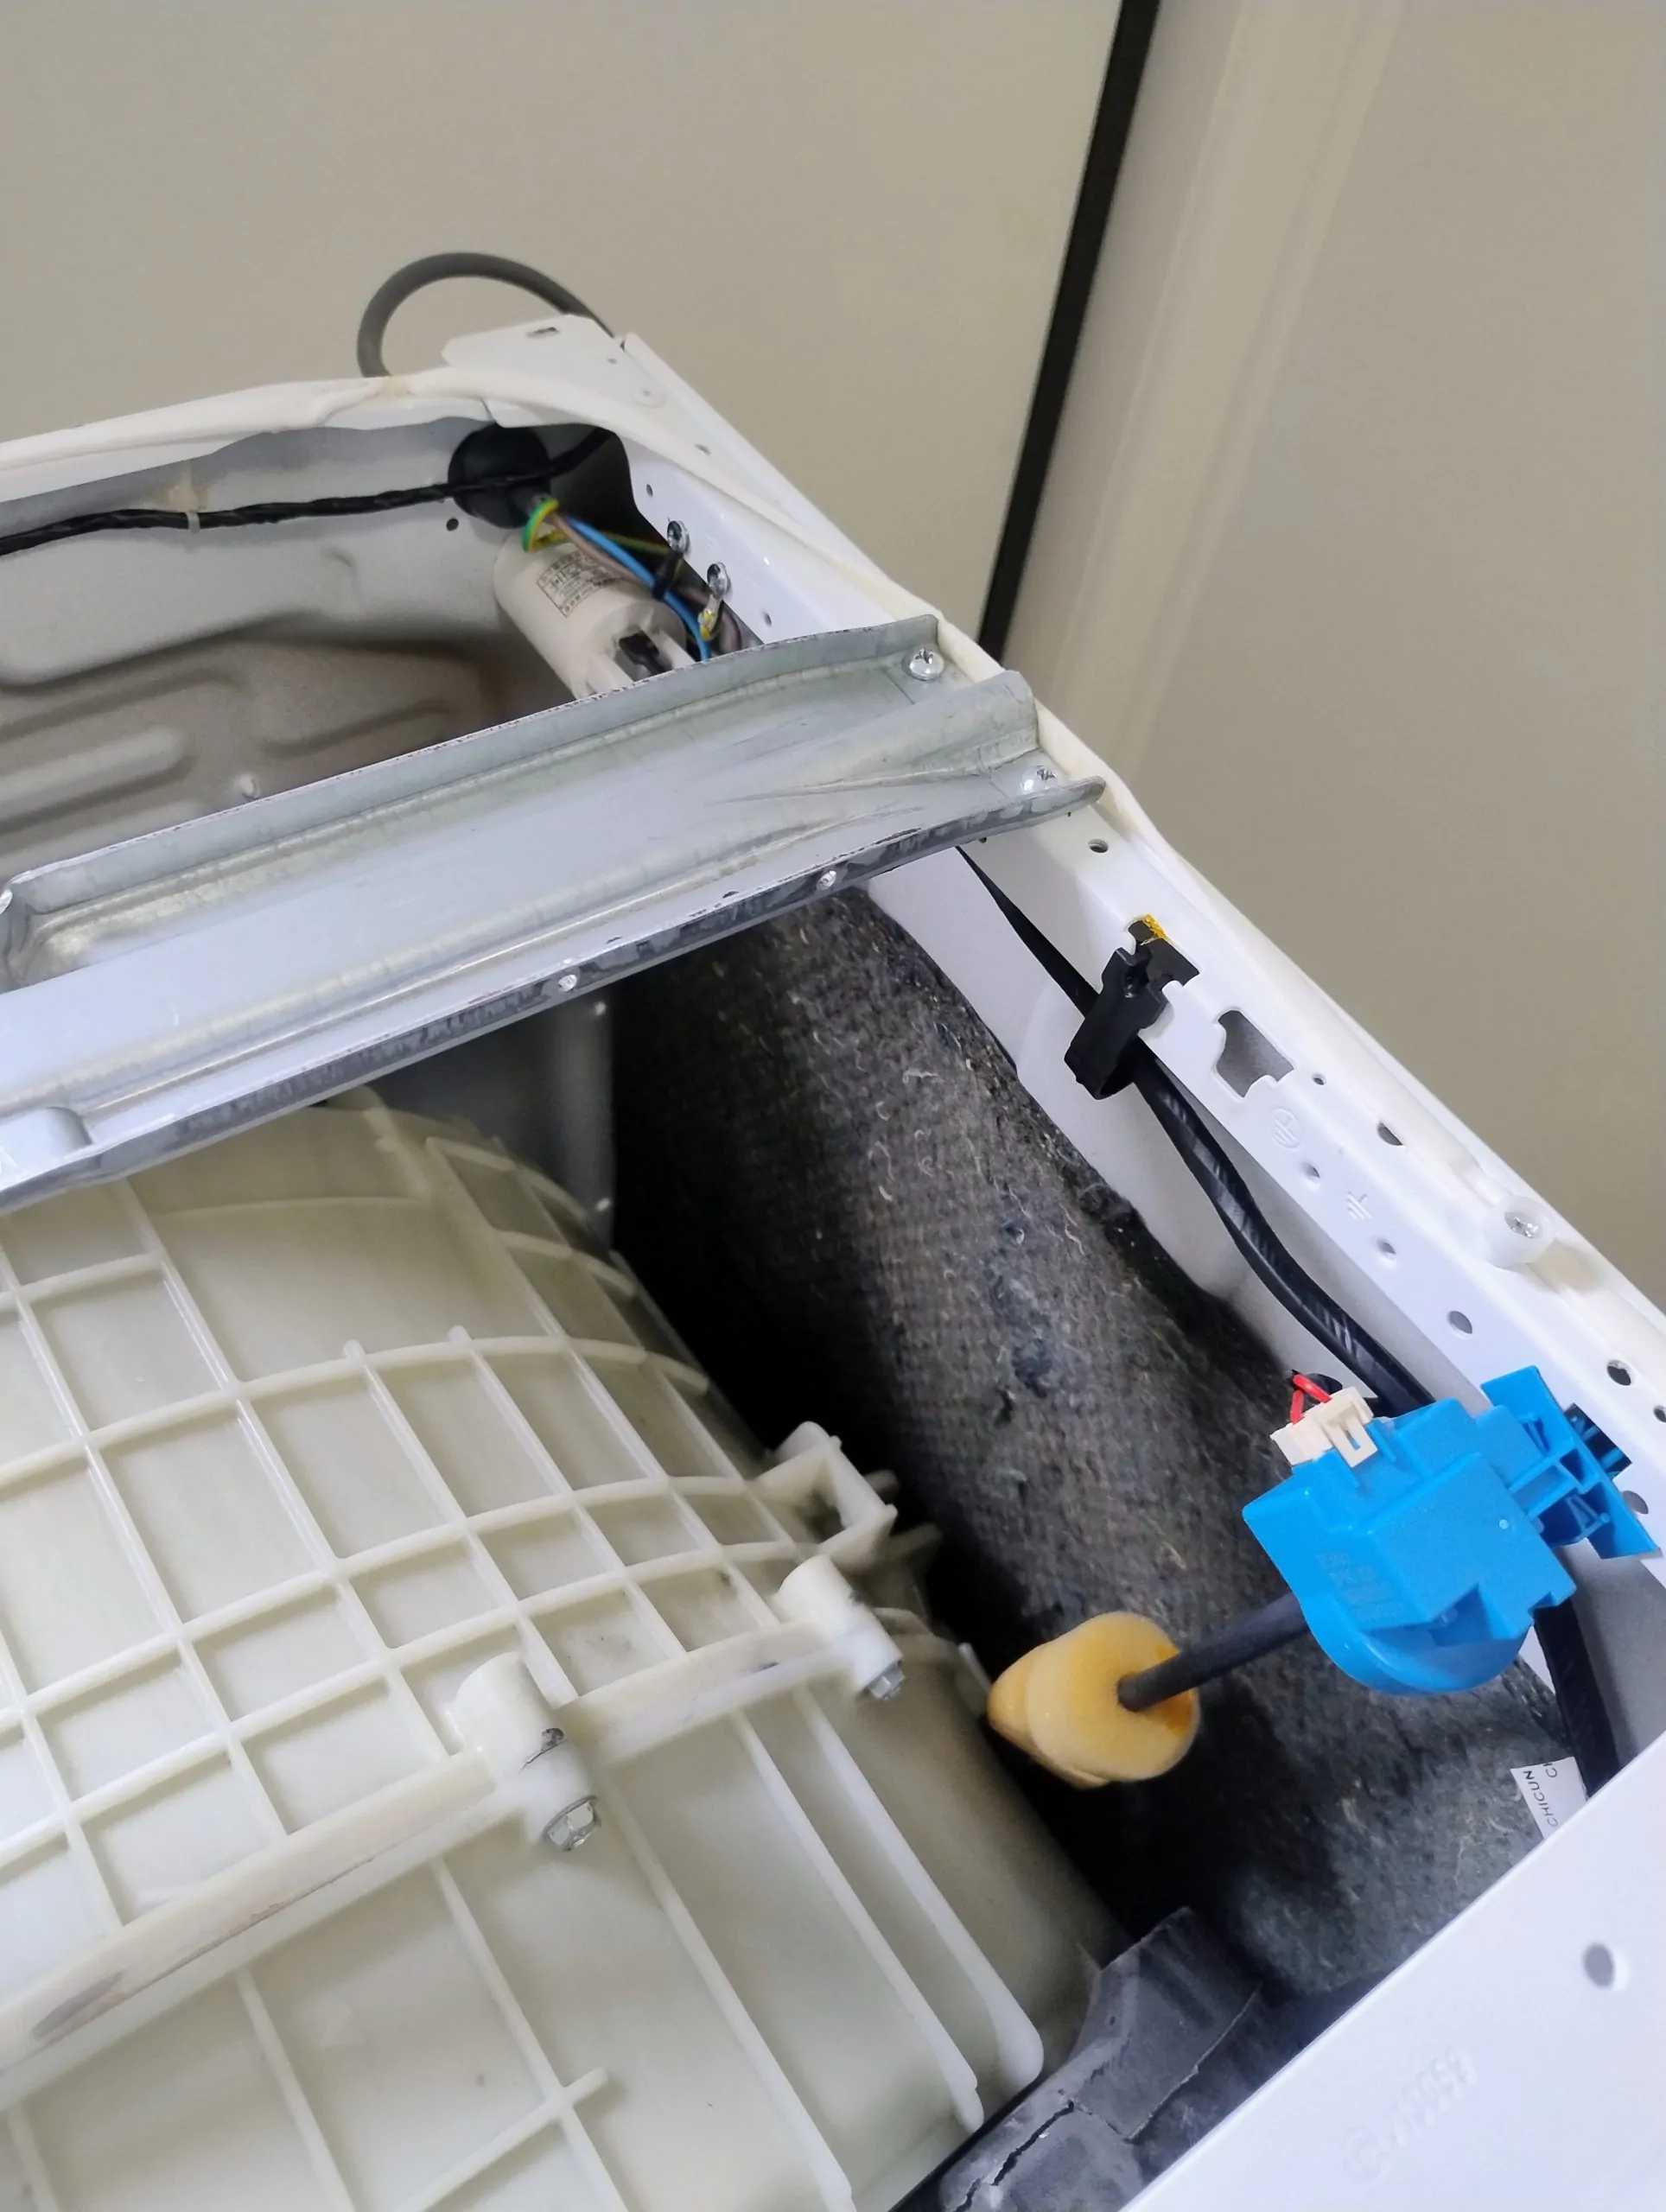
Removing the Drain Pump Filter

Accessing the drain pump filter typically involves opening a small flap or door on the lower left or right side of the washer. Opening this reveals the filter’s front, which unscrews counterclockwise. Be prepared with a towel, as unscrewing the filter will release water trapped at the machine’s bottom. However, removing the filter isn’t always straightforward. Obstructions like coins, bobby pins and screws can jam the filter, making it difficult to remove completely or reinsert. In some cases, the filter’s turning mechanism may break off when you try and loosen a very tight filter, necessitating a replacement. Should the filter become jammed halfway through removal, and you’ve confirmed it’s fully unscrewed, use a long screwdriver to wedge it out. Position it between the filter housing and the inner front face of the filter. Carefully lever the screwdriver to wedge the filter out. Be aware that applying substantial force may be necessary and could lead to the filter breaking.

Again – We advise against tampering with the filter unless necessary, to avoid the inconvenience of needing a replacement during a move. Leave cleaning the filter for another day when you have the time and space to deal with a mishap. If the filter cannot be reinstalled properly prior to removal and transport, it will almost certainly leak water. While the quantity may not be substantial—perhaps a few hundred millilitres – it could be sufficiently dirty to stain carpets and fabrics. However, if the filter is left undisturbed, the likelihood of any leakage is minimal.

Using the Pump Outlet Hose for Draining

Adjacent to the filter, there’s usually a small rubber oumo outlet hose with an inserted cap. This hose offers a safer and more controlled alternative for draining water from the machine. Again we don’t recommend draining the water unless the washing machine will not be used for a month or more. Placing a tub or bowl below and removing the cap allows the water to flow out freely. This method is not without risks—the hose inside the washer is often intentionally kinked, requiring a moderate pull to straighten and facilitate water flow. Pulling too hard could damage the hose, necessitating replacement, and leaving a leaky washing machine to transport in the interim, while not pulling hard enough might prevent water from draining. If you have to drain the water from the machine prior to moving, use this method, and save removing and cleaning the filter for a day when you have time to deal with any issues.

In general, there’s seldom a need to remove water from the washing machine unless it will not be used for a month or more. Always ensure the caps for both the filter and the rubber hose are securely replaced before moving the machine to prevent any leakage.

Initially Moving the Washing Machine

With the washing machine now prepped and ready for relocation, it’s time to initiate the move. The first step involves maneuvering it out of its current position to a spot where a moving trolley or dolly can be easily positioned beneath it. A common challenge at this stage is the tendency of the washing machine’s rubber feet to adhere to the floor, complicating the initial effort to move it.

To overcome this, start by gently tilting the washing machine backward, ensuring you’re cautious not to damage the wall or any surrounding area. This action should help break the front feet free from their sticky grip on the floor. Next, carefully tilt the machine towards you—again, be mindful not to tip it over entirely. This movement aims to dislodge the back feet in a similar manner.

After the washing machine’s feet are freed, we must select the appropriate technique for moving it. The “walking” method, which involves a careful, rocking motion to shift the machine’s weight from side to side in small, measured steps, is highly recommended over dragging. This approach not only protects both the machine and the flooring but also offers superior maneuverability through tight spaces and around corners. However, walking the appliance comes with its challenges, such as the risk of accidentally slamming a corner of the washer into a wall and the difficulty in controlling the heavy appliance, as well as the risk of injury, particularly for those of us who are not specialised appliance movers.

Dragging the washing machine can lead to undesirable marks, scratches, or deeper gouges in your flooring, a risk that’s particularly pronounced with delicate surfaces like hardwood or vinyl. Additionally, the rubber coating on the washing machine’s feet may have worn down to bare metal over time, especially if the machine has been dragged before, further increasing the likelihood of floor damage. Dragging can cause the rubber coating on the feet to partially peel off, resulting in the washing machine sitting unevenly and making it challenging to adjust when reinstalled. 

Despite the potential for damage, there are situations where dragging might be unavoidable, such as when the washing machine is positioned in a tight spot under a bench. In such cases, the best approach is to slightly tilt the machine, open the door, and firmly grasp the front face of the machine at the top of the seal to pull it out. This method minimises the risk of damage by reducing the friction and opportunities for a foot to get caught.

A selection of washing machine feet damaged from dragging compared to a brand new washing machine foot

Installing the Transit Bolts (optional)

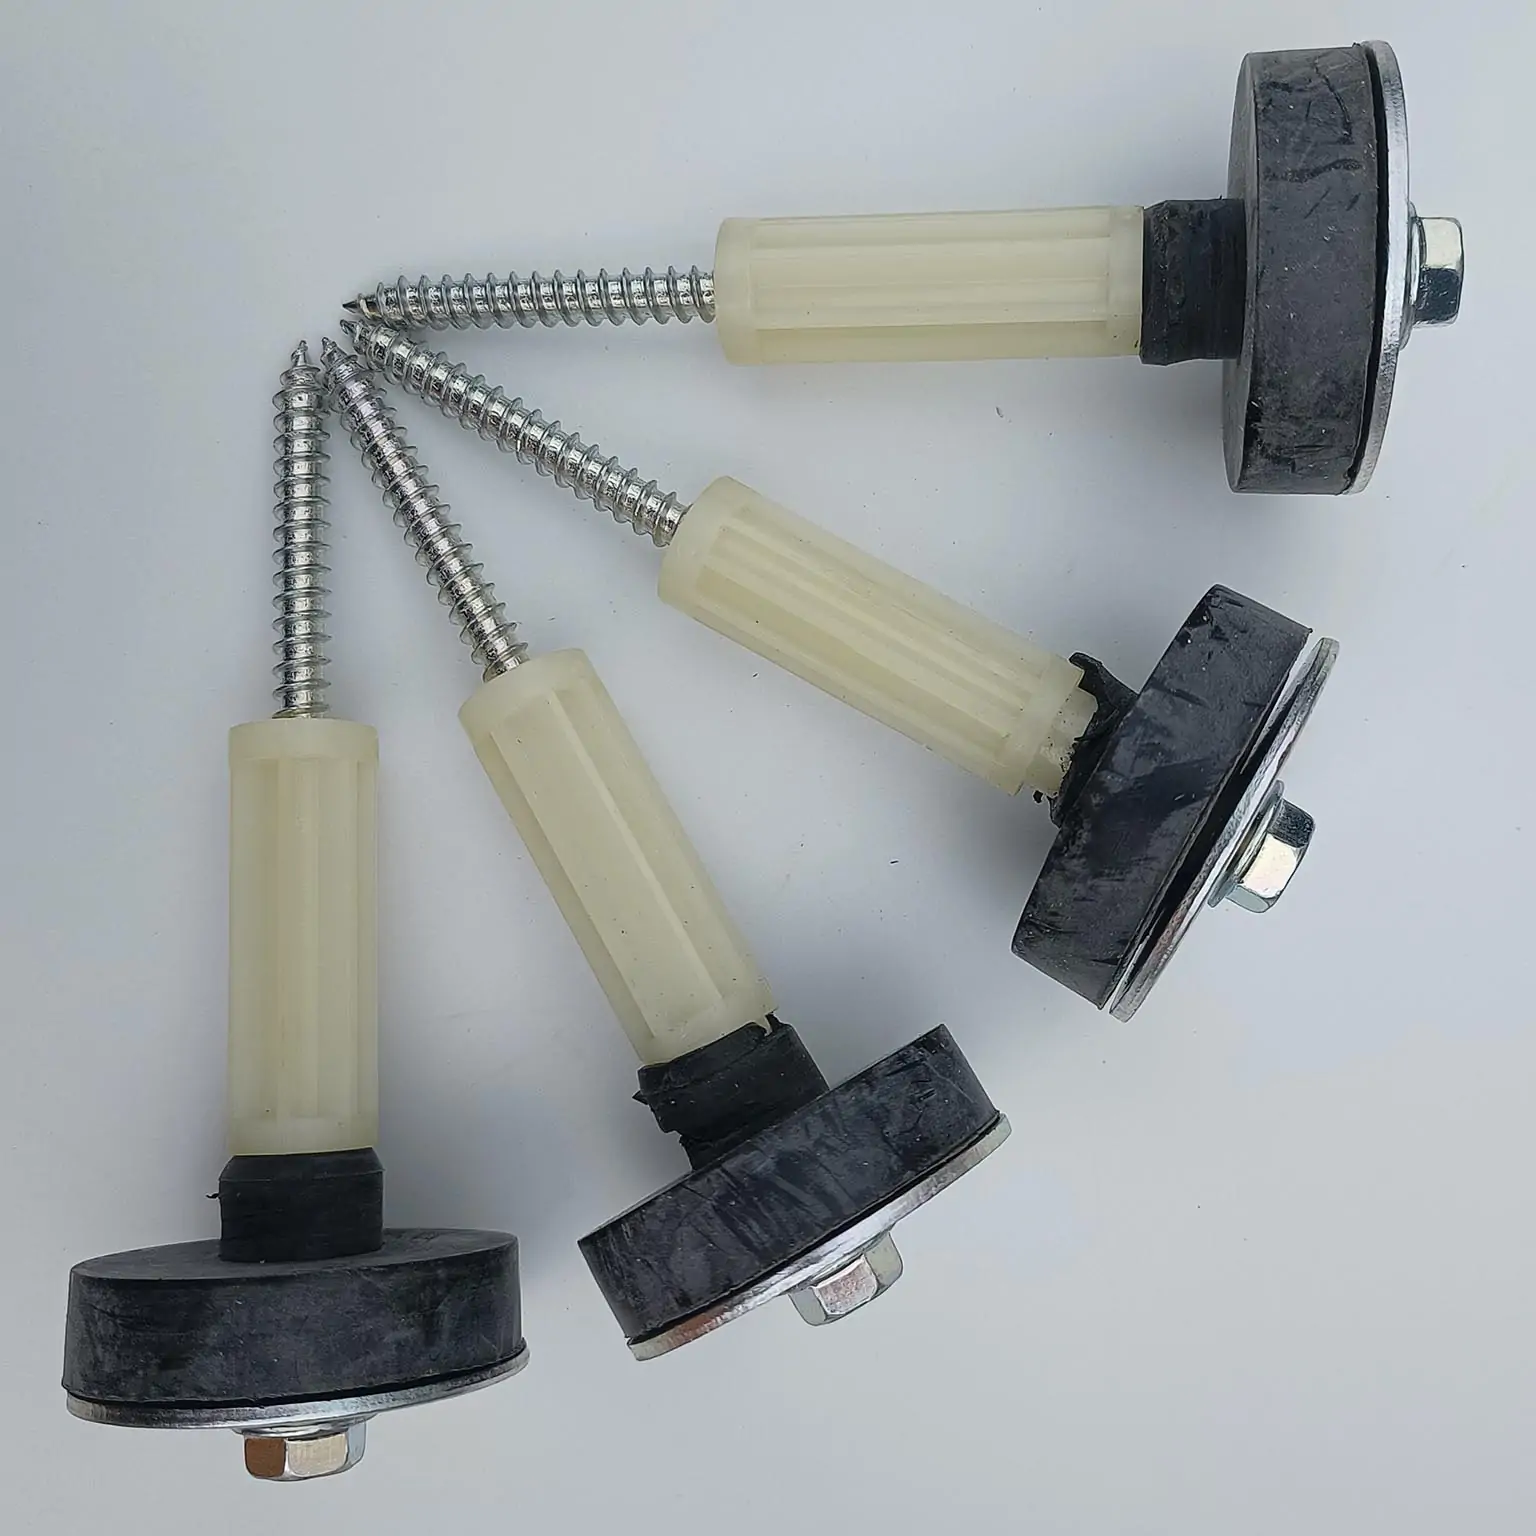
When moving a washing machine, whether you need to use transit bolts or shipping bolts depends on the type of machine and how far you’re moving it. Transit bolts are special screws that keep the inside parts of a front loader washing machine from moving around too much when you’re moving it. 

Transit Bolts and Toploader Washing Machines

Top loader machines don’t use these bolts. You can insert blankets between the drum and case for protection, but this method is often more trouble than it’s worth. The blankets are likely to slip out, and the tipping the washer on its side to install them from underneath is more likely to cause the exact damage we were trying to avoid in the first place – the drum causing dents in the case due to excessive movement.

Installing Transit Bolts

Transit bolts are designed for front loader washing machines to secure the drum during transportation. My professional advice, based on daily handling of these appliances, is nuanced. For short distances, especially within the same premises or nearby, you probably don’t need to install the transit bolts. However, for longer moves, particularly interstate or international relocations, securing the machine with transit bolts is wise to prevent any potential damage from rough handling or emergency braking.

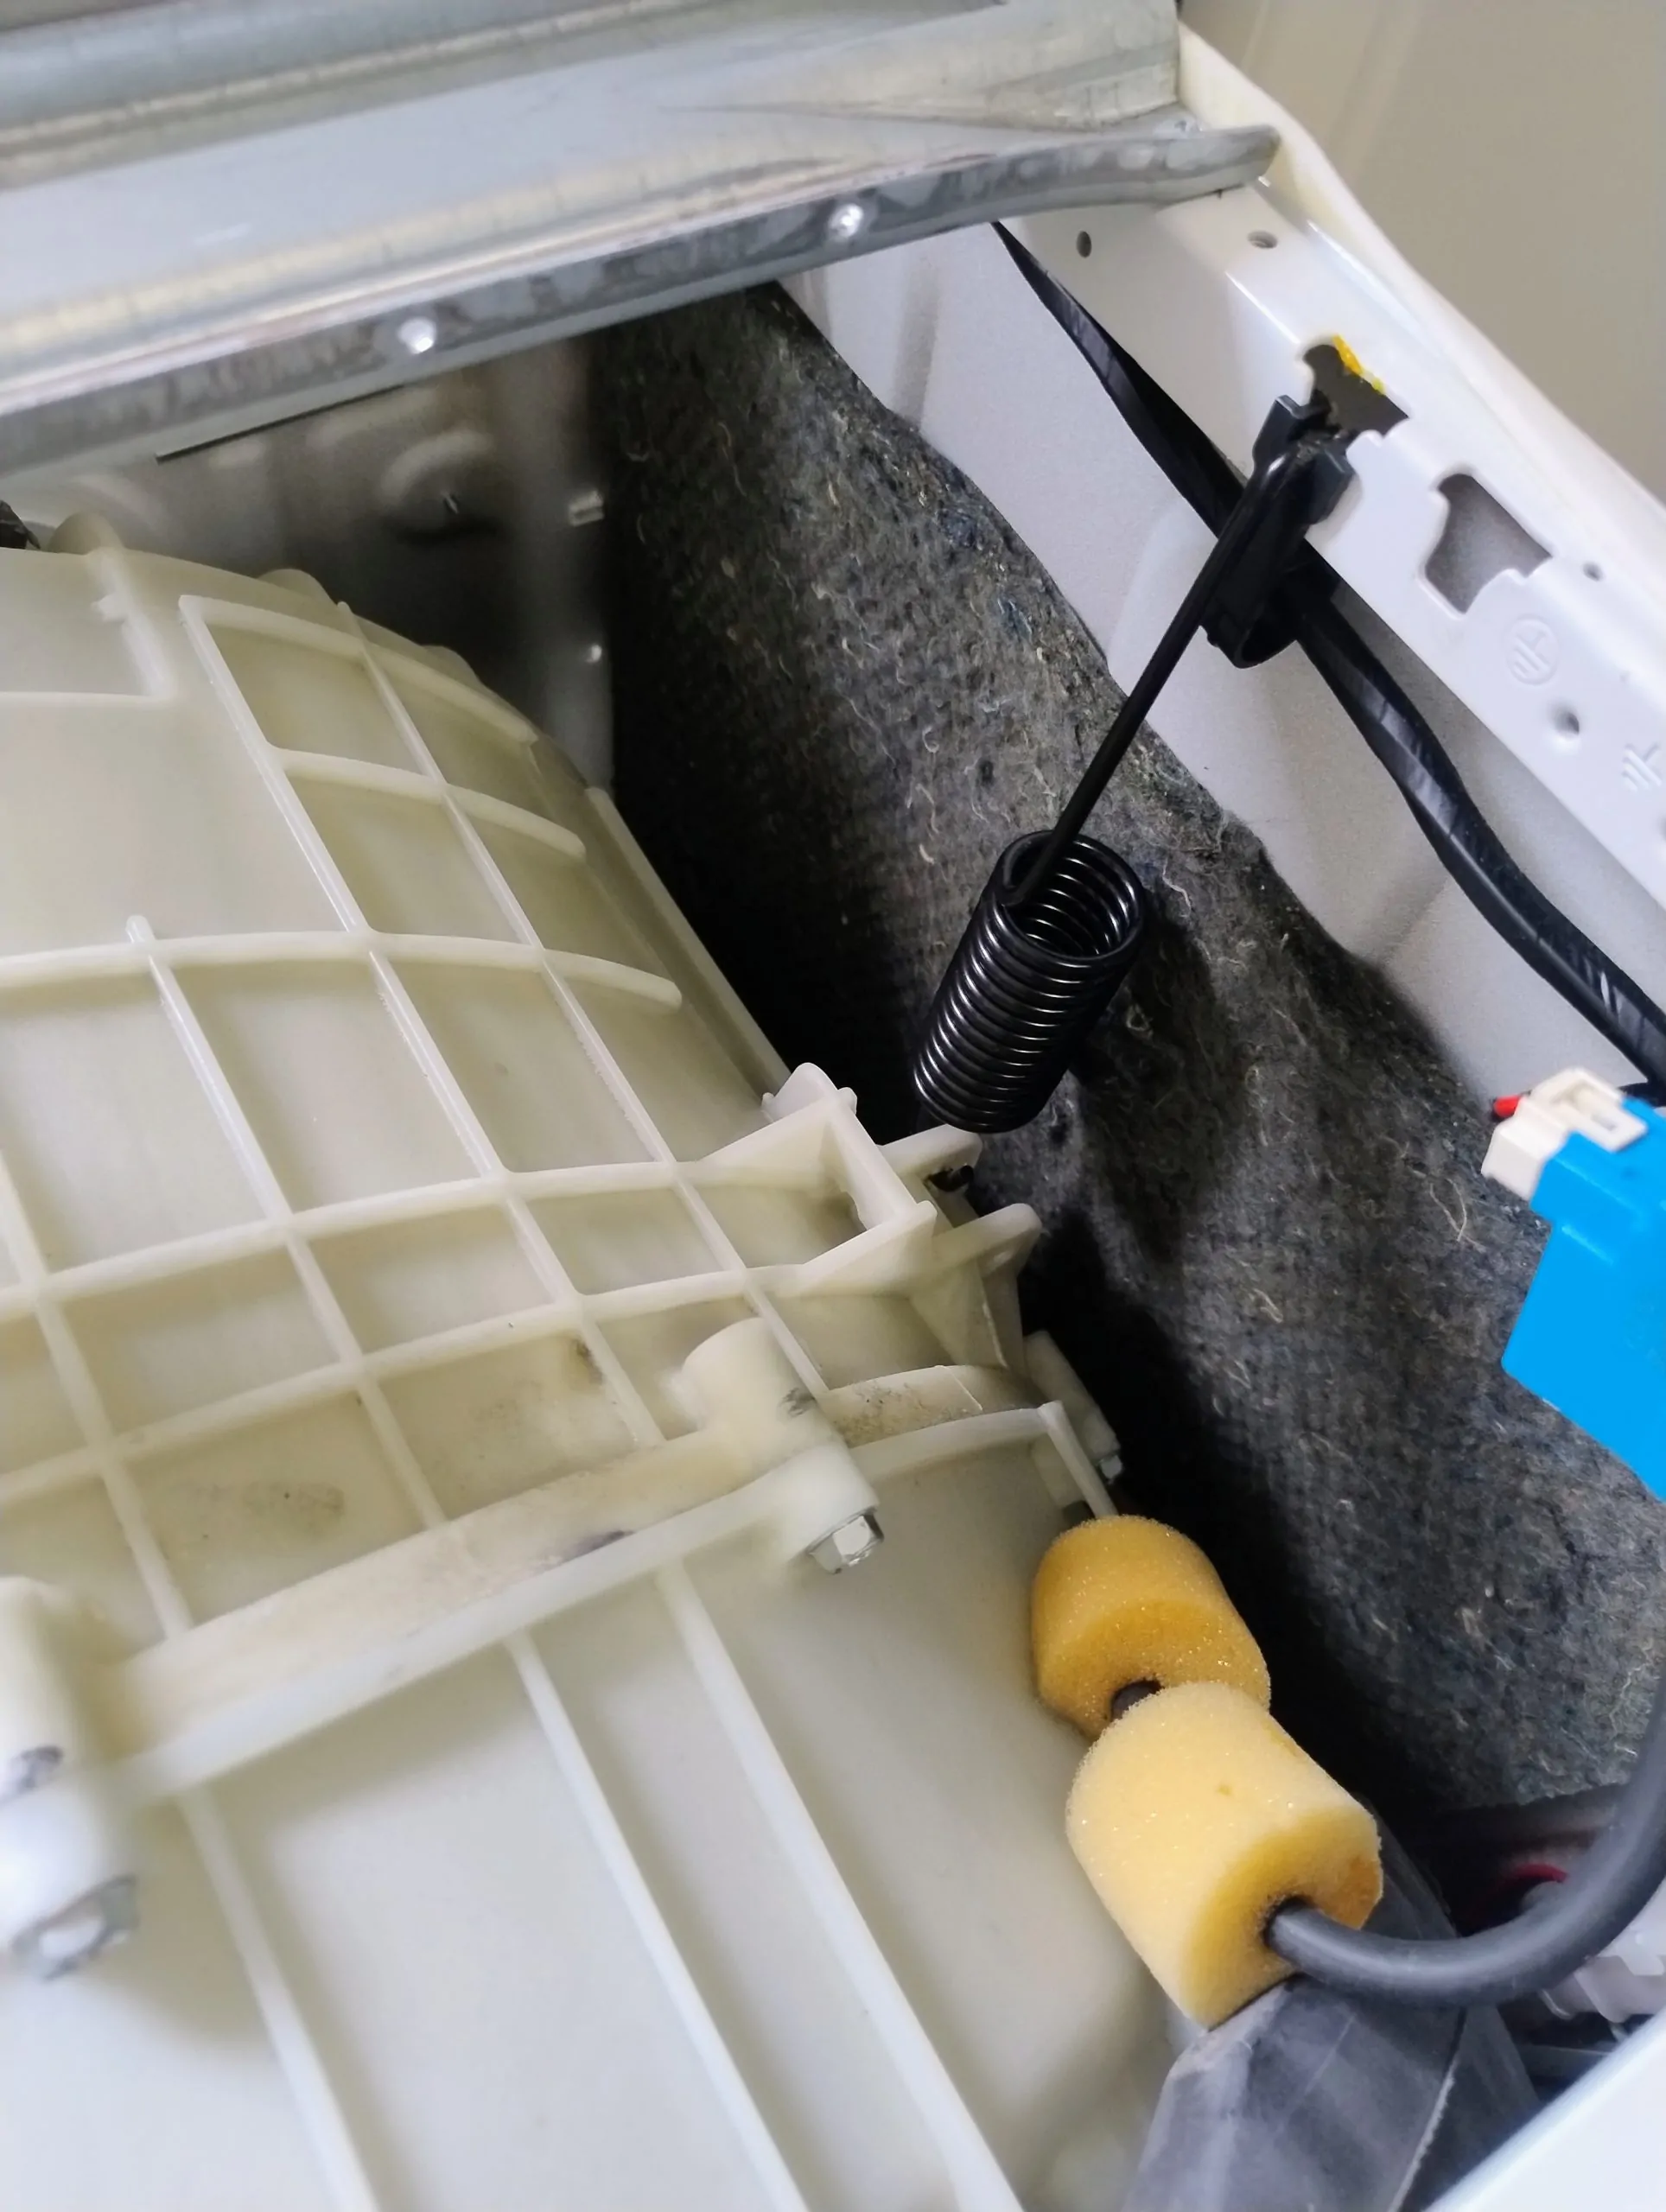
Front loaders rely on a suspension system comprising two springs at the top and 2-3 shock absorbers at the base, with transit bolts designed primarily to prevent the springs from detaching. A detached spring will lead to drum misalignment, visible as a distorted door seal and an off-centre drum visible through the door. If the machine is operated like this it can cause damage. While fixing detached springs might be straightforward for professionals and doable for amateurs, preventing such issues with transit bolts is simpler and safer. Using transit bolts also helps the machine move more steadily on a trolley because the drum inside won’t shift around and change the balance as you’re moving it.

If you’re just moving the washing machine a short way, like to a new home in the same city, you probably don’t need to worry about the transit bolts, especially if you’ve lost them or never had them. They’re mainly to stop things from going wrong if the machine tips over, so just take precautions to stop the machine tipping over. If you’re moving further afield though it’s a good idea to use them to keep your machine safe. If you want to know more about transit bolts, steps to take to prevent the machine tipping, and the installation and removal of transit bolts, we’ve written a full guide here.

Packing and Moving a Washing Machine

Finally we’re ready to move this washer! Ideally you want a moving trolley to move the washer out. It is advisable to wait until the washing machine is outside and ready to be loaded onto the delivery vehicle before wrapping it in a moving blanket or bubble wrap. This prevents the material from unravelling and causing accidents, especially when navigating stairs. When using a trolley, use a trolley with plastic protectors or place a piece of cardboard between the machine and the trolley to avoid paint marks transferring from the trolley onto the washing machine.
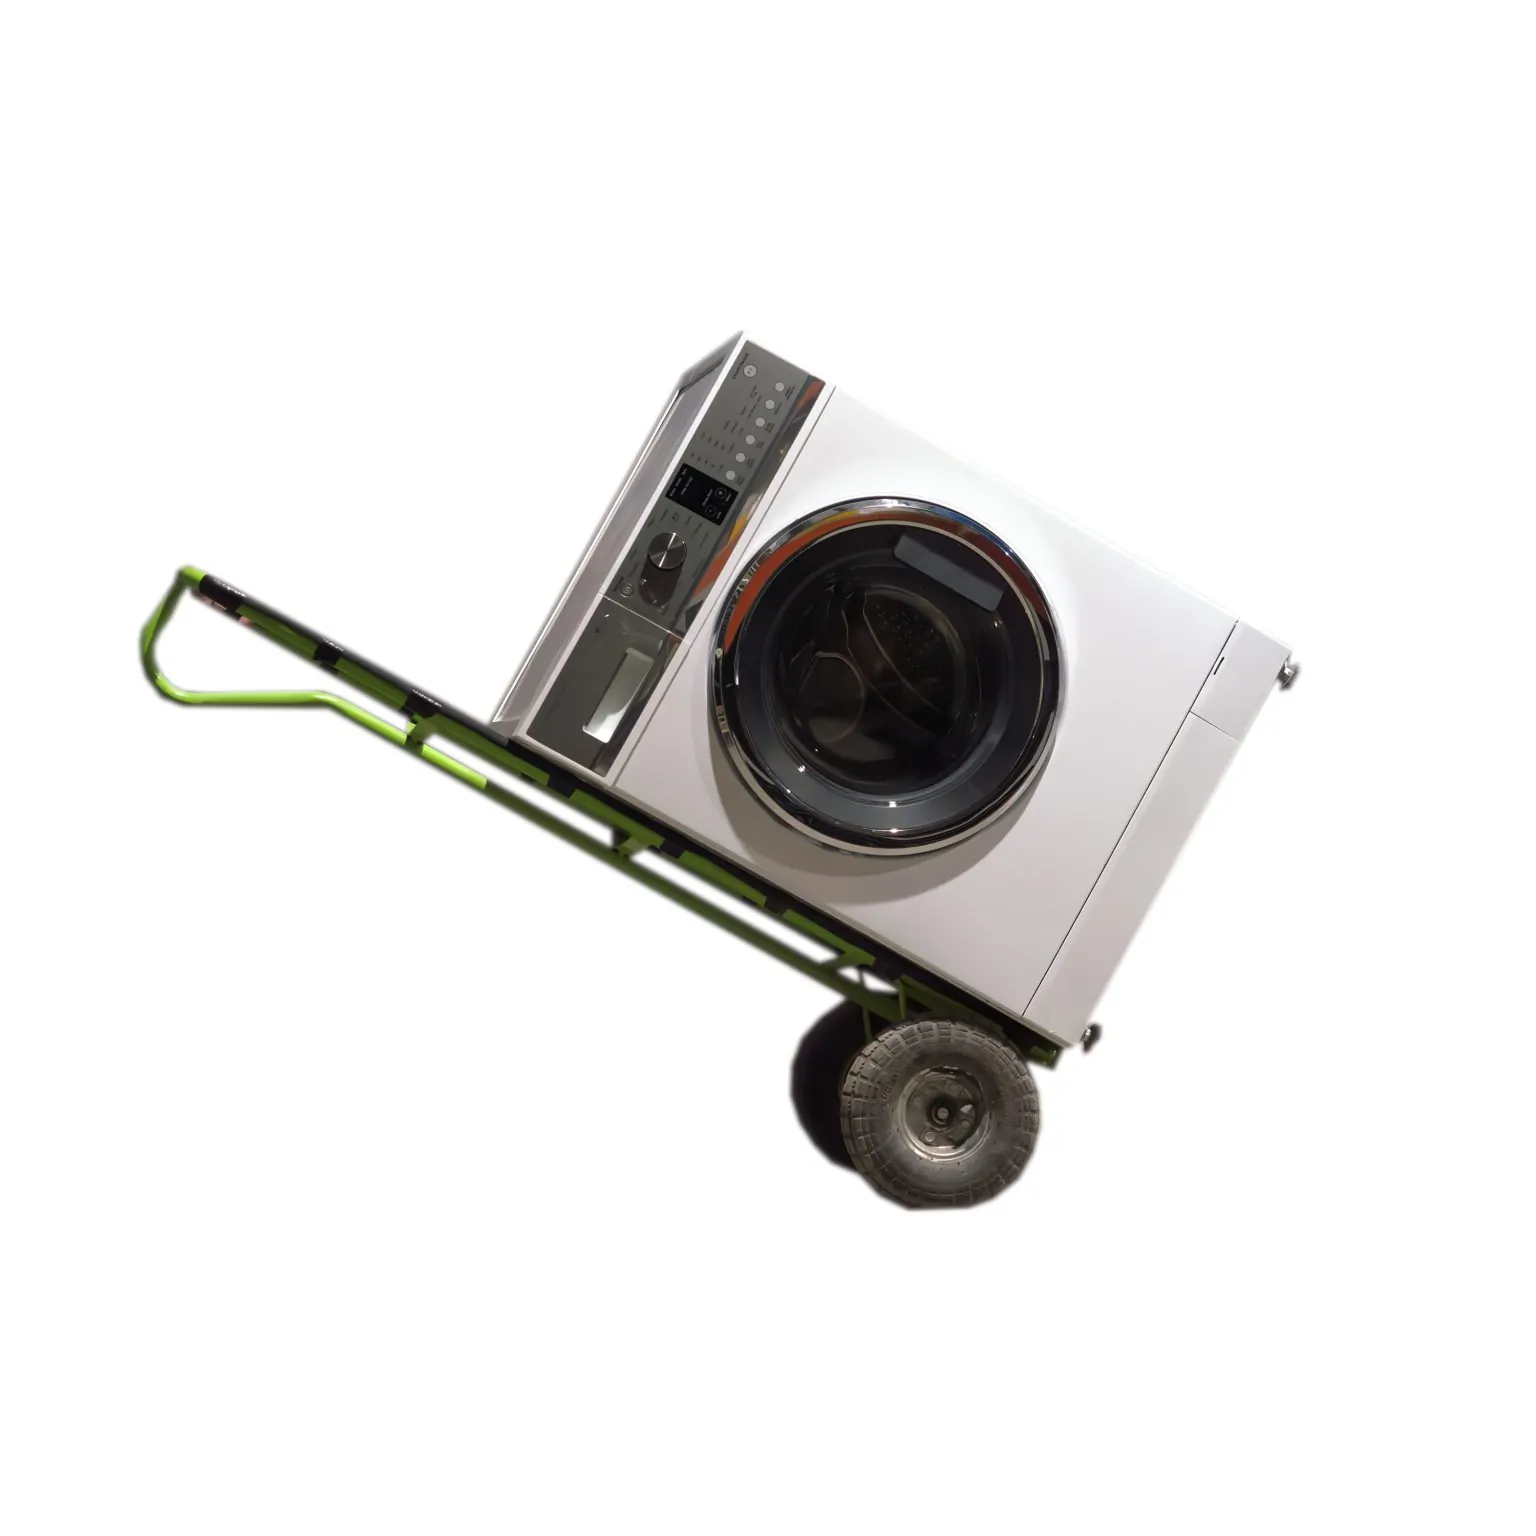
Using a Trolley

A moving trolley is the best method for safely transporting a washing machine, particularly if stairs are involved. You may want to secure the machine to the trolley with a ratchet strap or rope, taking care to position the strap to avoid scratching the appliance’s paint. This may not be practical if your move has lots of corners and you need to keep taking the washing machine on and off the trolley to manoeuvre it. For top loaders, trolley the machine from the back so that any cabinet damage Is more likely to be on the back and hidden once reinstalled. For front loaders, lift from the sides for better stability, especially if you have not used transit bolts.

Once outside exercise be wary of dips and bumps they can easily destablise your load. Be particular caution when navigating gutters and curbs at an angle, as this poses a high risk of tipping the appliance over and causing a mishap. If a tailgate lifter is available, simply place the washer on it. Otherwise, if the vehicle is low enough and you’re using a trolley, approach the vehicle so the washer’s legs are just above the vehicle’s platform edge. Then, carefully tilt and walk or slide the washer into the vehicle, ensuring not to trip over the trolley as it’s released to the ground. For vehicles too high without a lifter, enlist the help of another person to lift the washer into the vehicle. The technique for manual lifting is detailed in the “Carrying by Hand” section below.

Navigating Stairs

Don't Use a Stairclimber Trolley

Using a stairclimber trolley for moving appliances on stairs is not recommended due to two significant issues. Firstly, it doesn’t allow for breaks during the ascent or descent; once you start moving, you must continue until reaching flat ground, eliminating any opportunity for adjusting grip or resting. Secondly, stairclimber trolleys are too long. Adding a washing machine extends the trolley’s total length, making it too long to fit on stair landings and navigate turns, potentially causing you to get stuck between a step and a wall.

Use a Regular Trolley

Opt for a regular trolley with rubber wheels and air filled tyres and, if necessary, have someone assist by taking some of the weight, allowing for safer, step-by-step navigation. Exercise caution and treat the task with the respect it deserves, considering the real danger involved and the surprisingly high number of stair-related accidents annually. Ensure the stronger individual is positioned underneath to better control the washer in case of any mishaps. In this scenario, the best way to prevent injury where the top person is incapacitated is for the person below the washer to secure the washer by lowering their knee and thigh against the bottom of the washer and pressing the trolley wheels into the back corner of the step, laying the trolley down on the stairs. If the bottom person is incapacitated the top person may simply sit down on the stairs pulling the trolley wheel into the back corner of the stair and holding it there with the trolley resting on their knees.

Moving a Washing Machine Upstairs with a Trolley

  • Teamwork is Essential: Moving a washing machine upstairs requires two people for safety and efficiency. Position one person above the washer and the other beneath.
    Securing the Washer: If the washing machine is not strapped to the trolley, the individual pushing from below must be cautious not to apply excessive force, which could dislodge the washer from the trolley.
  • Clear Roles and Communication: Designate one person as the leader to coordinate the move. This person will count “1, 2, 3,” and on “3,” the person at the bottom pushes while the person at the top pulls. Take breaks to rest and regroup, ensuring everyone’s safety and maintaining energy for the task.
  • Navigating Landings and Taking Breaks: As you near a landing, be aware that the person at the top risks being squeezed between the wall and the trolley. This stage requires particular care and finesse to safely navigate.

Moving a Washing Machine Downstairs with a Trolley​

  • Using Gravity: When moving the washer downstairs, gravity will assist in the process, potentially reducing the need for additional help. However, a second person positioned below the washer can provide stability and share the load.
  • Controlled Movement with Excellent Timing: Approach each step with caution. As the trolley reaches the edge of a step, pull back and take the weight to ease the washer down, minimising the impact of the descent.
  • Maintaining Alignment: Ensure the trolley is aligned straight with each step. An angled approach can increase the risk of wobbling or losing control.
  • Safety Precautions for the Helper below: If someone is assisting from below, and the washer is not strapped to the trolley, they should be careful not to lift the washer off the trolley. Watch for hazards like walls or railings that could injure hands, especially as the washer might shift, bounce or roll upon impacting each step.

Carrying by Hand

If a trolley isn’t available, manually carrying the washing machine is an alternative, though it’s important to note they are heavy: a front loader typically ranges from 70-90kg, and a top loader from 30-50kg. This task requires two physically fit individuals, preferably wearing gloves or having durable hands. 

Carrying a Front Loader Washing Machine

Start by removing the soap dispenser drawer for a secure grip with one hand, while the other hand should grasp the back corner of the machine near the water inlet. Avoid lifting the appliance by its top or lid, as it is usually secured with only two screws through plastic mounts and cannot bear much weight. Once the machine is angled for movement, the second person should grip the machine’s feet at the front and back closest to them. These parts may be damp and dirty, making gloves advisable for a more comfortable grip. Once outside, set the washer down beside the delivery vehicle for a brief rest before the next stage of lifting.

Carrying a Top Loader Washing Machine

Start by securing the lid with some electrical tape.  Electrical tape won’t leave difficult to remove residue like other tapes and is easily removed following transport. Now tilt the washing machine backwards with one person holding the washer from the back.  Now the second person should reach underneath the washer from the front and lift it up.  Spiders often like to live in this spot so gloves are advised to prevent any panic dropping of the machine.

Lifting onto a vehicle

Lifting a Front Loader Washing Machine onto a Vehicle

When lifting a frontloader washer onto a vehicle from the side of the vehicle, position it so the front of the washer faces the back of the vehicle. If lifting from the back of the vehicle, position the washer so that one of the sides is facing towards the front of the vehicle. Position one person on each side of the washer. Tilt the washer away from the vehicle, placing one hand on the top side of the washer that’s furthest from the vehicle. Then, with your other hand, grasp the bottom of the washer closest to the vehicle and lift it onto the corner of the vehicle’s platform. Carefully tilt and then walk the appliance onto the vehicle.

Lifting a Top Loader Washing Machine onto a Vehicle​

For top loader washing machines we follow the same procedure as above for a frontloader. If you’re moving a top loader on an open ute, ensure the front of the washing machine is facing backwards and use electrical tape to keep it securely closed. If the lid opens unexpectedly, it could not only be damaged itself but also cause damage to other parts of the washing machine. The lid can easily detach completely and become a dangerous projectile to other road users. 

Vehicle Positioning

Moving a Washing Machine in a Ute or Trailer

To ensure the safe transportation of a washing machine in an open ute, follow these steps to minimise risks and protect your appliance.

  1. Positioning the Washing Machine: Place the washing machine at the front end of the ute’s tray, ensuring it is centrally aligned. The back of the washer should face the cabin. Centring the machine on the tray is vital. Incorrect positioning increases the risk of the washing machine tipping over during cornering.
  2. Securing with Ratchet Straps: Utilise ratchet straps to secure the washing machine from each side of the ute, going over the top of the appliance. Ratchet straps provide additional security against the forces encountered during turns and bumps. However, be aware that ratchet straps can sometimes loosen or break, especially if the washer has not been centred. If the washer hasn’t been centred, a racthet strap actually increases the chances it will tip over during cornering. Therefore, positioning the washer in a way that it has limited movement against the cab at the end of the tray, is recommended.
  3. Preventing Tipping and Movement: The primary concern during transportation is to prevent the washer from tipping over, particularly during sudden stops, which are often beyond the driver’s control. By positioning the washing machine against the wall of the ute’s cabin and ensuring it is centered on the tray, you mitigate the risk of it tipping over. This also helps prevent the appliance from rocking over speed bumps. The correct positioning and the use of straps are crucial in keeping the washer stationary.

Moving a Washing Machine in an Enclosed Truck

When transporting in an enclosed truck, we don’t need to worry about centring the machine or placing it at the front, but the use of ratchet straps is more important. Position the washing machine against any wall of the truck. The back of the washing machine should face the wall, with the front facing towards the interior of the truck.
Secure the washing machine to the truck wall with ratchet straps. Attach the straps to the strapping points and around the front of the washing machine, ensuring they are tight and secure.

Moving a Washing Machine in a Van​

Van is a pretty broad term.  If you have a van that you cannot stand inside without ducking down, this is what we mean.  If you have a full height van with proper ratchet strap points, follow the instructions above for an enclosed truck. 

When transporting in an enclosed van without strapping points your best option is to place it as close to the front of the cargo area as possible, on one side of the van, wedging it on the sides with moving boxes or moving blankets to prevent it tipping over in corners. Drive carefully to avoid the washing machine from moving around, and maintain an awareness that there is a poorly secured 80kg projectile with you in the vehicle.

Moving a Washing Machine in an SUV, Hatchback, or Station Wagon

  1. Protective Measures: Begin by laying a moving blanket over the rear bumper and the loading area to safeguard your vehicle from scratches or dents. This is crucial to maintain the car’s condition.
  2. Upright loading: Attempt to lift the washing machine vertically up and over the threshold into the cargo area. Keeping the machine upright is preferable but not always realistic.
  3. Lay the machine down if needed: If the vehicle’s interior height is insufficient, you may need to lay the washer down. Position front loaders on one of their sides, and you should empty the water from the machine before loading it as described previously to minimise the leakage. Similarly, lay top loaders on their side to prevent control board damage from leaking water. Be prepared for minor water leakage especially with a top loader. Top loaders might have springs disengage, and front loaders could suffer if transit bolts aren’t used. Using transit bolts when transporting a washer on its side is highly recommended to prevent the significant risk of spring detachment.
  4. Ensuring Stability: Push the washing machine far enough into the vehicle to prevent it from potentially impacting and smashing the rear window upon closing. Use wedges or additional blankets to secure the gap between the washer and the rear of the cargo compartment, ensuring the machine doesn’t slide into the rear windshield during transit. Use blankets to wedge the washing machine on each side and in front of it as well to prevent it moving. Remember you are now driving with a significant projectile in the event of emergency braking, or an accident, so drive carefully!
  5. Post-Transport Care: Once the washing machine is positioned upright at its destination, wait 24 hours before use. This pause allows any moisture that may have come in contact with the electronics to dry, reducing the risk of electrical issues. Top loaders are particularly vulnerable to control board issues if transported on their backs, hence the emphasis on side positioning. However, this does pose a risk of cosmetic damage to the appliance’s cabinet. If a top loader has been transported on its back it is recommended to leave it unplugged for a week or more to minimise the risk of control board damage.

Moving a Washing Machine in a Sedan or Compact Vehicle

Attempting to fit a washing machine into the backseat, front seat, or boot of a sedan or compact car is highly challenging and not recommended. The risks include potential damage to the vehicle, the appliance, and safety concerns due to the appliance acting as a projectile in the event of abrupt stops or accidents. Transporting a washing machine poses a risk of water spillage, which can further complicate the process.

If Attempted Compact Appliances Only

Only very compact models might feasibly fit, and even then, the risks probably outweigh the benefits. Consider the potential for damage to the car’s doors and interior.

Reinstalling a Washing Machine after Moving

Once you’ve moved the washing machine to its new location, moving it inside is the reverse of moving it out, and the steps above cover off everything you need. Once you’ve got the washer into the laundry area where it will be installed proceed with the below.

Resetting the feet

When moving a washing machine from one location to another, we ought to reset its 4 feet to ensure it stands stably in its new position. It’s best to do this before moving the washer inside where space is more limited and damage more likely. If we don’t reset the feet at all it just makes it more difficult to get it stable when inside.

Firstly, it’s worth noting that some washing machines, particularly top loader washers, come equipped with self-adjusting feet, which automatically level the machine once it’s placed on the ground and started. For these models, manual adjustment isn’t necessary. However, for the vast majority of washers without this feature, you’ll need to manually reset the feet. Check your manual or Google your model if you are unsure.

Most washing machines have adjustable feet often with a lock nut, which can be turned clockwise or counter-clockwise to raise or lower each corner of the machine. All feet should be wound back into the machine as much as possible and should rotate freely.

A selection of damaged and rusted washing machine feet some with seized locknuts (above), comapred to a brand new washing machine foot with lock nut (below)

Brand new washing machines typically have feet and lock nuts that spin easily by hand. However, the feet on older machines may seize or rust into place, requiring a spanner or wrench to break the corrosion. When using a spanner or wrench use it on the lock nut of you can, using tools on the rubber feet is likely to damage them. It’s not uncommon for a lock nut to have seized or rusted completely to the foot of the washer, and often there’s nothing you can do other than replace it. For a temporary fix you should move the affected foot to the front of the machine. If you have two or more feet with seized locknuts move them to one side of the machine, you don’t want them diagonally opposite each other. If you are unable to adjust a foot or remove it, its usually not a big deal, we just need to be aware of it and work around it. The fewer feet we can adjust, the harder it will be to get our washing machine stable when it is inside. 

Tips to Make Foot Removal Easier

  • If transporting the washer in a ute or truck, position it so two feet hang off the edge – being cautious to prevent the washer from falling – providing easy access to loosen them. Rotate the machine 180 degrees and repeat. 
  • If the washer needs to be laid down at any point, this also presents a good opportunity to adjust the feet. Alternatively, having someone tilt the washer on a hand trolley can offer convenient access for adjustment. 
  • If you need to lay the washer down at any point, that’s also a great opportunity to do it, or you can have one person tilting the washer on a hand trolley as well to give you access.

Transit Bolt Removal

Remove any transit bolts used during the move.  Check out our guide here.

Positioning Your Washing Machine

  • Proximity to Connections: Select a spot for your washing machine that’s near the necessary water, drainage, and electrical connections. Usually it is evident where the washing machine is intended to be installed.
  • Stable Flooring Is Key: The importance of a stable foundation cannot be overstated. Avoid placing your washer on carpet or any soft flooring. A solid floor (it needn’t be level we can fix that later) is essential to minimise vibration and ensure smooth operation. Inspect the floor area for any signs of wear or rot, particularly if you’re installing in an older home. A slow leak from a washing machine can cause significant damage over time, make sure you don’t get blamed for previous damage as a tenant by reporting any damage to the landlord now.

Planning Your Connection

In most cases, the installation is straightforward—the taps are directly above the washing machine’s intended spot, and the drain hose simply feeds into a nearby laundry trough. Very little planning may be required and we can proceed to the next step. For more complex European Laundry or under-bench installations, a bit more planning may be needed. If the water and power connections are located in a cupboard adjacent to the washing machine’s location, consider the following steps:

  1. Power Cord First: Run the power cord through to the connection point first. The plug is bulky, but the cord itself is thin, making it easier to maneuver through tight spaces, and hard to fit the plug through if you route the other hoses first.
  2. Attach and Route Hoses: Connect the water hoses to the back of the washing machine before threading them through to the taps. You won’t have access to the back of the washing machine if it is going under a bench. Standard water inlet hoses are around 1 metre in length, if you find yours is not long enough you can buy longer hoses without much trouble.
  3. Drain Hose Last: After the water hoses are in place, thread the drain hose through. This sequence allows you to ensure that all components fit through the necessary spaces without obstruction. If you find your washing machine drain hose is too short its usually a relatively simple job to lengthen it with a couple of hose clamps a barbed connector and an additional length of drain hose.
  4. Avoid Hose Kinking: Be particularly vigilant to avoid kinking the inlet hoses in under bench installations. Braided hoses, are more prone to kinking compared to rubber hoses. A kinked hose will impede water flow and usually result in the washer not filling. If you can connect both ends of the hose loosely before tightening this helps avoid kinking.  Additionally once the water is on and the hose is pressurised it is less likely to kink.
  5. Securing the Connections: With under-bench installations, once the washer is in place, inspecting and tightening the inlet hose connections on the back of the machine can be challenging due to limited access. Ensure these connections are secure during the initial installation to prevent leaks.

Connecting the Taps to Your Washing Machine:

Begin with the washing machine positioned a short distance from the wall. This allows easy access for making necessary connections. Initially, loosely connect the water hoses to the corresponding taps. Ensure not to kink the hoses during attachment; braided hoses are particularly prone to this compared to rubber hoses.

Identifying Hot from Cold

To identify the hot water supply if the taps aren’t labelled, attach a hose to one tap and direct it into a sink or bucket. After a few minutes, check the water temperature. The hot water hose, usually marked with red, should connect to the hot water inlet, while the blue hose is for cold water. Remember, the hot water hose is usually rated at 70 degrees celcius with the cold water hose typically rated to 25 degrees celsius and may burst if mistakenly used for hot water. Good quality hoses should be stamped with this information, but you may need to revert to the convention of blue is cold and red is hot.

Securing the Connections

Once the hoses are correctly identified and connected loosely to the taps, securely tighten the fittings to the correct inlet on the washer, before tightening the hoses at the taps. The inlet valves are usually coloured orange or red for the hot water hose and blue or white for the cold water connection. If you have a washing machine with only a cold water inlet this process is a lot simpler. Its desirable to avoid unnecessary leaks and spills; a dry area will help you spot any potential leaks more easily.

Turn on the taps and carefully inspect for leaks, listening for any hissing sounds that indicate a water leak. Taking a break and checking again after an hour can help ensure no delayed leaks appear from the tap or hose connections.

Addressing Leaks

It’s not uncommon for the hot water tap, especially if unused for a while, to leak from the top. Many front loader washing machines have only a cold water connection which sees the hot water tap go unused for long periods of time. This could be due to dried out rubber O-rings and seals. Operating the tap a few times might lubricate the seals enough to stop leaks.

Should you find a leak in the hose connections, never using Teflon tape, as it will make things worse. Instead, check the tightness of the connections and the condition of the rubber washers. Hoses should be snug but not overly tightened, and never require tools like pliers or wrenches for installation. If leaks persist, consider replacing the hoses or the worn washers as detailed earlier. Washing machine hoses should be replaced every 5 years.

Connecting the Drain Hose

The drain hose can be connected to the home’s sewage system in several ways, including a stand pipe, a hole in the laundry sink, a barbed connection on the laundry sink trap, or directly into the laundry sink if no special arrangement exists. Before proceeding, verify that any existing hole in the laundry sink is actually connected to the sewage system to avoid water simply draining onto the cabinet floor. Sometimes what looks like the drainage hole might not actually be connected, its important to verify.

Use a Hose Outlet U Bracket

Always use a hose outlet U bracket to secure the hose in place except for direct connections to a trap. While it might seem unnecessary, and you can often seemingly get away without one, failing to use one can lead to the hose dislodging and potentially causing a flood. This simple step can prevent significant water damage.

Maintaining an Air Gap

When connecting the drain hose, ensure there is an air gap between the end of the hose and any standing water in a pipe. When inserting the washing machine drain hose into a dedicated hole ion a laundry sink you don’t want to keep shoving it down as far as you can. A gap is essential to prevent possible sewage backflow into the washing machine, which is undesirable for obvious reasons.

Connecting to a Barbed Connector

Advice for Front Loader Washing Machines

In cases where the drain hose connects to a barbed connector on the trap under the sink, it’s important to check if the connector is open. From factory these connectors are usually sealed, requiring you to drill them out before use. If there is no washing machine drain hose connected to the barbed connector, anytime the sink is used water will leak out at this point. Confirm the connector is open by probing with a long, thin tool like a flathead screwdriver. If the connector is sealed it will need to be drilled open. It’s easier to remove the U-bend and drill it out in most cases. Once the drain hole is confirmed as open, the drain hose should just slide onto the connector. Push it down as far as it will go then secure it with a hose clamp for a reliable connection. While cable ties can serve in a pinch, hose clamps are recommended for reliability. While connecting the drain hose, you may need to push the washer closer to its final position to ensure the hose reaches without strain. When doing so, try to walk the washer back instead of sliding it to avoid damaging your floor or the machine’s feet.

Advice for Top Loader Washing Machines​

Top loader washing machines usually have a different type of drain hose that does not lend itself to being connected to barbed connectors.  It is possible to make a connection using a lot of Teflon tape, but it may not be the most reliable.  Consider semi permanently siliconing the hose in place in these cases, or finding a replacement drain hose solution designed to seal over a barbed connection.

Plugging in the Washing Machine

This process is straightforward but requires attention to certain details to avoid potential risks. 

Considering Powerboard and Double Adapter Use

Directly plug your washing machine into a wall outlet where you can. Double adapters pose a significant and real risk of fire, especially when a clothes dryer is the second appliance on the double adaptor. The primary concern with double adapters is that running a washer and dryer simultaneously will overload the adapter and the outlet, using double the rated power in most cases.

If a powerboard is used, choose one with overload protectors to mitigate fire risk. However, be aware that this setup may lead to frequent trips of the overload protector if both the washer and dryer are used together, as they are both likely to use close to the boards rated power output individually.

Extension Cord Use

You can use an extension cord but never use an extension cord with a double adaptor. This is a house fire waiting to happen.

Upgrading the Wall Outlet

Instead of using a powerboard or double adaptor, consider upgrading from a single to a double outlet. This task, which is relatively minor for a professional electrician, can prevent overloading issues and eliminate the need for potentially hazardous adapters and powerboards.

Positioning the Washing Machine

With the washing machine plugged in, it’s time to position it in its designated spot. Preferably, move the appliance by walking it to its final position. Sliding is an alternative if necessary, but it should be done with care, and you can expect marks on your floor. Usually rubber marks can be removed from a tile floor with a cream cleanser like Jif. Don’t turn on the washing machine at the wall yet, unless the power point will be obstructed by the washing machine when it is in place. We have a few more things to do.

Leveling the Washing Machine

Once in place, we want to make sure the machine is stable. A perfectly level machine is less important than one that doesn’t rock or move. Put away your level and simply visually inspect the machine. If it doesn’t appear noticeably on a lean front or back, it’s usually adequate. What we care about is stability, we don’t want it rocking.

Checking for Movement

To test stability, apply gentle pressure to opposite corners of the top of the machine (one front corner and one diagonal back corner) and attempt to rock it. Repeat this process for the other set of diagonal corners. Any movement or rocking indicates that adjustments are needed.

Adjusting the Feet

If you detect movement, the machine’s feet require adjustment. Generally, adjustments are only necessary on one of the front feet. Properly adjusted feet contribute to a quieter spin cycle, avoiding excessive noise or movement during operation. Typically, there’s no need to adjust the back feet if you’ve already reset all feet to their initial positions after the previous installation as covered previously. Adjust the relevant front foot by turning it counter clockwise until the machine is stable, with no discernible movement when you apply pressure. Once you’ve got the machine sitting correctly adjust the locknuts so that they sit against the base of the washer.  If your locknuts are seized and this is not an option, the machine should be ok, but it’s worth keeping an eye on. Resist the temptation to chock the machine especially with cardboard or other soft materials, it rarely lasts long – replacement feet are relatively inexpensive and worth buying if required.

Final Checks and First Use

Before initiating the first use of your washing machine, completing a series of final checks is essential to ensure everything is set up correctly and to avoid potential issues.

Powering On and Leak Inspection

If you haven’t already, switch the machine on at the power point. Conduct a final inspection of the inlet hoses and their connections to ensure there are no leaks.

Drain Pump Filter Check for Front Loaders

For front loader washing machines, ensure that the drain pump filter and its rubber washer are clean. If you’ve removed the filter—which we advised against earlier—reinstall it carefully to avoid leaks. To reinstall the drain pump filter you usually need to align it with two tabs to insert it and then screw it in. It should screw in clockwise until you feel a very definite stop. If it feels very tight and you’re having trouble turning it this is usually the result of an obstruction in the filter housing, or a pinched rubber washer on the filter itself. A pinched rubber washer will result in a bad seal. Usually if the rubber washer is pinching the only solution is to buy a new filter, the washers are generally not available as a standalone part. When the washer has filled with water monitor the drain pump filter for leakage, it’s a very common point of leaks if you have removed and reinstalled the filter.

Running a Short Cycle

Turn the machine on and select a short wash cycle without adding any detergent. This initial run will help you identify any immediate issues with the setup without the complication of suds.

Monitoring During First Fill

Pay close attention during the machine’s initial fill cycle to prevent overflow, especially if you followed our advice earlier and transported the washer without draining the washer. An air pocket in the pressure system can mislead the washers control board about its water level, leading to excessive filling and overflowing. For front loaders, stop the cycle if water levels exceed one third of the door window. For top loaders, stop if water surpasses the pre-set level. Then, switch to a spin cycle before attempting a new cycle. Usually this issue resolves on the first attempt, but you may need to repeat this process once or twice until the machine fills correctly and proceeds with the wash cycle as expected.

Checking Drainage and Monitoring for Leaks

Ensure that the drain water is properly exiting into the designated drainage point and not ending up on your floor. Vigilantly check for any leaks or drips from the machine, using a flashlight to inspect underneath it. If you discover leaks that you can’t immediately resolve, it’s prudent to turn off the supply hoses and allow the area and machine to dry out completely. This pause helps distinguish between actual leaks and residual water from installation. The most common leak points when reinstalling a washing machine are the taps, the hose connections and the pump filter.  It’s unlikely that the machine has been damaged in transport and is leaking internally. If leaks persist again after a few days waiting and you cannot find anything obvious, consider consulting a professional for a diagnosis.

Posted on Leave a comment

Transit Bolts (Shipping Bolts) for Front Loader Washing Machines: Do you Need Them?

Four Fisher Paykel transit bolts arranged in a quarter circle

As an appliance delivery specialist at Whybuy, I’ve moved countless front loader washers and have a wealth of experience regarding the best practices for transporting appliances. One common facet I’ve dealt with daily is the use of transit bolts – those crucial (or not so crucial) components can play a significant role in the safe transport of washing machines. Through this guide, I aim to demystify transit bolts, answering common questions and sharing insights from my daily experiences.

Four Fisher Paykel transit bolts arranged in a quarter circle

What Are Transit Bolts (Shipping Bolts) and Why Are They Important?

Transit bolts, or shipping bolts, play a crucial role in safeguarding the drum of front loader washing machines during transportation. Typically, the drum of a front loader is suspended by two springs from the top and supported by two to three shock absorbers at the base. The main function of these transit bolts is to prevent the springs from becoming unhooked. If a spring detaches, the drum will no longer be properly secured to the machine’s case, leading to noticeable misalignment when viewed through the door, with the seal appearing dislodged and the drum seeming incorrectly positioned. Operating the machine in such a state risks damaging not only the seal and the door but potentially other components as well. Although reattaching any dislodged springs is a relatively straightforward task for a professional and manageable for an experienced DIYer, taking measures to prevent these issues from occurring in the first place is more desirable.

Are Transit Bolts Universal?

Transit bolts are not universal. Their design, including length, width and threading, varies significantly between different washing machine models and manufacturers. If you intend on using transit bolts, use the correct ones for your machine or you’re better off not using transit bolts at all.

Do I Need Transit Bolts to Move My Front Loader?

My professional advice, based on daily handling of these appliances, is nuanced. For short distances, especially within the same premises or nearby, you probably don’t need to install the transit bolts. However, for longer moves, particularly interstate or international relocations, securing the machine with transit bolts is wise to prevent any potential damage from rough handling or emergency braking. However, if you’ve already disposed of the transit bolts, can’t find them, or simply never had them to begin with, my recommendation is to proceed with moving the washing machine without transit bolts. Considering the cost and effort to acquire new bolts against the relatively minor risk of the springs detaching, it’s more practical to go ahead with the move and address any minor issues as they come up. Reattaching a spring is generally a quick task for someone experienced, taking about 20 minutes, assuming there’s no significant damage, which is rare. Any damage that does occur is likely to be minor, such as a crushed plastic part or a disconnected wire.

How to Transport a Washing Machine Without Transit Bolts

Transporting a washing machine without transit bolts isn’t a cause for concern. The primary issue that transit bolts aim to avoid is preventing the springs from dislodging if the washer falls over. So let’s make sure the washer does not fall over. The key to maintaining the appliance upright begins with aligning the door either towards the vehicle’s front or back. Thanks to their design to withstand unbalanced loads, washing machines are more prone to tipping forwards or backwards rather than sideways. This orientation ensures stability even when facing significant forces from turning corners, with the main concerns being sudden deceleration or acceleration, with the main concerns now being sudden deceleration, acceleration, or really big bumps.

Heavy braking is the most significant force you need to concern yourself with. You don’t have a lot of control of when you need to brake heavily and the last thing you want to be thinking about is how hard you can brake before the washer moves. Position the washing machine securely against the front wall of the tray or truck body and/or fasten it firmly with straps or rope. Using straps or ropes is advised as this also safeguards against heavy acceleration and big bumps. If you have no ropes or straps you can get away without them using this method but if you hit a speedbump hard or take off fast, there’s a good chance the machine will move, but these two aspects are much more in the drivers control.

How to Install Transit Bolts

  1. Locate the Bolts: Before moving your front loader washing machine, find the transit bolts that came with your appliance. These are typically found in the original packaging or may have been provided separately by the manufacturer.  They will be long bolts usually with pointy ends and big rubber or plastic washers.
  2. Prepare the Machine: Ensure the washing machine is unplugged and all water connections are disconnected. This prevents any accidental damage or injury during the installation process.
  3. Identify Bolt Locations: Check the back of your washing machine for the bolt holes. Usually there are 3-4 holes.  They are usually marked and located near the outer edges of the machine.  Often they will have little plastic covers over the holes that need to be pryed off before the bolt can be inserted. 
  4. Insert the Bolts: Carefully insert each transit bolt into the designated holes. Depending on your model, there might be three to four bolts. Align them with the hole on the drum inside the cabinet.
  5. Tighten the Bolts: Use an appropriate tool, usually a wrench or socket set, to tighten the bolts. They should be firm enough to hold the drum securely but not overtightened as this could damage the machine.  Gently try to rock the drum and make sure there is no movement of the drum or at the bolts.

How to Remove Transit Bolts

  1. Safety First: Ensure the washing machine is not connected to any power source or water supply before starting the removal process.
  2. Access the Bolts: Move to the back of the washing machine to access the transit bolts.
  3. Loosen the Bolts: Using a wrench or socket set, loosen each bolt by turning it counter-clockwise. Be ready to support the bolt as it comes free to prevent it from falling into the machine or getting lost.
  4. Remove the Bolts Completely: Once loosened, carefully remove each bolt from the machine. It’s a good practice to keep these bolts in a safe place should you need them again for future moves.
  5. Inspect and Secure: With the bolts removed, gently rock the washing machine to ensure the drum moves freely. This confirms the bolts have been successfully removed. Finally, replace any plastic caps back over the transit bolt holes.

What If I Forget to Remove the Transit Bolts?

If transit bolts remain installed after setting up the washing machine, it effectively lacks suspension. This situation can result in the machine shaking intensely or even toppling over. Such movements may cause considerable harm to walls, floors, and likely result in flooding, ultimately risking the destruction of the appliance and your laundry. It’s crucial to removr the transit bolts before using your washing machine.

Can I Damage the Concrete Weights by Transporting Without Transit Bolts?

From my experience, such damage is extremely unlikely. Any force capable of damaging the concrete weights would likely cause significant damage to the washing machine regardless of the bolts’ presence.

In Summary

While my experience at Whybuy has shown that transit bolts are seldom necessary for the kind of movements we undertake daily, understanding their purpose and correct usage is essential for anyone looking to move their washing machine. Should you lose your transit bolts or find yourself in a situation where using them isn’t feasible, remember that careful handling and proper orientation during transport can mitigate most risks. However, for long-distance relocations, I still recommend using them to ensure your appliance arrives in the best condition possible.

Posted on Leave a comment

A Sticky Situation: Why You Should Peel Off Appliance Stickers Sooner Rather Than Later, and How to Fix it If you Haven’t

Those energy rating and promotional stickers adorning your appliances might seem like a badge of honour – a testament to your commitment to sustainability or simply a reminder of your savvy shopping. Or perhaps you are worried you might damage your shiny new appliance by trying to take the stickers off, or maybe they just don’t bother you and you’ve never given it much thought. I’m here to share a crucial piece of advice: Remove those stickers while you can! Yes, they may look sleek and informative at first, but they’re actually ticking time bombs of aesthetic displeasure.

The Aesthetic Downfall

Initially, these stickers might serve as a symbol of efficiency and pride. Who doesn’t want to show off their eco-friendly choices, and the newness of their appliances? And sure, they might even bump up the resale value if you’re eyeing the second-hand market. However, these stickers are not designed for longevity. Over time, they degrade, turning from helpful labels into torn and stained blemishes that are a nightmare to remove.

The Removal Ordeal

After a few years, what was once a simple sticker becomes a tenacious tenant on your appliance. Attempting to peel it off transforms into a Herculean task – they tear, and cling to the last slowly wearing your fingernails down to the nub. But that’s not even the worst part.

A Tale of Two Whites

The most upsetting issue arises from the stark contrast between the protected patch of paint beneath the sticker and the rest of the appliance’s surface. Yes, the sticker did a fantastic job of shielding a portion of your appliance from oxidation, leaving a gleaming patch of white, where the rest of the appliance has become a few shades of white closer to yellow.  Usually this would be imperceptible, but thanks to the gleaming patch of white, the whole appliance now looks tired and old. It’s an eyesore that no homeowner deserves.

The Do's and Don'ts of Sticker Removal

Faced with this sticky situation, you might be tempted to reach for strong solvents like isopropyl alcohol, eucalyptus oil, or heaven forbid, acetone. Stop right there! These substances are far too aggressive for the paint finishes and plastic components on your appliances, risking damage that ranges from dulled surfaces to exposed bare metal.   The safe and effective way to tackle this problem is with automotive degreaser in a spray can – your new best friend in the battle against stubborn stickers. A simple spray, a brief wait, and with a bit of luck, you’ll witness the glue dissolving before your very eyes, allowing for a smooth, non-destructive removal.  Automotive degreaser is generally gentle enough it wont affect plastics or react with painted surfaces, but is still powerful enough to soften the glue holding the sticker.


For those pesky stickers that refuse to budge, a strategic approach is key. If the sticker appears to be paper layered with plastic, carefully peel off this top plastic layer to allow the degreaser better access to the underlying paper and adhesive. For fully plastic stickers, gently lift a corner, apply your degreaser, and work slowly, applying more as needed. Patience is your ally here.

Rescuing Appliances from Sticker Scars: A Last-Resort Method

If you’re dealing with an unsightly blemish left by a sticker that was removed too late from your appliance, there’s a last-resort solution that involves the use of creme peroxide, commonly used in hairdressing at a concentration of 12%. Before proceeding, it’s important to acknowledge the risks involved and consider this method only when other options have been exhausted.


To begin, ensure you’re wearing protective gloves (You really want to wear gloves, 12% hydrogen peroxide will quickly give you chemical burns) and evenly apply the peroxide over the entire affected area, not just where the blemish is. For example, if we’re removing the sticker from a freezer door, you want to treat the entire freezer door. Now you need to move the surface into direct sunlight, such that no part of it is in shade. The effectiveness of this treatment relies on the catalytic action of UV rays from direct sunlight, which helps the peroxide whiten the painted surface. However, this process requires careful monitoring. Every 10 minutes, thoroughly wash off all the peroxide to check the progress and prevent damage. Leaving the peroxide on for too long can cause the paint to blister, especially if the surface was already in a compromised condition. The exact time before damage occurs can vary, so it’s essential to proceed with caution.


It’s also crucial to ensure that the peroxide does not come into contact with any plastic parts of the appliance. While peroxide can restore a uniform white appearance to painted surfaces, it has a detrimental effect on plastics. Initially, the plastic may look brighter, but it quickly turns to a much more intense yellow, ultimately leading to an undesirable and unsightly yellow hue.  Remember, using peroxide is a risky procedure that could potentially harm your appliance’s surface. It should only be considered as a last resort and performed with the utmost care.

A Fisher Paykel E249T fridge with the freezer door open showing plastic trim yellowed and damaged by peroxide
The results of peroxide on plastic will be a brilliant white at first but quickly degrade to a horrific yellow.

In Conclusion

While it might be tempting to leave those stickers untouched, either out of laziness, fear, or a desire to preserve the appliance’s ‘newness’, the truth is they’re likely to damage the consistent appearance of your appliance and leave an unsightly mark if you leave them be. Embrace the brief moment of effort now to save yourself a heap of hassle later. Remember, a clean, uniform appliance is far more appealing than one marred by the ghosts of stickers past. Happy peeling, and may your appliances always reflect your impeccable taste and care.

Posted on Leave a comment

Don’t Fall for the Smart TV Trap: Why “Stupid” TVs with Smart Boxes Make More Sense

The allure of a smart TV is undeniable. They promise convenience and simplicity, with countless apps and services at your fingertips. Delving deeper however, is a solution that might seem awkward and needlessly complicated at first, but which is good advice upon closer examination: Opt for a “stupid” TV and enhance it with a smart TV box like a Google TV or Apple TV. This approach unifies the disparate pace at which the software side of TV viewing is evolving, like the available apps, streaming services, and functionality, with the now more incremental evolution of the hardware – the TV itself. The argument for a “stupid” TV paired with a separate streaming device is compelling, especially when considering the rapid pace at which smart functionality evolves compared to the relatively stable advancements in screen and other hardware technology. By separating the smart capabilities from the display, you ensure that your entertainment setup remains future-proof.

The Smart Choice in a World of Smart TVs: Don’t Buy a Smart TV

Gone are the days when annual updates rendered last year’s models obsolete. Today, whether you’re looking at OLED, QLED, or LED, the advancements in screen technology have become incremental rather than revolutionary. We are unlikely to see any new ports for a while. HDMI, USB, what more does the average consumer need? Neither is there any competing alternative on the horizon to to usurp their dominance. This slow in evolution means that investing in a good quality “stupid” TV can keep you contented for years, if not decades, with its performance. The real change and innovation occur on the software side, where new services and platforms emerge with dizzying frequency, and and the potential impact of rapid AI adoption remains a topic of speculation. As new streaming platforms emerge and existing ones update, a standalone streaming device can be easily upgraded, updated or replaced, keeping your home entertainment system current without the need to invest in a new television.

The Power Couple: Basic TVs and Advanced Streaming Devices

One of the most immediate benefits of pairing a smart TV box with a “stupid” TV is the cost-effectiveness. “Stupid” TVs, lacking the built-in smart technology, are cheaper than their smart counterparts. Smart TV boxes can be had cheaply as well, the Google TVHD is available for as low as $50. Another benefit is that you can choose the ecosystem you want. With plenty of Apple and Android fans out there, and having their TV operating on the same ecosystem as their phone really streamlines things. By separating out the smarts from the TV, consumers get an overall cheaper more tailored solution to their needs.

Choosing a “stupid” TV and pairing it with a smart TV box is also a sustainable choice. It significantly reduces electronic waste, as the lifespan of the display itself is extended, not being held back by outdated software. Instead of discarding a television simply because its smart features are outdated, you can continue using the same “stupid” TV for years, updating (soft and hard) the streaming device if needed.

From Limited Storage to Brand Tiffs: The Smart TV Pitfalls

I remember having an LG smart TV, and it had such a tiny amount of storage that you had to delete apps to fit new ones on. I remember in 2019 when Google and Amazon were having a tiff and refusing to allow each others streamers on their smart TV boxes or operating systems. I remember when it took LG a full 12 months after Disney+ was released for them to have it as an available app for download on my LG smart TV. And don’t even get me started on the smart functionality of my current Ffalcon 50” TV.

The 50” Ffalcon (a rebranded TCL) TV we offer at Whybuy is far from smart. It’s actually a bit embarrassing how bad it is in terms of smarts.  It doesn’t have Chromecast, instead some nonsense called T-Link, you can’t add new apps, and it has only Netflix, Stan, Crackle and Youtube alongside a bunch of weird apps. The processor is so underpowered that it lags when you change the volume.  This isn’t uncommon among Smart TV’s. We always advise our customers when they subscribe to this TV, that they should treat it as a stupid TV and outsource the smart functionality to a $50 Google TV. 

However, if you look past the smart features, the 50” Ffalcon is actually a fantastic TV. The picture is awesome, and the inbuilt sound is great as well. I personally have this TV, and I’ve paired it with a Google TVHD. You can opt for a more expensive Google TV4K as the TV is 4K HDR, but I, like most consumers can barely tell the difference between HD and 4K, and even if I could, I wouldn’t pay the extra for my streams to be in 4k, so barely any of the content I watch would be 4k. You can sync up the Google TV remote so it can power the TV on and off and adjust the volume (when prompted for the brand in the Google TV setup select TCL), but I’ve always needed the TV remote to change the HDMI input. I can live with that.

Beyond 40 Inches: The Challenge of Buying Big "Stupid" TVs

You might wonder why we even offer the 50” Ffalcon smart TV if they’re such a bad idea. Here’s the problem – once you go past 40”, it is basically impossible to find a non-smart TV; they are all smart. At Whybuy, all our TVs are “stupid” until you reach the 50″ model. Finding a large TV that isn’t smart is a challenge. So, the next best thing is to buy a TV based on picture quality and pair it with a Google TV or an Apple TV. Ensure it has enough ports for your needs so you’re not constantly plugging and unplugging devices. Sound is important, but if needed, you can always upgrade with a soundbar.

The Smart TV Trap

Why is it that all TV’s over 40 inches are smart TV’s? I have a theory. TV manufacturers have realised that screen technology has matured and they can’t expect consumers to throw their TV away every few years due to redundancy. So they’ve come up with something more deceptive. So, they’ve devised a more deceptive tactic: software that quickly becomes obsolete. This software, lucky to receive an update, runs on processors barely powerful enough at the time of release. If updates are provided, the applications often become more resource-intensive over time, leaving you without the necessary processing power. If updates cease, the apps might continue working until one day, they don’t, due to the app owner ending support for your version. Thus, within a few years, maybe 5 if you’re lucky, the smart functionality becomes obsolete, slow, buggy, prone to crashing, a security risk, and likely incompatible with some of your streaming apps.

Thin Margins and Hidden Profits

As TV prices have gotten cheaper, especially on the lower end of the market, the margins on the TV itself have become very thin. To compensate, TV manufacturers are increasingly making money through deals with streaming services and advertisers. They are paid to add special buttons to their remote controls and to preload bloatware onto the TVs. This practice not only enhances their revenue but also creates a feedback loop which encourages manufacturers to design a product which will need replacement every few years so they can profit again by adding new buttons and bloatware.

Planned Obsolescence

Consumer expectations have been shaped over the last two decades to believe their TV would become obsolete with hardware advancements, which is no longer the case. To maintain profits, manufacturers have introduced deliberate software obsolescence to their products, fostering the illusion of progression and prompting consumers to replace their TVs every few years. They can do this because the smart functionality is perceived as a minor component of the overall product. It’s not that the Smart TV no longer works; it’s that technological advancements have supposedly rendered the smart features obsolete, absolving manufacturers of blame for the premature obsolescence.

In contrast, streaming boxes like Google TV or Apple TV, designed solely to offer smart capabilities, face greater scrutiny. If they don’t perform well from the start and become obsolete within a few years, consumers would rightly be outraged and abandon these products. It can be seen that Smart TV box manufacturer interests are aligned much better than Smart TV manufacturers and consumers.

Ultimately, breaking free from the smart TV trap by opting for a ‘stupid’ TV and a smart streaming device is a testament to smarter consumerism. It champions a more enjoyable, cost-effective, and environmentally friendly approach to staying on the cutting edge of entertainment technology. So, before you commit to another smart TV, consider the benefits of this smarter combination. It’s a decision that promises to enhance your viewing pleasure and simplify your life in the long run.

Posted on Leave a comment

Is Bleach Bad for the Environment?

Deciding whether it’s okay to flush bleach down the toilet or use it in the washing machine isn’t straightforward. – Its environmental impact hinges on its use and disposal. Employing bleach as a cleaning agent should be a considered choice, reserved for instances where less harmful alternatives, such as vinegar, oxy bleach (sodium percarbonate) citric acid, and cream cleansers have proven ineffective.

The Environmental Impact of Bleach In The Home

The potential hazards of bleach extend beyond its immediate effectiveness as a cleaner. When used inappropriately or in excess, bleach poses risks not only through direct exposure but also through its interaction with the environment. For instance, bleach fumes can be more potent at higher temperatures, meaning its better to use bleach with cooler water to reduce chlorine fumes. Importantly too, bleach should never be mixed with other cleaners due to its high reactivity with acids and ammonia, which can produce toxic chlorine-based gases.
We must also recognise that bleaches disinfecting, bleaching and cleaning power is unrivalled. For certain cleaning challenges, like eradicating mould from washing machine seals, there’s no alternative to bleach’s potent cleaning power. In such scenarios, where the alternative might be discarding the appliance, the judicious use of bleach is the more environmentally friendly option. Then again, if the washing machine had not been allowed to become mouldy through a weekly preventative clean with vinegar, we’d not need the bleach either.

The Environmental Impact of Bleach Down the Drain

Bleach’s journey doesn’t end after it swirls into the drain. Left in pure water, bleach will ultimately degrade into table salt and water, especially when exposed to sunlight. This degradation can happen swiftly, often within days, under the right conditions. Bleach becomes more problematic when it encounters other substances including ammonia and simple organic matter in sewage systems, leading to the creation of trace amounts of harmful chemicals such as carcinogenic trihalomethanes, chloramines, and other chlorinated compounds. These byproducts can threaten aquatic ecosystems and human health if they are allowed to enter water bodies. Therefore, while a bowl of bleach left in the sun might harmlessly transform into salty water within days, its introduction to the complex environment of the sewer system can yield unpredictable and potentially harmful chemical reactions.

Modern Sewage Treatment

Fortunately, contemporary sewage treatment plants are adept at managing bleach, diluting, and converting it to minimize environmental harm before its release. However, this capacity varies significantly with the infrastructure in place. In regions lacking sophisticated wastewater management or in homes relying on septic systems, flushing bleach down the drain is never a good idea. Introducing bleach into a septic system can be particularly detrimental, as it disrupts the microbial processes essential for breaking down sewage in the septic tank, leading to environmental and health hazards.  Sewage will no longer be effectively treated, as well as toxic and biohazardous compounds may be introduced to local waterways and groundwater.

So - is Bleach Bad for the Environment?

Bleach’s environmental impact is a matter of responsible use. If you’re lucky to live in an area that has advanced sewage treatment plants, flushing bleach down the toilet is likely to have a negligible environmental impact, but not no environmental impact. Bleach – and the trace toxic compounds it has transformed into on its way to the sewage treatment plant – still requires resources to remediate, that milder cleaners like vinegar would not. It’s also important to bear in mind that the treatment plant is also unlikely to remove and treat all of the bleachs trace by products, so there is likely to be some spillover into the environment. While bleach can pose risks if used thoughtlessly or excessively, giving a little consideration to what happens after it goes down your drain, goes a long way to mitigating its impact.

Posted on Leave a comment

Vinegar Washing Machine Clean: The Effortless Solution for a Clean Washer

If you’re anything like me, keeping the house clean feels like a never-ending battle, especially when it comes to laundry. But fear not, because I’ve got a trick up my sleeve that’ll not only keep your bath towels hygienic and fresh, but will also ensure your washing machine stays healthy and clean – especially if you usually run cold washes only.  It’s all about washing towels.

Let’s talk about those bath towels – they’re little germ magnets, right? With all the moisture they soak up, and the humid environment they spend much of their time, it’s no wonder they need a good wash frequently to eradicate those musty smells.  But here’s the thing – putting those musty towels into your washer on a cold wash is also a great way to accidentally dose your washing machine with humidity loving microbes.  The same microbes causing that musty towel smell , you’ve just introduced them into your washer, where they’ll happily set up camp, especially loving the nooks and crannies of the rubber door boot.

The Issue with Cold Wash Cycles

If you wash on cold cycles either to save money or for sustainability reasons – or both – your machine, especially the rubber seals, will be particularly susceptible to microbe invasion.  While washing on cold cycles is a great way to save money and is the more sustainable way to go, you also want you washing machine to, well, wash – and part of that is sanitisation.  Cold water washes do little to nothing to kill microbes, and they thrive in the humid environment inside your washing machine if they get established.  Using hot water as a sanitising agent is the more sustainable option as opposed to waiting for the machine to become a mould infested heath hazard that at best needs bleach and harsher chemicals to resolve, and at worst sees the machine thrown away well before its time.

A Simple Solution: A Hot Wash, Once a Week

I’ve found the best way to keep my machine fresh is by throwing my towels in for a spin at 60°C (140°F) once a week. If you make a habit of washing your towels once a week, it also sets a good sanitation schedule for the washer, and the rest of the time you can continue washing on cold cycles. Here’s the beauty of it – by keeping up with those weekly towel washes, you’re inadvertently staying on top of washing machine maintenance too. It’s a two for one, a three for one if you count the built in reminder to sanitise your machine. You’ve gotta love the efficiency! I recommend a wash temperature of around 60°C, but you can go hotter if you want to. Higher temperatures result in faster, and more certain elimination of microbes:
  • At 90°C (194°F), bacteria and moulds are eradicated within minutes.
  • At 60°C (140°F), it takes around 30 minutes to achieve the same level of sterilization.
  • At 50°C (122°F) it typically requires around 60 minutes to effectively kill germs. Any colder and you’re unlikely to get full sanitation

Remember – the cycle you select will also include fill, rinse and spin time, so you can’t just go off the cycle time displayed on the machine. It’s also worth bearing in mind that the water sits in the bottom of the bowl, and you want to sanitise the whole bowl right up to the top. So while you might have 50 degree water sitting at the bottom of the bowl that might not be enough to heat the top of the bowl, and in particular the top of the rubber door seal, meaning that once the cycle is over, microbes are ready and waiting to quicky recolonise the machine from the top.

Will Hot Water Ruin my Towels?

While most towel manufacturers recommend regular washing at 40°C and an occasional deep clean at 40-60°C to eradicate bacteria and body oil accumulation, I prefer ensuring my towels are thoroughly cleaned after each wash. I’d rather not have a build up at all – to me the presence of a build up can only mean my towels are not coming out of the wash clean enough. To my mind if a towel cannot withstand temperatures hot enough to sanitise it, it is not fit for purpose.

Temperatures below 60°C are unlikely to achieve effective sanitation under real-world conditions. Washing towels at 60°C, despite a possibly diminished lifespan, is a compromise I’m willing to make for consistently clean towels and a sanitised washing machine.  It’s a bit like saying if you leave the towel in the drawer and never use it, you will extend its lifespan.  Sure, but its not very useful to me if I can never use it, just like its not useful to me if I slather myself in bacteria and body oil every time I leave the shower. 

For towels made from a cotton rich or poly-cotton blend, a 60°C wash could excessively shorten their lifespan. In practice for those looking to sanitize towels and bed sheets effectively without compromising fabric integrity, opting for 100% cotton materials is a better choice. Poly-cotton blends are not fit for purpose when it comes to towels and bedding because they cannot usually be safely washed at the temperatures needed for proper sanitation. Avoid cotton rich or poly-cotton blends especially if you’re looking to avoid environmental downsides like microplastics shedding in the wash and ending up not just down the drain, but blasted out from your dryer as lint, and then shed over your body as you dry yourself. Going for pure cotton might hit the wallet a bit harder, but it’s a better choice for both health and environmental reasons. 

A Bonus Tip: Vinegar as a Fabric Softener

Adding vinegar to the fabric softener compartment will not only help soften your towels, it’s great for preventing mould infestations with its anti-microbial properties, while being safe and non-toxic.

Dealing with an Already Infested Machine?

Now you know the best way to keep your front loader washing machine clean, and prevent mould infestations, but what if you’re dealing with a mould infested machine?  If you can see mould, its too late for hot washes and vinegar.  Vinegar is a great preventative, but once mould has taken hold, you need to turn to harsher chemicals like bleach. Read our guide here.

Posted on Leave a comment

The Pitfalls of Airbnb Management in Melbourne and Victoria: Lessons from a Failed Host

In the tumultuous real estate landscape of late 2022, I put my beloved investment property a few hours outside of Melbourne in one of the goldfield towns on the market for sale. My tenants had moved out, scared away by the prospect of a new landlord, and suspecting selling might take some time, I decided it might be prudent to hedge against failure by testing the waters of Airbnb hosting, converting my century old renovated miner’s cottage into a charming retreat for travellers. Nestled a town steeped in gold rush history and teeming with tourists, the prospects seemed promising.

Setting up my my Airbnb, I went to great lengths to deck out the place. From Airbnb’s must haves to thoughtful extras, I went all in. Balancing my fulltime employment in Melbourne with hosting duties, I shuffled between the two cities, crashing at my mum’s place when the guests rolled in. The grind was real – weekly top tier cleanups and constant upkeep. But it paid off handsomely, earning me the coveted superhost status and an impressive average rating that danced above the 4.8 star mark. I charged $100 for a weeknight, and $160 on a Friday and Saturday night with a 2 night minimum. I was making more than I would in rent, and it was functioning as my own house as well; I felt like a financial genius. Just as well because the house wasn’t selling, so I pulled it from the market and committed to Airbnb.

Running an Airbnb wasn’t all sunshine and rainbows though. Living in the property while hosting added another layer of complexity. Balancing the comfort of my personal space with delivering a top notch experience guests expected required finesse. Every week I’d have to deep clean the house to an end of lease standard, which was at least made easier by the fact I’d done the same clean a week earlier. All of my personal belongings had to be shoved away in my locked off bedroom, the bathroom, pantry and fridge all cleaned out.  It was a real hassle. The experience underscored the importance of a separate bathroom and scaled back kitchen access, minimising the hassle of constant cleaning. I’d also consider engaging an Airbnb cleaning service, it didn’t make sense to do it all myself when I could hire someone for $100 a clean to do the majority of the work.

Key Lessons I Learned from Self Hosting an Airbnb:

Necessity is Key 

Don’t bother trying to meet all of Airbnb’s requests for additional amenities like workstations, restrained furniture, BBQs, etc – unless you have a good reason for it.  Airbnb will push you to keep adding amenities, which I found weren’t used and didn’t impact my bookings at all.

Pet vs. Kid Friendly

Choose wisely between kid friendly and pet friendly – it’s an either or situation. Neither is also a good option. It’s a lot of extra work to list as child friendly. I tried to be both pet friendly and child friendly, and it bit me with a one star review from an anxious parent. Children spend a lot of time on the ground, and parents, especially new ones, will give you a poor review for the slightest bit of dust. In my view, you need to choose between pet friendly or child friendly, and those with pets are usually just grateful you’ve let their pet stay. I already had a dog, and my property was perfect for pets, with hard floors and a large secure yard, so it made sense for me to be a pet friendly property. It didn’t make sense for me to try and facilitate a child friendly property.

Personal Connections

Building pre-stay rapport with guests is more than just a tip; it’s absolutely necessarry if you want to be a superhost. It makes a big difference. There are essentially two groups of people. Those that understand unless something serious went wrong, with consideration to the nightly rate, it should be 5 stars. Then there’s the other group that believes that nothing deserves 100% and there’s always room for improvement. I once had a guest leave a 4 star review based on value, and when I asked what I might do to improve the value, he said “nothing, I thought it was great value!” The latter group makes achieving the 4.8 star Superhost status very difficult, and throw in the odd 1 or 2 stars from a neurotic new parent, and you’re left struggling. Doing it properly means reaching out to guests before they arrive and making them see you as a person, not a business. A person they would feel bad for if they left a bad review – after all – you’re friends now, right? Seal the deal with a bespoke local gift, maybe a locally made pillow mint or a local bottle of wine.

Bathroom and kitchen

If you’re going to live in the property you are inviting guests into, having your own separate bathroom and kitchen would make a big difference in your comfort. It would be much easier to not have to live out of a toiletries bag, and need to clean the oven, stove and fridge out every. single. week. 

Airbnb Property Management - The Big Mistake:

If I had a time machine and could go back to the point I decided to seek Airbnb property management, and not, I would. It all went awry when I was offered a position as a caretaker for a large empty house in Mt Eliza. I would stay in the granny flat and in return maintain the property. A good deal, but it put me too far away from my Airbnb in the goldfields to keep running it myself, and I didn’t need two homes either. As I considered whether I should put my property back up for rent or find an alternative solution to keep running it as an Airbnb, I hit upon something on Google one night. An ad from Airbnb flashed up to the top of my screen “Airbnb Management Melbourne.” I went down the rabbit hole, and here was Airbnb themselves recommending potential airbnb rental management companies to me. People who would manage the property and look after everything. Fantastic, I thought.

The First Airbnb Property Management Co host

What a mistake. The first Airbnb management co host I put on seemed great and accommodating at first but quickly became difficult to work with. They became domineering and stubborn and impossible to work with. After only 2 short weeks, they informed me by SMS that they had decided to go a different direction with their business and instead of Airbnb property management, they were going to rent out houses and run them themselves. Instead of being annoyed, I felt a wave of relief rush over me that I wouldn’t have to disentangle myself from this person I’d perhaps too quickly rushed into a working relationship with. Perhaps I had put too much credence on Airbnb’s apparent recommendation of them. When the co host refused to pay me my share of the booking income and Airbnb did absolutely nothing to help, instead referring me to the police and my local court system, I lost my trust in Airbnb and realised I shouldn’t trust their recommendations 

The Second Airbnb Property Management Co host

Ultimately, the house ended up being off the platform for a month, in which time I’d found a new Airbnb manager, based locally like the first, and also recommended by Airbnb. This time I did more due diligence and checked for other reviews, and was a bit more hesitant to dive right in. But ultimately, I did, and my attitude was that as long as the place made more than I’d have made renting it after I’d paid for utility bills, that was ok.

After 2 months the place was making less than half of what I’d get if I rented it out, and that was before I’d paid for utilities. The problem was that the Airbnb manager wasn’t managing the property. Their idea of managing was to get good initial photos, list the property on booking.com and Airbnb, call the cleaner, and respond to customers if they made contact. When I arrived after not checking the place for 2 months, the bins and letterbox were overflowing, and the lawn was a foot tall. The robot mower which I’d been promised would be looked after hadn’t been properly attended to, and so hadn’t done its job. And worse, I hadn’t been notified about the state of my property whose care I’d entrusted to a manager. To this point, I’d not bothered to check the listing, but my faith in the Airbnb manager had been shaken. Upon checking, I saw the average rating – 3.4. Because the Airbnb rental management company hadn’t been reaching out to guests, they’d not been getting the best reviews. The latest review, a 1 star review, lamented the dirty beds, and the dangerous height of the lawn for their dog in a pet friendly property. When I checked the beds a few weeks later, I found them all to have significant dirt marks on the top of the doona covers. A dirty beds review is perhaps the worst you can possibly get, and a business I was paying good money to manage the property had failed to ensure the beds were appropriately clean.

Since that guest had stayed, another had stayed after I’d brought the lawns back down and cleaned up the garden. When I asked the Airbnb manager if they would please reach out to this guest and beg for a good review to put the 1 star review at least not right at the top, my contact responded, “I don’t beg.” When I asked for the guests contact details so I could do it, they dropped me as a customer. It was at this point I’d now been through 2 out of the 3 Airbnb managers in the local area; the third never returned my call. It was time to give up. It just didn’t work with a manager. I put the property back up for long term rent in January 2024 and called it a day.

Key Lessons I Learned From Engaging Airbnb Property Management

The main reason I think that it didn’t work with Airbnb rental management companies was twofold. First, the limited pool of potential Airbnb managers in a small town meant I wasn’t getting the best of the best, or anything even approaching this. The property wasn’t managed well, and pricing wasn’t adjusted dynamically. The second problem was the comparatively low nightly rate paired with a substantial cleaning cost. The best occupancy I had was around 25% when it needed to hit closer to 70% to make it a better option than renting out to a long term tenant. And to do that the pricing would need to be adjusted for midweeks, time of year, and all the other factors when I believe it was just up for the one expensive fixed nightly rate every day of the year of approximately $240.

The second problem was the comparatively low nightly rate that was achievable for the property coupled with the high cost of airbnb cleaning services of around $185 a go on an average 2 night stay. Add the 10-20% charged by Airbnb rental management companies that was taken off the top of everything including cleaning, and there was just nothing left. The cleaning fee was made worse by the relative size of the property as well; it would have been better to have something smaller than a three bedroom detached house.

All up my Airbnb management experience was a failure, and I think it always would have been. Were my property able to be rented out for significantly more per night by being in a trendy Melbourne suburb or inner city, then I think it would be different. There would be access to more and better Airbnb management in Melbourne. Booking fees can be much higher, and the cleaning cost as a percentage of total revenue would be lower.

The main takeaway for those considering Airbnb management in Melbourne or Victoria is this – It is much harder to make the economics stack up when you bring in an Airbnb cleaning service and Airbnb management. Realistically it’s unlikely to work outside of Melbourne unless you’re self hosting.  If you’re self hosting it can be a great earner and pay the bills, but for regional Victorians, forget about Airbnb property management for your Airbnb.

Posted on Leave a comment

What Temperature Should My Fridge Be? In °F!

A thermometer showing the different temperatures to store groceries in degrees fahrenheit

When it comes to setting the temperature for your fridge, the general consensus is colder than 41°F for optimal food safety. However, the reality is a bit more nuanced. Most domestic fridges allow you to adjust temperatures between 34°F and 48°F in the fridge and 14°F to -4°F in the freezer. So, why the range?

A thermometer showing the different temperatures to store groceries in degrees fahrenheit

How Cold Should a Fridge Be?

Ideal Temperature: Less than 41°F

Real-world Recommendation: 37°F

Food Standards Australia New Zealand recommends keeping your fridge below 41°F for optimum food safety and to prevent the growth of food-poisoning bacteria. However, due to factors like varying temperatures within the fridge and fluctuations, setting it to around 37°F on the top shelf is usually the sweet spot.

Temperature Fluctuations

The fridge is not a static environment; it maintains an average temperature, not a precise one. Rather than consistently holding a specific temperature like 37°F, it might fluctuate between 34°F and 41°F.

Hot Air Rises


Another compounding factor is the simple fact that hot air rises and cold air sinks. So while the temperature of the fridge is dynamic, it is also usually warmer on the top shelf and colder on the bottom shelf. So while the top shelf may be varying between 34-41 degrees, the vegetable crisper might be 32-39 degrees, or worse 30-37°F. So your nice lettuce is freezing and thawing several times a day into a soggy mess. It’s good advice to store the perishable groceries like meat, fish, juice, and dairy closer to the bottom of the fridge, with condiments and non-perishables closer to the top. 37°F on the top shelf should mean the top shelf never goes above 41°F while the contents of the vegetable crisper don’t freeze.

You Get What You Pay For!

Fridge temperature fluctuation is influenced by factors such as the frequency of door openings, how loaded it is, external temperature, and the capacity of the fridge’s cooling system. Better fridges have less fluctuation, and often you get what you pay for. Fisher and Paykel fridges, for example, can, and often do, run their fans independently of the compressor to circulate the air for a more consistent and stable temperature throughout. A cheaper fridge won’t do this. A better fridge would be expected to have 34°F or less of fluctuation from the average, and less than 34°F of difference between the top and bottom shelf, while a cheaper fridge could expect to see 35.6°F or more of fluctuation.

Pro tip - Put a glass of water in the fridge on the top shelf and leave it there for 24 hours. Measure the temperature of the glass of water instead of the air temperature inside of the compartment. The glass of water will reflect the average temperature in the cabinet and is more reliable.

Why the Range?

If there’s really only one correct temperature for your fridge, then why do manufacturers bother to give you the ability to adjust it? Wouldn’t it be better if there was no need for you to have to Google this dumb information and your fridge was just set at the correct, safe, temperature already? Honestly yes, but it’s not practical. Other sources will give you bad answers – wanting to save energy or storing cold-sensitive items at a warmer temperature.

The real reason is that over time, thermostats and sensors go out of their factory range. The same setting on one would be a slightly different temperature to another, and with time and entropy, as springs lose their tension, and corrosion creeps in, things go out of whack. The setting that used to be 37°F is now 39°F or 36°F, and without the ability to make an adjustment, your fridge isn’t running where it should be, significantly reducing its service life.

How Cold Should a Freezer Be?

Ideal Temperature: 0°F or colder

The freezer’s primary role is to keep food frozen, preserving it for extended periods.  The ideal temperature for the freezer compartment is 0°F or lower. This temperature is cold enough to prevent the growth of bacteria, yeast, and mould, ensuring the long-term preservation of your frozen goods.  Setting the temperature at 0°F or colder helps maintain the quality, texture, and flavour of the frozen items.  Food is less prone to freezer burn, and less subject to degradation caused by enzymes in the food.  On the downside running your freezer this cold will mean it costs more to run, and will have a shorter service life than if you ran it hotter, simply due to wear and tear on the mechanical systems being on longer.

Adjusting for Practicality

Having adjustability in the freezer makes more sense because it really depends on how an individual user wants to go about things. A classic example is ice cream. If you want to store the ice cream, the right temperature is colder than 0°F. But ice cream that cold is not fun to eat; it is rock hard. Your spoon has bent trying to scoop it out of the container, and then you have to wait 10 minutes for it to thaw out enough to eat. But the thing is it doesn’t thaw consistently; the outside melts while the inside stays a frozen solid core. If you just bought ice cream, you plan on eating it in the next week, and you want it to be nice and creamy and delicious all the way through, you want your freezer set at around -12°C (10°F), the perfect ice cream eating temperature.

You might also want to save some money, and running your freezer warmer will save you money. Do you want to eat that spaghetti bolognese you made in the next three weeks or the next 3 months? If you want to store your food longer, you want to keep it colder. But if nothing stays in your freezer for more than a few weeks, you don’t need it very cold. The general consensus seems to be that if you keep your freezer at or below -18°C (0°F), it will be safe to eat indefinitely, but after 3-12 months depending on what it is, the flavor and texture will begin to suffer.

Freezer Size Matters

If you have a fridge with a smaller freezer, like the 248L Fisher and Paykel, generally, you need to run the freezer colder. Most domestic fridges max out at -4°F in the freezer. As a general rule, I’d say anything below 300L total capacity should be run pretty cold in the freezer. This is because during the defrost cycle, where a heater turns on in the back of every frost-free fridge for about 20 minutes every 1-2 days, the contents of a little freezer just don’t have the thermal mass to stay frozen, especially if it’s pretty empty. If they’re not very frozen at the start of the defrost cycle, there’s a good chance they will have thawed out by the end of it. One of the most common symptoms of this is ice cream that has melted and then frozen solid like an ice block.

Pro tip - If you don’t keep much in your fridge or freezer you can help stabilise the temperature and prevent temperature fluctuations by filling water or soft drink bottles with water and placing them inside.

Final Considerations

A couple of other considerations are the fridge quality and how often the freezer door will be opened. If it’s a cheap appliance from an unknown brand you might expect more temperature fluctuations and to make sure it’s not getting too warm, you need to set it colder. If you have kids constantly opening the freezer door in the middle of Summer to get to the icy poles again, better to set it colder as the more the door is opened, especially on a hot day the more the freezer temperature will fluctuate. If you’re worried about the power going out setting your freezer colder makes sense as well since the colder it is when the power goes out, the more likely it is you will make it through the blackout with the contents of your freezer still frozen.

Posted on Leave a comment

Why Does My Washing Machine Take So Long?

A person frustrated their washing machine is taking longer than expected

Do you wonder why your washer will tell you that a wash will be say 60 minutes, but then you come back 3 hours later and there’s still 20 minutes remaining? Why does it gaslight you? Wonder no more! As an appliance repair expert I can tell you why, and better yet – it’s an easy issue for anyone to work out with no tools required or experience needed.

A person frustrated their washing machine is taking longer than expected

There are a number of reasons your washer can be taking longer than it claims it will, from the temperature you select, water pressure, and how loaded the washer is. Most of the time, especially for a frontloader, it’s because you’re overloading your washer. Sometimes, but more rarely, its because your water pressure is no good or you’re running a two inlet machine on only cold water. Lastly it can be because of the water temperature you’re selecting. It’s really unlikely there’s a fault with your machine.

Overloading The Washing Machine

For frontloaders, and less so for toploaders, overloading can make your wash take much longer.  If you’re having big blowouts in time, this is the first place to start. 

Frontloader Washing Machines

Modern frontloader washing machines (anything built after around the year 2000) are all controlled by a computer. The Fisher Paykel frontloaders we carry at Whybuy, and that I specialise in, are computer controlled. Before they go into a spin cycle the drum gently starts spinning. The computer then carries out what we can call a clothing distribution test – How many amps is the motor using and how consistent is this use? This test determines how well distributed the clothes are in the bowl and if its likely to be balanced enough for a spin. If the test fails, it restarts again. And it can go on restarting and restarting for 45 minutes before giving up and throwing an out of balance error, requiring human intervention. On the Fisher and Paykel frontloaders you will get an “Out of Bal” message flashing on the screen, at which point you need to remove some clothes and restart a brand new cycle. Hooray! The more clothes you put into the machine, the more likely it is that you’re going to fail the clothing distribution test by going over the amp threshold in any given test. Given there can be up to 4 spin cycles in any given wash, its easy to see how you can have a big blowout in the initial time.

Toploader Washing Machines

Toploaders follow essentially the same procedure in balancing out the clothes as a frontloader but they give up on rebalancing much sooner (usually within 10 minutes) and call for human help. This is because once the water has drained out of the tub ready for a spin, there’s nothing the machine can do to move the clothes around if they’re not properly balanced out. The machine would have to fill with water again to do this, and I’ve never seen that. Towels and sheets are more likely to give you problems as they’re really heavy when wet and need to perfectly situated. If you’re finding your toploader is having a hard time balancing and calling for help often and on smaller loads, it usually means the shock absorbers are worn out and need replacement. In Australia at least, that’s a job that will cost more than the second hand replacement value of the machine and you’re better off just buying another.

It’s really easy to test if overloading your machine is the reason it is taking forever – just run it empty. Start a stopwatch or timer on your phone and come back when the machine says it should be done. If it finishes within 10 minutes of when it says it should, that’s fine, as remember there’s other factors that can slow it down, which we go through below.

Bad Water Pressure

This one is pretty simple. If you have bad water pressure your machine will take longer to fill. If it takes longer to fill the timer will be inaccurate. This is particularly noticeable if you have a gravity fed hot water service on a hot wash. Unless your water pressure is really bad this will generally only add a few minutes to a cycle. Really bad water pressure can also result in the machine throwing a fault. The water inlet solenoids need a certain amount of pressure to open, and if it’s not high enough the machine will not fill at all. For example, the Fisher Paykel frontloader will give you an error on very low water pressure “No Tap”. 

If you have good cold water pressure but bad hot water pressure (usually because of a gravity fed hot water service) and your machine is a frontloader, you might try turning off the hot water inlet tap, but that will also lead to a slightly slower machine in a different way as outlined below. Frontloader machines usually have on board heaters that can heat cold water to the temperature selected, so don’t always need both a hot and cold water connection. Some machines will give you the equivalent of a “No tap” error though, and must have both a hot and cold connection. Additionally, turning off the hot water supply tap isn’t a solution for a toploader as they typically do not have any on board heater. At least I’ve never seen one, but I’m sure there is a rare example somewhere. It’s funny because there’s no reason a toploader cannot have an on board heater, they just don’t. I’d guess its because they would have to heat much more water than a frontloader which would significantly slow down the cycle, removing one of two competitive edges a toploader has over a frontloader being that they’re faster than frontloaders, the other being you can put your clothes in from the top which is good for some people with mobility issues.

Running a Two Inlet Washer on Cold Only

Your washing machine might have a connection for both a hot and cold supply, or cold only. If your washer has both hot and cold inlets, but you’ve only connected the cold supply this can slow the wash down by a few minutes. Essentially what happens when you press go on any cycle other than cold is that your machine will call for hot water for a few minutes before it realises, Oh ok there’s no hot water coming, I’ll just use cold water and heat it. Some washers will just refuse to wash even though they are perfectly capable of heating the water themselves, they’ll throw a no tap error if there is no hot water tap connected.  It’s also important to note that not every washing machine has an on board heater.  Most toploader washing machines do not have a heater, and most frontloader washing machines do.  If you run a washer that doesnt have a heater on a hot wash and connect no hot supply, it will usually give an error code.

Hot Washes Can Make Your Washing Machine Slow

Another possibility that might cause your cycle to be slower than the machine is indicating is that you’ve got a frontloader and you’ve selected a hot wash. Lets say for example that you’ve got a machine that only has a cold water supply and you select a 90 degree hot wash cycle. The machine needs to spend time heating that water up before it can start its cycle. Even on a machine with a hot water inlet as well as cold, if your hot water service is far from the machine you’d be lucky if you got 30 degree water in. In Australia all new constructions require hot water to be no more than 50 degrees, so often, even in a best case scenario, the water in will be no hotter than 50 degrees, and it needs to be 90 degrees. While it’s somewhat predictable especially for a cold water inlet machine only, most manufacturers fail to account for this in a fit of optimism and wilful blindness. You won’t lose more than 10 minutes to this though. It can slow down a cycle a bit, but not a heap.

Marketing

The final reason your machine might be giving you optimistic cycle times is that it is actually gaslighting you. Manufacturers want to be able to put short cycle times on their machine and so tend to be optimistic about the conditions of the cycle. If the machine is running empty on a cold cycle and the water pressure is perfect, sure it will come in perfectly on time. But throw one thing out and the estimated time goes out the window. For the most part though its not going to be a significant amount of time.

Posted on Leave a comment

What Temperature Should My Fridge Be? In °C!

A thermometer showing the different temperatures to store groceries in degrees celcius

When it comes to setting the temperature for your fridge, the general consensus is colder than 5°C for optimal food safety. However, the reality is a bit more nuanced. Most domestic fridges allow you to adjust temperatures between 1°C and 9°C in the fridge and -10°C to -20°C in the freezer. So, why the range?

A thermometer showing the different temperatures to store groceries in degrees celcius

How Cold Should a Fridge Be?

Best Fridge Temperature: Less than 5°C

Real world Recommendation: 3°C

Food Standards Australia New Zealand recommends keeping your fridge below 5°C for optimum food safety and to prevent the growth of food-poisoning bacteria. However, due to factors like varying temperatures within the fridge and fluctuations, setting it to around 3°C on the top shelf is usually the sweet spot.

Temperature Fluctuations

The fridge is not a static environment; it maintains an average temperature not a precise one. Rather than consistently holding a specific temperature like 3°C, it might fluctuate between 1°C and 5°C.

Hot Air Rises

Another compounding factor is the simple fact that hot air rises and cold air sinks. So while the temperature of the fridge is dynamic, it is also usually warmer on the top shelf and colder on the bottom shelf. So while the top shelf may be varying between 1-5 degrees, the vegetable crisper might be 0-4 degrees, or worse -1-3°C. So your nice lettuce is freezing and thawing several times a day into a soggy mess. It’s good advice to store the perishable groceries like meat, fish, juice and dairy closer to the bottom of the fridge, with condiments and non-perishables closer to the top. 3°C on the top shelf should mean the top shelf never goes above 5°C while the contents of the vegetable crisper don’t freeze.

You Get What You Pay For!

Fridge temperature fluctuation is influenced by factors such as the frequency of door openings, how loaded it is, external temperature, and the capacity of the fridge’s cooling system.  Better fridges have less fluctuation and often you get what you pay for.  Fisher and Paykel fridges for example can, and often do, run their fans independently of the compressor to circulate the air for a more consistent and stable temperature throughout.  A cheaper fridge won’t do this.  A better fridge would be expected to have 1°C or less of fluctuation from the average, and less than 1°C of difference between the top and bottom shelf, while a cheaper fridge could expect to see 2°C or more of fluctuation.

Pro tip - Put a glass of water in the fridge on the top shelf and leave it there for 24 hours. Measure the temperature of the glass of water instead of the air temperature inside of the compartment. The glass of water will reflect the average temperature in the cabinet and is more reliable.

Why Have an Adjustable Control if There is Only One Best Fridge Temperature?

If there’s really only one best fridge temperature, then why do manufacturers bother to give you the ability to adjust it? Wouldn’t it be better if there was no need for you to have to google this dumb information and your fridge was just set at the correct, safe, temperature already?  Honestly yes, but it’s not practical.  Other sources will give you bad answers – wanting to save energy, or storing cold sensitive items at a warmer temperature.

The real reason is that over time thermostats and sensors, go out of their factory range. The same setting on one would be a slightly different temperature to another, and with time and entropy, as springs lose their tension, and corrosion creeps in things go out of whack. The setting that used to be 3°C is now 4°C or 2°C, and without the ability to make an adjustment your fridge isn’t running where it should be, significantly reducing its service life.

How Cold Should a Freezer Be?

Ideal Temperature: -18°C or colder

The freezer’s primary role is to keep food frozen, preserving it for extended periods.  The ideal temperature for the freezer compartment is -18°C or lower. This temperature is cold enough to prevent the growth of bacteria, yeast, and mould, ensuring the long-term preservation of your frozen goods.  Setting the temperature at -18°C or colder helps maintain the quality, texture, and flavour of the frozen items.  Food is less prone to freezer burn, and less subject to degradation caused by enzymes in the food.  On the downside running your freezer this cold will mean it costs more to run, and will have a shorter service life than if you ran it hotter, simply due to wear and tear on the mechanical systems being on longer.

Adjusting for Practicality

Having adjustability in the freezer makes more sense, because it really depends on how an individual user wants to go about things. A classic example is ice cream. If you want to store the ice cream the right temperature is colder than -18°C. But ice cream that cold is not fun to eat, it is rock hard. Your spoon has bent trying to scoop it out of the punnet, and then you have to wait 10 minutes for it to thaw out enough to eat. But the thing is it doesn’t thaw consistently, the outside melts while the inside stays a frozen solid core. If you just bought icecream, you plan on eating it in the next week and you want it to be nice and creamy and delicious all the way through, you want your freezer set at around -12°C, the perfect ice cream eating temperature.

You might also want to save some money, and running your freezer warmer will save you money. Do you want to eat that spaghetti bolognaise you made in the next three weeks or the next 3 months? If you want to store your food longer, you want to keep it colder. But if nothing stays in your freezer for more than a few weeks, you don’t need it very cold. The general consensus seems to be that if you keep your freezer at or below -18°C it will be safe to eat indefinitely, but after 3-12 months depending on what it is, the flavour and texture will begin to suffer.

Freezer Size Matters

If you have a fridge with a smaller freezer, like the 248L Fisher and Paykel, generally you need to run the freezer colder. Most domestic fridges I’ve seen max out at -20°C in the freezer. As a general rule I’d say anything below 300L total capacity should be run pretty cold in the freezer. This is because during the defrost cycle, where a heater turns on in the back of every frost free fridge for about 20 minutes every 1-2 days, the contents of a little freezer just don’t have the thermal mass to stay frozen, especially if its pretty empty. If they’re not very frozen at the start of the defrost cycle, there’s a good chance they will have thawed out by the end of it. One of the most common symptoms of this is ice cream that has melted and then frozen solid like an ice block.

Pro tip - If you don’t keep much in your fridge or freezer you can help stabilise the temperature and prevent temperature fluctuations by filling water or soft drink bottles with water and placing them inside.

Final Considerations

A couple of other considerations are the fridge quality and how often the freezer door will be opened. If it’s a cheap appliance from an unknown brand you might expect more temperature fluctuations and to make sure it’s not getting too warm, you need to set it colder. If you have kids constantly opening the freezer door in the middle of Summer to get to the icy poles again, better to set it colder as the more the door is opened, especially on a hot day the more the freezer temperature will fluctuate. If you’re worried about the power going out setting your freezer colder makes sense as well since the colder it is when the power goes out, the more likely it is you will make it through the blackout with the contents of your freezer still frozen.